Pages

Thursday, February 24, 2011

Quinoa Cornbread Pizza Crust (gluten-free, vegan)

Well, it is a winter lull here in Michigan this week. Kinda just can't wait for spring...it really is only a few weeks away, but right now it seems like it will be forever. I don't know about you, but in our house it seems like we need something special to perk us up and have a little fun. What about a pizza? Yes! Maybe to the average American family, they order pizza every week from their favorite place so it's no big deal to have pizza, but that is just not how it works in our house. There are many gluten-free crust mixes you could buy, but not any of those are homemade or have quinoa in them...you are in for a yummy healthy treat with this one!

I like to cook a big batch of either brown rice or quinoa at the beginning of each week. Then I have it ready to use in the fridge for stir-fry's soups, salads or whatever. Well, how about some cooked quinoa in your pizza crust, or flat bread? Why not, right?! Quinoa adds protein and fiber, not to mention a perfectly nutty taste. If you haven't tried quinoa yet, then I suggest you get your cute butt to the grocery store and find it and buy it. Yes, it may not be well known by your grocer, but ask and see if they have it. If they do not, then you can definitely buy it in bulk online. I actually buy mine as a large 3 pound bag at our local Costco store... so it can be found in large chain stores, and for a decent price I must say. It is a great grain (actually a seed) that is cooked just like rice, but tastes much different and adds a little more variety and spunk to your life.
I did not end up getting any cooked flatbread pictures, so the two above are of the crust before it was cooked. It is almost like a thick cake batter, but bakes well to be stiff and moist as well. I used it as a perfect pizza crust for dinner, but it can be used as a flatbread for any dinner of soup or salad as well. I made a pizza with this recipe and add some of my favorite toppings...fresh spinach, fresh basil, craisins, pinenuts and dairy-free, vegan Daiya "cheese".

Quinoa Cornbread Pizza Crust/Flatbread Recipe
1 1/2 cup cooked quinoa
2 cups organic cornmeal (millet flour would be the substitute for corn-allergy)
1 1/2 cup of tapioca flour
1/3 cup of flaxmeal (ground flax seeds)
1 TB. of baking powder
1 ts. sea salt
1 TB of Italian seasoning herbs, or 1ts. of each marjoram, basil, and oregano
1 ts. of dried garlic powder
1 TB of maple syrup or honey
1 1/2 cup of pure water
2 TB of olive oil
1/4 cup of coconut milk beverage (or other non-dairy milk), with 2 ts. of apple cider vinegar mixed separately before adding to the rest of the mix. This allows the milk to become a buttermilk like substance.

Mix all of the dry ingredients together first, also with the pre-cooked quinoa. Mix the non-dairy milk with the apple cider vinegar, and let sit for 5 minutes. Then add the wet ingredients and the *buttermilk mixture* to the dry ingredients. Mix well. This will be like a thick cake batter. Then spread out about 1 inch thick on a 11x14 pan that has either been oiled, or has parchment paper on it. I suggest the parchment paper for best results and no sticking.

Bake at 450 degrees for about 20 minutes. If you want it softer, then do 15 minutes, if you want it crispier, then go with 25 minutes. Then pull from oven and let cool for a few minutes and then add your pizza sauce, toppings and choice of cheese. If you can eat dairy, I would suggest getting an organic mozzarella, or goat cheese, and if you are dairy intolerant, then I suggest a soy free version of Daiya Cheese that I like very much on special occasions. It melts and doesn't taste too awful! :)

Then after you add the toppings to your crust, bake for an additional 10-15 minutes until your cheese melts and it ready for eating. This pizza will serve 4-6 people.

If you just want to make this recipe as the flat bread, then I would suggest baking on a 11x14 pan as well, but maybe keep the batter a bit thicker/smaller in size when you spread out, and sprinkle some seeds, or herbs on top to add some flavor and spzaaz. You can bake it the same time around 20 minutes unless you want it softer or crispier like above.

Enjoy!

Also an update from my last posts, there are 4 more days to take advantage of the $1000 scholarship towards a $5000 dollar tuition for the Holistic Health Counselor Program at the school I went to in NYC, The Institute of Integrative Nutrition. I still have 2 more scholarships to offer! Do you want to use one in the next 4 days? The program is now more accessible and you can do it in the comfort of your own home! Email me at stephanielaidlaw@gmail.com if you are interested or have questions and I will do my best to answer and help you out.

Much love to you today!

Stephanie

Monday, February 21, 2011

Chewy Molasses Bars (gluten-free, vegan)


What a weekend! It was 55 degrees last Friday and the 2 feet of snow melted to show us the grass again, and then yesterday it turned cold and snowed another 8 inches. Crazy Michigan weather! After about 4-5 inches had fallen late yesterday afternoon, I looked at my husband and said, " I need to bake something!" He was thinking..."why don't you take a nap and relax", but with a napping baby and a beautiful snow-covered yard, I decided...it was a good time to bake a treat. Of course, and who says it is not relaxing idea anyways. Having some warm molasses bars from the oven on a cold wintry afternoon is the perfect combination of rest and comfort.

I have still been thinking way too much about chocolate brownies. These bars will have you thinking you are going to bite into a chocolate brownie because of their appearance, but then you would be pleasantly surprised that it is in fact a sweet, spicy and chewy molasses bar instead. I love molasses. There is 500 mg of potassium in 1 TB of black strap molasses and it has 20% of the daily iron intake. So, molasses is a perfect nutrient for a new mother or any one that suffers with anemia or nutrient deficiencies.

In my opinion, molasses should be considered a superfood sweetener. Yes, it is considered a sweetener because it is derived from sugar cane and sugar beets, but instead of having all the nutrients stripped and refined away it carries all of the minerals and vitamins to naturally be absorbed. That is why I also love sucanat as a sweetener because it is very similar to molasses in flavor, but also it is dried unrefined sugar cane juice. Another great sweetener is coconut palm sugar that is processed in a similar way and has almost the same amounts of potassium, calcium and iron in it as well.

When I first started eating more whole foods I was so confused about if I should just eat NO sugar at all, or if I could have a little. I think that a good question for any person is asking HOW MUCH sugar and sweeteners you are consuming, but also as equally important is WHAT quality you are consuming. The body does crave natural sweets... and you may notice that if you have a balanced plate of bitter, sweet, salty, and sour that you will have a more satisfaction after a meal (which means less snacking). This is very common in ancient dietary structures. To have a balance of tastes to satiate the taste buds and the stomach. This was of course done with bitter herbs, sour citrus, or salty minerals... not with MSG, corn syrup and preservatives.

Today, I think it is a good practice to notice how much of certain tastes you are eating...maybe your craving for "salt" is the fact that your body is in need for more minerals... or sea salt. Or maybe if you body is craving sweets, you should resist fake sugar and eat sweet potatoes, molasses and carrots. It is interesting how our bodies maybe crave what it needs. Not always the case, but interesting to think about at least. I think it is true that women crave chocolate at certain times of the month for a reason... maybe that dark chocolate that is naturally infused with magnesium and iron that your body knows you need just a little bit to "feel" better. So maybe if you are feeling weak or lazy your body may be in need of some iron. Have that spinach salad...but then maybe think about how you could add more molasses to your life. This is all in theory mind you, but still interesting to think about. At least I think so... but I am a food nerd, so that makes sense.

Well, I better get to the recipe... it is pretty simple, but truly a perfect combination of sweet and spicy with the ginger and molasses. If you like molasses cookies, then you will LOVE these. I have fallen in love with them, and think I may have forgotten about chocolate brownies once again. So, I am happy... and so I must share this joy with you of course. I hope you try them, I know you will not be disappointed.

Chewy Molasses Bar Recipe
1 cup of buckwheat flour
1/2 cup of millet flour
1/2 cup of brown rice flour
1/2 cup of tapioca flour
1 cup of coconut palm sugar
2 TB of flaxmeal
1 1/2 ts. of baking powder
1 1/2 ts. of baking soda
1 ts. of sea salt
1 1/2 ts. of ground cinnamon
2 ts. of ground ginger

1/2 cup of blackstrap molasses
1/2 cup of applesauce
1/2 cup of melted coconut oil
2/3 cup of coconut milk beverage, or other non-dairy milk
optional: splash of pure vanilla

Mix all of the dry ingredients together first, then add all of the wet and mix well with a spatula. Make sure to not have any clumps, and batter should be gooey and more solid that watery. Oil a 9x13 pan with either coconut oil, or organic palm oil shortening. Pour in batter and then sprinkle the top with a handful of sucanat, or other sugar like sweetener. Put in a preheated 350 degree oven for 30 minutes. Bake until the top is crisp from the sucanat, and when you use a toothpick in the middle it comes out clean. This is very much like a brownie batter and should appear like it when pulling from the oven. Then let 5-10 minutes to sit and cool before cutting into to avoid crumbles and breakage in bars. Use a clean unserated knife to cut, like you would brownies. They are a chewy bar to be enjoyed! YUM!
Update from my last post: I still have (2) ($1,000) scholarships available for one more week (February 28). This scholarship is towards the tuition of the long distance program to become a Holistic Health Counselor with Institute of Integrative Nutrition. I love the school, and could only recommend it to those interested and serious about health, balance and life.

This is a HUGE offer, and one they do not offer this great scholarship amount much anymore. So, if you have been on the fence about furthering your education, or finding something new and amazing in your life, then I suggest you check IIN out. Their website is...www.integrativenutrition.com. Or call them, and ask for Coach Julia, and tell her that I, Stephanie Laidlaw, sent you. That is the hook up to getting the discount and for learning the most there is to know about Integrative Nutrition. Also, email me or leave a comment so that I can help explain more of what I do, why I like the school, and answer any questions you may have bouncing around in your brain.


Much love to you today, as always!

Stephanie

Tuesday, February 15, 2011

Fudgy Carob Brownies (grain-free, vegan)

I had great intentions of posting this recipe pre-valentine's day celebrations... but here I am a day late to share a delectable valentine dessert. Oh well. brownies are good most other days of the year too :) I made carob brownies because chocolate doesn't agree with my nursing babe, and so for the sake of true love I will do anything for my babe (and for the love of chocolate). I can give up gluten no problem, and dairy can take a hike, who cares... but when I have to give up my extra dark chocolate, now that is where I find myself weak and sulking. Life is better with dark chocolate....period. Even if I just each an inch by inch square almost every day... that is enough, just a bite of pure goodness. I don't over-do it. I'm not a chocoholic. I'm not obsessed. Well, that is what I told myself before I stopped eating it.
I mean, when you go grocery shopping and all you can smell is the chocolate treat being baked in the bakery. Or, you dream in chocolate fountains. Or you want to lick the plate of the kind person next to you just indulging in their favorite fudge covered brownie sundae. I mean, seriously.... do I have a problem? I am deprived. I just need it.....ah!

So, I have to help myself. There has to be a compromise. There has to be a temporary solution. I can do this. I need to pull myself together. So, brownies, with carob...instead of chocolate... could that even be any good? Well, I baked to see what I could discover... and, they calmed the craving and made me very happy.
Not bad. In fact, carob brownies are quite good. Hm, I think I can handle this. I think I may survive this chocolate fast. These brownies turned out fudgy and moist. Perfect for the chocolate brownie craving. Maybe I do have a problem, but admitting it is a start.

Carob is a seed that comes from a pod on a tree, much like cocoa. But carob does not contain any "chocolate", or caffeine, or sugar. It was anciently used as a sweetener in Egypt and is known in the middle east region as a fruit like treat to be snacked on or a beverage is made from the seed. It has had many uses over the thousands of years that it has been eaten. More recently it has been used as a thickener, sweetener and a substitute for chocolate. It has many health benefits on it's own, and has also been considered an aphrodisiac. So, I suggest if you haven't tried carob yet that you look for it at your grocery store or natural food store as a powder, much like cocoa powder. Or you could find it as carob chips or nibs. I hope you try it out, even if you can eat cocoa and chocolate as much as your hearts desires.

Fudgy Carob Brownies Recipe (vegan)
1 cup of ground almonds (almond meal, or raw almonds ground up in a food processor)
1/3 cup of raw or roasted almond butter
1/3 cup of carob powder
1/3 cup of coconut palm sugar 
1 TB of flaxmeal (ground flax seeds), or chia seed meal works too
1 ts. of baking powder
1/2 ts. of baking soda
1/4 ts. of sea salt
1 ts. of xanthan gum

1 TB of pure vanilla
1 TB of maple syrup
1/2 cup of applesauce
1/3 cup of mushed banana puree
1/3- 1/2 cup of coconut milk beverage or other non-dairy milk
1/4 cup of melted coconut oil

OPTIONAL: If you do not want moist fudgy brownies, then I suggest you add 1/3 cup of your favorite gluten-free flour... maybe sweet sorghum or rice. That will make it more solid and cakeier if that is what you are looking for out of your brownie. Also, that would make it have a grain in it... just so you are aware.

Mix all of the dry ingredients together, and then add the wet ingredients and mix well together. It should have the consistency of a brownie mix batter and not be too runny. I added 1/3 cup of the non-dairy milk and then added a touch more to get the consistency I wanted. Pour into a 8x8 greased with coconut oil pan. I used a glass pan that was well oiled. Baked in a pre-heated 350 degree oven for about 30 minutes. You can check it at 25 minutes and see if it is the texture you desire. I like my brownies crispy on the edges and gooey in the middle so I did my best at baking around 28 minutes or so.

Let the brownies sit for at least 5 minutes before cutting into. These brownies may been a little pudding-like at the beginning before they cool because they are vegan and not baked with eggs or gluten. Although, if you wanted to eat them with some vegan ice cream right from the oven, it may be more like a fudge topping... so do what you please. This recipe will make a 8x8 pan of brownies, so about 9-12 brownies. They are best for 3 days after baking. I like to put mine in the fridge after cooled for best results. If you want to freeze them I suggest you wrap them individually.

There it is... my newest brownie recipe.... without the chocolate. I hope you enjoy.

In the spirit of love, I thought I would mention an awesome opportunity this month I have to offer. It's about finding love and more balance in your life. And who doesn't need that. Maybe you have thought that you should get involved in this holistic health field. Maybe you felt your heart tugging to go back to school, or learn more about nutrition and health. If this is you, I would love to talk to you more about the school I went to....The Institute of Integrative Nutrition is the place. And, the best part is that you can now take their program anywhere in the world because it is now mobilized to your own home. I found my voice through this school. I always knew I wanted to be involved with nutrition and health, I just didn't know how...and now that I am a certified Holistic Health Counselor.... I feel like I have found my niche. I know I can make a bigger difference with the knowledge and experience I have. This could be you...

I have 2 ($1,000) tuition scholarships to offer any friend that may be interested in becoming a Holistic Health Coach like me. Contact me via email. And I will give you more details. I only have 2 scholarships to offer, and can only be used by February 28th. So email me ASAP if you are seriously interested! I would love to chat more...please contact me. :)

Much love to you today! And have a happy day of love, post February 14.

Thursday, February 10, 2011

Granola Bar Cookies (nut-free, vegan)

Is it a granola bar or is it a cookie? Well, make them and see what you think. They are a very hearty version of a cookie, but are true to granola bar texture and taste. These are a treat for the healthiest of persons, but could be a good breakfast on the go for the 'health-food-junkie'. I know you are... a 'healthy, tree-hugger, green-smoothie, granola-junkie' kinda person. Yeah, you are, and these are for you!
I have been accused of eating cookies and milk (coconut of course :)) for breakfast. But I don't care. I like eating cookies for breakfast, especially when they are like a hearty bowl of granola on the run. Truth be told, I was thinking about making a nice big batch of my favorite homemade granola, but then I decided to try something a little more travel friendly. A cookie. Same ingredients plus a few and there you have it. And, then I remembered my first post of this blog, 2 years ago this week. My first post was my Lil' Spice is Nice Granola, and now here I am two years later making the same great granola into a cookie. Some things never change. Especially tasty faithful recipes that rock your world.
The only thing different about this recipe is that it doesn't contain nuts. I know... silly me. I forgot them. :) But, for the nut-free friend out there, these can be made for you. If you want to add your favorite nut, then I say... go for it and see how it goes. Maybe like 1/2 cup of nuts would be the right amount so that you have a good amount of wet ingredients to cover the addition. The sunflower seeds really give them a crunch though, so you may just love them without the nuts!

Granola Bar Cookies Recipe
1 cup of unsweetened shredded coconut
1 cup of raw sunflower seeds
1 cup of buckwheat flour
3 TB of flaxmeal
2/3 cup of coconut palm sugar
1 ts. of baking soda
1 ts. of baking powder
1 ts. of sea salt
1 ts. of ground cinnamon
other optional spices: ginger, nutmeg, cloves, cardamon (1/2 ts. of each would do).
1 cup of raisins or craisins
1/2 cup of melted coconut oil
1/2 cup of applesauce
1/4 cup of pure maple syrup 
1 TB of blackstrap molasses
5 TB of coconut milk beverage or other non-dairy milk

Mix all of the above ingredients in a large mixing bowl. Mix the dry first and then add in the wet. Mix well and let sit for a minute to let the wet soak into the dry and then you should have a sticky cookie dough to get ready for baking. Scoop about a TB sized ball onto a baking sheet and bake 12-15 per pan since they do not spread thin. Bake in a 350 degree oven for 20 minutes until golden brown. This recipe makes about 3 dozen cookies, so eat up and freeze the rest for a treat on the go.


After 2 years of creating and posting recipes on this blog, I can say with confidence it was a good decision. I love how it motivates me to stay creative in the kitchen, and also to share with my friends what it is like to have a gluten-free dairy-free life. Most of all, I hope that this blog can be a source of inspiration and love to those struggling to find foods that they can make on their own healing journey towards whole foods and a better balanced life. Thank you for allowing me to be a part of your kitchen, and here's to many more recipes in 2011. Cheers!

Much love to you today!

Stephanie

Tuesday, February 8, 2011

Coconut Cashew Crusted Chicken

If you are a gluten-free, dairy-free momma like me you may be looking for some extra protein to get you through breast feeding, sleep deprivation and loosing extra pregnancy pounds. I do not eat meat every day, or sometimes not every week, but I do know when my body needs some. It seems more common lately that my body is aching for higher amounts of protein. I have noticed that with breast feeding that my baby seems to be happier and less gassy as well, so maybe the protein is getting to him to help him grow stronger. My body type also thrives on a high protein diet, so I focus on getting as much whole grain, and whole plant food protein as possible, but sometimes I admit I just feel my best when I get a serving of chicken or salmon. It just does my body good. It is a bit more expensive to add organic or free range hormone free meat to your plate, but when you only eat it a few days a week it isn't as expensive and it is more about quality than quantity in this case.
I don't ever want to come off preachy about 'to eat meat' or 'not to eat meat'. I truly 100% believe that is all about what makes your body feel best.

And balance. Extremism has never been good for anyone.

Yet, I do know that the American diet over eats meat like crazy. We eat meat and dairy like we have endless amounts, and I guess in America it is some of the easiest food to buy. Still, imagine if you had to get your own dairy and meat from your own animal or farm in your backyard- I guarantee you would not be eating steak every night. You wouldn't be eating cheese at every meal either. Mostly because you now how much time and energy it would take to make a nice quality slab of cheese. It's a treat and a delicacy for sure!

If you had your own farm, you would have a more balanced approach to how much animal protein you were consuming. If you had that one cow or a few chickens you would make sure you didn't kill them only after a week of having them. Not to mention- after killing and cleaning a chicken you may have a different mindset all together about eating too much meat and what that all entails.

Basically, I think my approach now is to be more connected to where my food is coming from and not engage in the mass-producing-factory growing-meat market. That means if I am going to be a meat eater, I need to be a conscious buyer and know where my meat is not being fed chemicals and hormones. Buying from not only healthy, sustainable farms, but ones that care about God's world and environment.

I share all of this because I truly think it is important to think about. Consider the options and decided what is best for you and your family. I do enjoy a chicken meal when I make one because it seems more like a special occasion or feast to be enjoyed instead of an everyday occurrence. I like feeling that way. Like it should be something to be more thankful for in a grateful sort of way. Every food and every meal is a gift. Lest we forget!
So, with all of that said, here is one of my newest and most favorite recipes to make with some quality chicken. And if you are GF like me, you will enjoy this recipe more than the average person. Mainly because it is like a crispy chicken strip recipe that you may have not enjoyed since becoming GF. It is crunchy and then with the Thai seasonings you will be in heaven!
Coconut Cashew Crusted Chicken Recipe

1 pound of quality chicken cuts (boneless breast or thigh meat)

2 cups of coconut milk beverage (or other non-dairy milk)
2 TB of fresh lemon juice, about the juice of one lemon
pinch of sea salt and pepper

Wash, clean and cut the chicken into strip sized pieces. I usually get about 6 pieces from one breast and if you have 2-3 breasts with a pound of meat then you should get about 12-18 strips of chicken. Soak the raw chicken in a bowl with the non-dairy milk, lemon juice and TB of red curry paste. Mix all together and set aside for 30-60 minutes in the fridge to marinate and season.

Then mix up the following ingredients in a separate bowl to dip the chicken in...

1/2 cup of tapioca flour (add a little bit more if you need it)
1 cup of ground-up raw cashew pieces (you can grind whole cashews in a grinder or food processor to achieve a good consistency)
1 cup of unsweetened shredded coconut
1 TB of dried cilantro
pinch of sea salt

Olive oil or coconut oil for pan

Drop the wet chicken pieces into the bowl of the mixed dry ingredients. Roll and cover the piece of chicken fully with the dry ingredients. And then lay in a oiled baking pan. If you use a large 9x13 glass pyrex pan then make sure you put a got amount of oil on the bottom so that it doesn't stick. Then bake the battered chicken uncovered at 375 degree oven for around 25-30 minutes. Check the chicken strip to see if it is fully cooked. The chicken should be tender and the crust crispy brown when done.

Also, I have cooked this chicken on the stove top in a skillet. Do the same step above of battering the wet chicken in the dry ingredients, but then fry them in a skillet of oil for about 4-5 minutes on each side. This is a bit more messy and takes a bit more time, but if you are looking for a crispy version of the chicken this is the way to go. Make sure to not over use oil or you may turn out with a deep fried version. :)

I made this chicken recipe with my almond butter vegetable curry the other night and it was a perfect match for the curry. That is what is pictured in the pictures of the chicken strips.

I hope you give this recipe a try and enjoy!

Much love to you today!

Tuesday, February 1, 2011

Almond Butter Vegetable Curry (vegan)

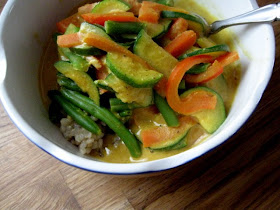
This recipe I have made on three separate occasions in the last week. I finally decided to take a few pics and write this one down to share with you. It has been keeping me warm and full this cold week. And now, they are predicting a blizzard is going to be hitting west Michigan tonight until tomorrow. So I am happy I made another batch to have for leftovers, plenty of good food while we buckle down and stay close to home. Also, I swear this recipe healed me from thehead cold that I was trying to avoid for days last week. It was short lived, but still not fun to feel achy and yucky for a few days. The ginger in this recipe was exactly what I needed!
The recipe is super simple and can be made in 15 minutes if you have some leftover rice or noodles to pour it over. If you count the time it is to make rice, then add that to the 15 minutes, but seriously simple and perfectly nutritious. I made it with some staples in my kitchen. I always have these items- pictured below (almond butter, So Delicious coconut milk beverage and Thai Kitchen Red Curry Paste) in my fridge and that is why I find the recipe a a new winner that can be made last minute without compromising on taste or quality.
Something to remember about eating gluten and dairy free is to keep it simple. Sometimes the added stress of what to eat when on a special diet will get you sick enough. So my suggestion is always about keeping it simple when it comes to the gluten and dairy free diet. Then, when you feel adventurous and ready for a challenge, buy that weird gluten-free flour and whip up something crazy special.
But for the sake of keeping it simple, I suggest that you think about what veggies you are going to eat that day and maybe what whole grains you are going to eat and then fill in the gaps. That means: Make easy soups, stirfrys and salads that you can incorporate the whole foods you know your body needs. A greens salad topped with seeds, nuts, quinoa with a simple dressing. Or a vegetable soup with whole grain gluten-free pasta or bread. Or, a beautiful warming veggie stirfry with a creamy almond butter sauce over brown rice. And those are just a few ideas. So, my friends, I hope you try this simple recipe out- even if it is a stretch for you.
Almond Butter Vegetable Curry Recipe
1-2 TB of coconut oil
1 cup of chopped zucchini
1 cup of chopped carrots
1 cup of chopped red peppers (or green pepper)
1 cup of bite-sized green beans
dashes of sea salt and black pepper

Saute the chopped veggies in the oil for 5-7 minutes until they are soft in a large frying pan or wok Add a different variety of veggies if you so prefer. Sprinkle some salt and pepper to season them just a bit. Then add the following and bring to a boil and then a simmer to mix the flavors...

1- 2 cups of So Delicious coconut milk beverage (this amount depends on how soupy you want your sauce). If you don't have any coconut milk beverage, I would suggest trying 1 cup of canned coconut milk with maybe 1/2 cup of water to thin it out a bit.
1/3 cup of almond butter (raw or roasted is fine)
1 TB of Thai Kitchen Red Curry Paste ( add 1 ts more if you want more spice).
2 ts of ground ginger
1 1/2 ts. of ground or minced garlic
1 ts. of ground tumeric
1/2 ts. of ground mustard seed
sea salt and black pepper to taste
a squeeze of fresh lemon juice, around 1 TB or so
Let the milk and almond butter meld together with the spices and seasonings. Let it simmer with a cover over the pan for 3-5 minutes and within a few minutes you will be able to tell that your curry is ready for eating because the sauce will be perfectly mixed and ready for eating. The smells are fabulous as well. Pour curry over rice noodles or brown rice. My favorite way is pour it over some rice in a bowl with extra sauce so that I can use a spoon and really enjoy the sauce with a ton of yummy veggies. This is a vegan dish, but could easily be paired with a nice side of chicken for some added protein.

That is the recipe. I love how colorful it is! Fresh food should look good, don't you think?! I also love how easy it is. And, like I said before, if you have some leftover brown rice in the fridge with some of the staple ingredients that I listed above, you have a quick lunch bowl or super supper in minutes. I made a coconut coated chicken dish with this curry for dinner the other night and I will have to share that chicken recipe next post. It turned out to be a Thai chicken dish that will be made again and again as well. I love finding new things to make that my family loves!

I hope you enjoy! Much love to you today friends, and a happy first of February!

Stephanie