Pages

Monday, December 19, 2016

Cherry Chocolate Snow Cake

It's been a winter wonderland for the last 10 days here in Michigan- so much snow! We are not complaining (now)- just enjoying the cozyness and the excitement the snow brings as it ushers in more Christmas spirit. I'm sure when January rolls around we will be a little more whiney about the constant shoveling and delays that snow brings, but for now I am truly enjoying the quiet and still gorgeous beauty of the snow falling. There is something magical in watching the world be glittered with gentle white powder sprinkles from the sky.  It stills the racing heart if you let it- something to sit and do amongst the crazy season of shopping, baking, wrapping and parties.
My kids saw this cake I was making and thought the sprinkle of powdered sugar on top looked like the beautiful snow and called it the snow cake :) Seems appropriate because we have been watching snow fall for so many days now. A cake is always needed to celebrate if you ask me and chocolate and cherries always help no matter what the season :)
This week also marks the Winter Solstice on Wednesday at 5:44 EST.  So the "shortest" day of the year for us in the Northern Hemisphere with the darkest day and hours of sunlight you can count on your hands. Traditionally the Winter Solstice is a time to reflect in the darkness and to journey deep within to restore and nourish from the inside out. I think the body observes these cycles whether we are aware or not- this shift in our world is happening whether we are present in it or not. So, being aware allows us to dig deeper into our thoughts, hearts and soul. I can appreciate the space to do this, if I actually allow myself to slow down and live fully present in this gift of life.
I have been enjoying my time in the kitchen this Christmas season. I know it may seems a little unreal or crazy that I do so much baking at my house.... but it is just a part of me. It may even be said to be "easy" for me to bake, cook, create. And it is most days- but I see it as my gift to share. That's what these recipes and blog is all about-it comes from a place in me that needs to be shared and given. I truly see what I have been given a gift- my life, my loved ones, my kids, and every detail of my little livelihood. But what brings me more hope, joy, purpose is when I can share what I have been given. The recipes are my gift to you. I hope they find you so that you can create them and share and enjoy them too. I know that it is not much when it comes to all that is hard and difficult in our world- but if it makes your home and life a little brighter- in the simplest of ways- then I know it was worth creating and sharing. 

So I hope you enjoy and have the merriest of Christmases with moments of hope, peace, joy and LOVE. You have been given the greatest gift of love and now it's our turn to share it too. Merry Christmas and much love and light to you xoxo

Cherry Chocolate Snow Cake Recipe
{free of gluten, dairy, soy, corn, nuts and seeds}

1 1/4 cup of gluten free oat flour
2/3 cup white rice flour
1/3 cup of tapioca flour
1/4 cup of potato starch
1/4 cup of coconut flour
3/4 cup of coconut palm sugar
1/2 cup of cocoa powder
2 ts. of baking powder (I use Hain brand)
1 ts. of baking soda
1 ts. of sea salt

1/3 cup of applesauce
1/3 cup of maple syrup
1 cup of date puree ***This involves pouring 1 cup boiling water over 1 cup of pitted dates and letting it sit for 5-10 minutes and then blending in a high powered blender to whip up a creamy date-pudding like substance.

1 ts. of pure vanilla
1 cup of warmed coconut oil
1 cup of coconut milk beverage (I use So Delicious)
2 TB of apple cider vinegar

2/3 cup of chocolate chips morsels (Enjoy life brand)

2 cups of frozen chopped pitted cherries, halved (I used ones from last summer pickings in our freezer, but any frozen cherry will do, tart or sweet)

First grind your GF oat flour and mix well with all the other dry ingredients. Then mix in the wet ingredients, date puree and lastly the warmed oil. Mix well and you will start to see the vinegar and baking powder do it's work and make the batter poof up a bit. Fold down and then mix in the chocolate chips, and then lastly the halved frozen cherries

Pour in a coconut-oil-lined baking pan. I baked mine in a bundt or angel food cake pan. But you could also make this in a 9x9 circle or square pan. Bake in a 350 degree oven for 45 minutes or until it is no longer wet and giggling. The cake should show a clean toothpick from the middle of the cake and firm, but soft. no wetness. Pull from the oven and let it cool completely.

When it is cool completely, you can use a sieve and sift powdered sugar over the top looking like snow falling on such a dark chocolate cake. I use about 1/4 cup of sugar, and I use the organic powdered sugar because it is processed with tapioca starch and no corn. 

Set up with some fresh cherries, cranberries, or green grapes for a little red and green color with the cake. It is a rich cake, but some coconut ice cream or whipped topping is a nice touch too. 

Hope you ENJOY! Happy Baking :)

Friday, December 16, 2016

Turkey Sausage, Kale and Cherry Stuffing

This has been my stuffing recipe for the past 4 years and I have never shared it with you. I've thought through why this hasn't happened and I guess it is just because it always gets eaten so fast after the holidays that I don't have time to take pictures and document it. Also things are always so busy in the kitchen around the holidays that it just hasn't been a recipe I have taken the time to write down and make into something to share. I know- it seems a bit complicated because of a few steps, but it is relatively easy after you bake and dry out the bread. And if you have made my bread before and have become a master at it yourself then you are more than half-way there. I think my bread is what makes it special. It's hearty and thick and gets all perfect with the other soaked flavors. I know Martha Stewart makes a versions of this type of stuffing with her own regular bread- so there's that- but, this one is special because of my bread. There are so many stuffing recipes out there and some have very passionate opinions when it comes to stuffing- but let me tell you- this recipe will forever change your mind about stuffing. And as I finally served it to some of my closest friends over last Thanksgiving- they declared it was their favorite dish I EVER made. That seems quite the exaggeration if you ask me :) Because we all know that I make a lot of food- and these friends have probably had 100's of my recipes- but they fell in love and when you fall in love- you say crazy things :)

Turkey Sausage Kale Cherry Stuffing Recipe
{gluten, dairy, soy, nut, seed and refined sugar-free}
2 loaves of bread- this BREAD RECIPE doubled
after baking the bread, cooling it and letting dry-out- cut each loaf into slices and then cube up each slice to come up with a 11x15 baking sheet worth of bread cube crumbs. 
Then bake and dry out in a 300 degree oven for 20-30 minutes and then check and toss through and then bake again for 20-30 minutes until the bread cubes are like croutons and hard and very crunchy. The timing on this may vary with each oven, but basically you have to keep checking on them to make sure they are getting dried how and crunchy and not burned. 
2 pounds of raw turkey sausage 
(I buy mine at a local farm at the farmer's market- it is actually a "breakfast" sausage blend, but it is just seasoned with paprika, herbs, sugar, and a little black pepper and salt. Any favorite turkey sausage or even pork sausage will do the trick- just make sure it is raw so you can ground it up with all the seasonings. I buy mine frozen, so I thaw it out for 12 hours and then toss in a large 8 quart pot and ground up and brown into chunks. Then pour our of the pot while you sauce up the rest of the veggies and then you can add in back in before you add the broth. 

2 TB of olive oil for sautéing
1 large yellow onion, finely chopped
1 whole bunch of celery, finely chopped
6 garlic cloves finely chopped and minced
1/2-1 cup of chopped poultry blend fresh herbs (sage, thyme, rosemary)
1/2 cup of fresh chopped parsley
1 1/2 cups of finely chopped lacinato kale
Sauté on medium heat the above veggies and herbs for 5-10 minutes to get the onion and garlic soft, then add back the browned sausage, and then add the apples, cherries and broth.

1-2 small peeled and finely chopped apples
12 or 16 ounces of organic dried cherries
4 cups of organic chicken broth

Cook in the broth and let it come to a boil and then pour the bread cubes in the huge pot and turn off the heat. Toss and mix as quickly as you can so that the broth evenly distributes itself over all the bread cubes and then very quickly pour into a large 11x15 Pyrex dish, or even a 9x13 work for it to have it in a pile in the middle, or you can use a 9x9 to use up the rest of the mixture. Or if you have a special glass (oven OK dish) that would fit the whole mixture. Then use foil to cover it- let it sit in the fridge for at least 4 hours, but it can be over night. I have also froze it at this stage and pulled it our the day of the dinner. Then, the day of the meal, bake off in a 350 degree oven for 45-50 minutes. For the first 30 minutes with the foil on, and then the last 20 with the foil off to get some crispy tops of the bread pieces. If you don't like or what crispy edges, and prefer a more moist finish, then go ahead and keep the foil on. Make sure the middle is HOT before you totally pull from oven. Then let cool for a few minutes before serving with the rest of the feast and fixings.
This is a perfect Thanksgiving stuffing- but also has been eaten as a cozy comfort meal through out the winter months. It would pair well with a roast or ham as well for Christmas. There is no going back after you have tried it- so let it be known I have warned you :)

Much love xoxo

Wednesday, December 14, 2016

Gingerbread People Cookie

Why is it that gingerbread "men" cookies are just that... "men"? I guess it's because my cookie cutters have legs and not skirts? That seems a a bit crazy now that I think about it. Where are the women gingerbread cookies? And why do we think the leg gingerbread cookie cutter are only men? So, in effort to do my part in offering a more diverse world for the gingerbread cookies- I declare these cookies as gingerbread people! For the LOVE! And for everything good and beautiful!

It was time to make a new recipe for my gingerbread people anyways. So that's just what I did.

They are gingery and soft and a bit of a companion for your evening tea or morning coffee.
Just in time for some Christmas cookie baking with the littles or with your besties. My favorite part of this cookie is actually the fact that they are not overly sweet- and a good dose of ginger. It feels almost like the perfect dessert after a heavy winter or holiday meal. So I make these this time of year of many reason- but the most obviously reason is that they are just fun cookies to make :)
Gingerbread People Cookie Recipe
{gluten, dairy, egg, nut, seed and refined-sugar free}

1 1/4 cup of ground certified gluten-free oat flour
1 cup of white rice flour
1/2 cup of tapioca flour
1/3 cup of potato starch
1/4 cup of coconut flour
1/2 cup of coconut palm sugar
1/2 ts. of sea salt
1/2 ts. of baking soda
1/2 ts. of baking powder
2 1/2 ts. ground ginger
1/2 ts. ground cinnamon
1/3 cup of applesauce
1/3 cup of blackstrap molasses
1/4 cup of maple syrup
2/3 cup of soft coconut oil
1 ts. of apple cider vinegar

Mix all the dry ingredients together first in a large mixing bowl. Then add in the wet and lastly mix in the softened coconut oil. It may seem to resemble a biscuit recipe and will be a sticky mess. Use extra rice or tapioca flour to make it less sticky and knead the dough ball into a nice rounded ball and place back in the mixing bowl and in the fridge for 15-20 minutes. This will stiffen the dough and make it ready to cut in 2 or 4 pieces and roll out on a parchment paper to 1 inch thickness and then you can use your cookie cutters on them. This one I used the ginger-people cutter- but you could also just boycott the people and go straight to the stars and hearts :) I used Enjoy Life chocolate chips to decorate BEFORE baking and just pushed them into the cookie dough.

Bake on a parchment papered baking sheet in a 350 degree oven for 12-15 minutes until golden and crispy. Let cool for 15 minutes before moving to avoiding cracking and breaking of the cookies.

Hope you have fun baking. Much love xo

Tuesday, December 13, 2016

Damn Good Crock Pot Beef Stew

Thank you, God- for crock pots, stews, soups and whatever else you can cook-up, leave and then serve wonderfully a few hours later. But really this is my favorite crock pot meal for some reason- it is so simple, yet completely nourishing and satisfying. And worth swearing over- it's that damn good!
This time of year the bones need warming-up at most meal times. I'll confess soup and stew are on my brain majority of the time for meal planning. It only feeds into my day-dreaming about opening up a soup and bread shop some day.... ahhhh :) A girls gotta have dreams and goals, amiright?!
Maybe some of you wonder why I care about vegan (no eggs or dairy) options for many of my baked goods, but still consume meat and feel OK about posting a recipe where beef is a main ingredient. I will tell you... Although, I respect and value the views of any person on their food/consumers journey- me and my family eat solely based on what we do not have allergies/sensitivities to in our house. So we are not paleo, vegan, GAPS, AIP, keto, or whatever trending names for diets are out there currently.We eat what we have found to not cause hives, breathing issues, digestive distress, IBS, headaches, and the list goes on for our sensitive issues. So we are not under any real diet label- it isn't easy or straight forward, but I work damn hard to provide nutritious food for myself and family that will help us promote the best health, balance and peace in our house. And this involves meat sometimes. Because no one is allergic to meat in our house ;) THANK GOD! But we choose the best options available to us if possible, which means pasture-or grass-fed, without the use of pesticides or antibiotics, and hopefully from a local farmer as well. So the beef stew meat I use in this recipe I buy from a local farmer that sells at our local farmers market. I can get it for 6 dollars a pound and buy meat for this meal under 20 dollars that will last us 2-3 nights of food. So I call it a "frugal meal", yet it is still a treat in our house because we do not really eat beef at this caliber more than once or twice a month.  So yes, I get food and diet and nutrition has LOTS of opinions on the matter- trust me- after 10 years of being in the "biz" of food and recipes and holistic health I GET IT! But I always come back to with myself and my clients--- what is your body telling you--- to be best nourished, balanced, and at peace- this is a different answer for every person, so the reminder is to be curious and kind, and not judgmental to yourself or others. OK- I get off my soap box now!!! time for the recipe :)
Damn Good Crock Pot Beef Stew Recipe
{gluten, dairy, soy, nut, seed and sugar-free}

1 very large onion, finely chopped
5 garlic cloves, finely minced
1 TB of grated turmeric
1 TB of grated ginger 
1 bunch of green onions or leaks finely chopped
pinch of sea salt
1-2 TB of avocado or olive oil

In a large pot, sauté the above ingredients until soft. While that is happening, coarsely chop up your potatoes and carrots below...

2 pounds of potatoes chopped into cubes
2 pounds of carrots sliced

3 pounds of grass-fed or pasture raised beef stew meat (most grocers have this meat already designated as "stew" meat)
1 ts. of sea salt/black pepper to taste

Then dump the above carrots and potatoes into the crock pot, when the onion saute mix is soft dump those over the carrots and potatoes and mix together then dump your raw fresh beef stew meat cuts in the same sauté pot and just brown the meat on all sides and use up the oil/onion juices in the pot as well. When the meat is browned on all sides, dump that also in the crock pot with potatoes and carrots and mix well to get an even mixture. Then you can add your fresh herbs and sprinkle and mix those in.

1/2 cup of fresh herbs- I use a combo of thyme, rosemary, sage, oregano if I got it
1/2 cup of fresh chopped parsley 

Then in the same pot you used to saute your onions and brown your meat- add 4 cups of broth, sprinkle in the tapioca flour and the following spices...

4 cups of broth: use either bone broth or veggie...I usually use a mix of both
1 6 ounce can or organic tomato paste
2 TB of tapioca flour
1 TB of dried Italian herb blend
1 ts. of ground garlic powder
sprinkle of sea salt and black pepper
Use a whisk and blend in the tomato paste and flour into the broth and you make a thickened gravy after about 5-7 minutes over high heat. Then pour this gravy over all the holes and crannies of the potato and meat mixture already in the crock pot. It will soak to the bottom of the crock and you will start to see in on the edges of the mixture. Set your cook time on low if you have 8 hours to cook. But f you have 5-6 then put it on high. I usually start mine cooking around 9-10 am in the morning and leave it on high until 3-4pm, and then put it on low or keep warm for the last house of cooking and serve around 5-6 for dinner.

Toppings to serve: 
I love to serve with a sprinkle of fresh parsley (or cilantro is great too)
Some on my family also love a dollop of sour cream
And most in my family make this a full wonderful mean with a large slice of my bread

I make this meal probably every 3-4 weeks during the winter. And it is a beloved favorite and every time I think- is there a more filling meal? My favorite part of the meal though is the fact I can make it in the morning and have the whole day to go on family adventures or accomplish some other task of the day and just roll into the kitchen at dinner time and serve it up with delight! It must be some form of magic if you ask me. The past few Christmas Eve's I've made this that morning and after a party (or two), an evening church service, then we come home to a warm nourishing meal out of the crock pot and snuggle in for the next 24 hours of magical Christmas. I hope you do something similar so that you have less work in the kitchen. 

Much love, xoxo

Monday, December 12, 2016

Apple Blueberry Cranberry Spice Crisp

If there was a "christmas crisp recipe" this would be it in my little corner of the world. Besides or maybe instead of the cinnamon rolls this would be another great Christmas morning treat for the whole family. It is a great make ahead and bake off or warm the morning of Christmas. Not only does the smells of spice, apple, and berries fill your Christmas-filled home, but the warmth of the dish brings out all the Christmas spirit feelings. Maybe better than any "christmas spirit" candle or essential oil, because you get to eat it after :)
To be honest, I was kind of over fruit crisps for a while. It is such an easy GF dessert, so over the past decade I have had my fill of hundreds of delicious bubbling crisps. They are so easy to throw together with fresh or frozen fruit and you can make it a little special with some spice or some fresh zest or even herbs. But this one... I fell in love all over again. I didn't actually have a serving until the day after I baked it, and when I did... I just stopped and sat down and enjoyed it as breakfast with a good cup of tea. It really surprised me at it's warmth and comfort it offers on a cold winter day.
There are a few tricks to make a great crisp. One is to make sure the fruit going in if it is the same or a variety is that they are all cut in similar size, and I would say that bite-size or even smaller is best. So for this crisp I have frozen blueberries from last summer, cranberries from a few weeks ago and apples... So I cut the apples the same size of the large berries- so that all pieces are the same size and it melds and mixes well.
I also think adding the spice to the fruit is the best, and no spice to the topping. Kinda like a biscuit topping and the surprise flavor is inside. Those are just some of my favorite tips to making a great fruit crisp. If you make enough crisps, you find the little secrets that you love most to make it special every time. This one is made special with the flavors of orange, cloves, nutmeg, and the berries with the apples. A great combo that I am so glad found its way to my home this snowy Christmas season!
Apple Blueberry Cranberry Spice Crisp Recipe
{gluten, dairy, egg, nut, seed and soy-free, vegan options}

4 heaping cups of finely chopped fresh apple pieces without skins
3 cups of frozen blueberries
1 cup of frozen or fresh cranberries
1 cup of unsweetened applesauce
1 organic orange to get 1/2 cup of fresh juice and 2 TB of fresh orange zest
1/4 cup of maple syrup
1/4 cup of pure honey (or more maple syrup to be vegan)
1/2 cup of water
2 TB of tapioca starch
pinch of sea salt
2 TB of pumpkin pie spice blend (cinnamon, nutmeg, ginger, cloves mix)

Mix all of the above ingredients in a large 9x13 glass pyrex pan very well with a spoon or with your hands. Press down if need be to fit the crisp crumble evenly on top.

2 cups of GF rolled oats
1/3 cup of tapioca starch
1/3 cup of potato starch
1/3 cup of rice flour
1/2 ts. of sea salt
3/4 cup of coconut palm sugar
1/4 cup of maple syrup
1/3 cup of organic coconut oil
1/3 cup of organic palm oil shortening
Mix the above ingredients together and you get a crumbly oat toping to sprinkle over top the fruit in the Pyrex pan. Try to evenly spread over the fruit and then put the pyrex pan on a baking sheet for extra coverage if there happens to be any juicy fruit drippage from the pan- it will not fall on your oven floor and start burning. Bake for 45-50 minutes in a 350 degree oven- or when the crust is golden brown and crispy and the fruit is bubbling and perfectly soft and sugary. Let it cool! Just for 10-15 minutes so that it is not scalding hot- it is best not scalding, but still very warm if you ask me. You can eat just as for breakfast, lunch, dinner or dessert, or add some coconut whip topping or ice-cream to get all fancy.
Hope you stay warm and enjoy!
Happy baking and much love, xoxo

Saturday, December 10, 2016

Chocolate Chip Cookies

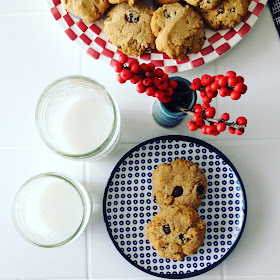
These lovelies were brought on by the gorgeous snowfall here in western Michigan the past few days. My kids were asking for chocolate chip cookies with their hot cocoa, and this momma couldn't say no. I tried making a more traditional recipe this time. I even had the large chocolate chip from Enjoy Life stored in the pantry. These cookies are also made easily with staple GF pantry items as well. So it was a really quick treat to make within an hour. Not to mention my favorite thing to bake in December is cookies- I love making a little variety and having them around to bring to gatherings and parties as a GF/DF option. Here is a post with links for some more Christmas cookie ideas. I think because we are covered in a large fluffy blanket of snow today I will be doing some gingerbread men baking of my own (I'll post my updated recipe in a few days ;). Happy baking, friends xoxo
Traditional Chocolate Chip Cookie Recipe
{gluten, dairy, egg, nut and seed-free, vegan}

1/2 cup of white rice flour
1/2 cup of potato starch
2/3 cup of tapioca flour
2/3 cup of ground certified GF oat flour
1/3 cup of coconut flour
2/3 cup of coconut palm sugar
1 ts. of baking soda
1 ts. of baking powder
1 ts. of sea salt
1/3 cup of maple syrup
1/4 cup of applesauce
2 TB of coconut milk beverage
1 TB of apple cider vinegar
2/3 cup of coconut oil
1 cup of Enjoy Life Dark Chocolate Morsels

In a large mixing bowl, mix together all of the dry ingredients well. Then mix in the wet, leaving the oil for last. Mix it well and it will feel like a traditional cookie dough, a little sticky, but firm when you roll out a dough ball. Then fold in the 1 cup of chocolate chip morsels. 
Try to evenly scoop out each cookie. Use about 1-2 TB sized pieces of dough to roll into a ball and then press down on the parchment lined baking sheet. This recipe will make 2 dozen cookies. Bake in a 350 degree oven for 12-14 minutes. Do not move them right from the oven. Let them cool for 15-20 minutes until they are cool enough to move to cooling rack or plate. 

Much love and light as you stay warm, xoxo

Friday, December 9, 2016

Sweet Potato, Kale and Turkey Meatball Soup

This not-so-great picture was snapped on my iPhone a few months ago, it was my last bowl of soup from a magical masterpiece soup I made out of what was leftover in my fridge one day. I snapped a photo as a way to say- "Goodbye...I thought you were amazing! I hope we meet again". I savored and looked forward to every bite. Yes, it was one of the first pots of soup I made in a while since it was newly autumn and I don't tend to make many soups during the hot summer months. So maybe it was just that... "a magical moment of time", loving the fact that "soup season" had returned, OR maybe it was just the perfect amount of leftover ingredients that made this combo so great!

Like I said, it was thrown together with ingredients to empty and clean out the fridge. That is one way to make the grocery budget to last a little longer! I chopped it all up and stirred it all together and I was surprised at it's deliciousness- I savored each bowl for 3 days and then when it was gone....I licked the bowl clean... and cried. So a few weeks later I tried to re-create it, trying to remember exactly what I did and what I added. It just wasn't exactly the same the second time. And I already knew going in...that magic could only happen once in a great while :) BUT it was still pretty fantastic, so I thought it would be worth writing down and sharing with you dear friends. You deserve to give it a whirl too, right?!? Maybe your leftover's soup will give way to a magical moment in time. The take-away is that you should most definitely use up and get creative in the kitchen with your leftovers- you may just never know what could conspire. Happy cooking, friends!
Sweet Potato Kale Turkey Meatball Soup Recipe
1 medium onion finely chopped
1 handful of green onions finely chopped
1-2 TB of grated fresh ginger
1-2 TB of grated fresh tumeric
4-5 garlic cloves finely minced
2-3 cups of bite-sized chopped carrot circles
4-5 cups of bite-sized cubed sweet potatoes
3 TB of finely chopped fresh parsley
3 TB of finely chopped fresh cilantro
2-3 TB of fresh thyme leave
1 TB of dried Italian herb seasoning blend
pinch of (about 1/4 ts.of each) cinnamon, turmeric, ginger, paprika
2 cups of tomato sauce or leftover marinara pasta sauce
3 cups of finely chopped kale
4 cups of vegetable or chicken broth
4 cups of water
juice from 1 lime
spoonful of honey
splash of apple cider vinegar

1 pound organic (or free range) ground turkey
1 pound of free range ground turkey breakfast sausage(seasoned with paprika, garlic, sugar, oregano)

8 ounces of rice pasta noodles (spiral, spaghetti, whatever)


First, chop up your onion and garlic and the rest of the veggies and get them sautéing in a large 8 quart soup pot. Saute until onion and garlic are soft and then add the herbs, kale and keep cooking for a few more minutes and then add in all the liquids. Let cook on medium heat until the sweet potatoes and carrots are soft. While this is cooking together you can...

Mix your thawed ground turkey and sausage together, and add a pinch of sea salt and ground pepper. Then add a sprinkle of Italian seasoning blend and a little ground garlic, ginger and paprika. I add about a 1/2 ts. of each spice and a drizzle of olive oil and mix it all up together and then scoop out 1 TB-sized amounts of meat and roll them into a meatball. Place them on a parchment baking sheet and 2 pounds should make about 24 meatballs. Bake in a 375 degree oven for 20-25 minutes. 

About the time the meatballs are done, they will be ready to add to the soup. Dump those in hot from the oven and add the pasta. Stir in the pasta and let it get soft in the broth from the soup for 10-15 minutes. Then the noodles will be soft and you are ready to serve up. You can top with a fresh herb for serving. I would say parsley or cilantro would taste best. 

I made this soup with turkey meatballs because I had those in the fridge to use up. But you could easily make this soup vegan by taking out the meat and adding in leftover pre-cooked beans (garbanzo or white would be my first choices) or cooked green lentils. It would be easy to dump those in from the cans too if you have those as pantry items. 

A great thing about this soup is the leftovers. The sweet potatoes start to break down and make the soup very creamy and thick. The first day cooking you can still get it to be a little creamy if you start to mush up some of the cooked sweet potatoes. But over time the sweet potatoes just start to melt into the soup by themselves and it makes it extra yummy!

Happy cooking, let those creative juices flow and make a masterpiece soup out of what you got!

Much love, xoxo

Thursday, December 8, 2016

Homemade Instant Cocoa and Marshmallows

Yes, it is the simple things in life that make the day seem kinder and more gentle sometimes. Like your favorite cozy blanket or book of poems in your favorite chair or "spot". A candle lit kitchen and the smell of bread coming from the oven. These simple joys that offer a sense of what real life is made up of. It's not really about the "job", the "money", and all the "drama" :) It's the simple things that make up the parts of life that you share with those you love so enjoyable. Like hot cocoa and marshmallows on a snowy winter day, am-i-right?!?
Here in Michigan it's cold this time of year, and it is only going to get colder and more grey for the next 3-4 months. And just today, a fresh new world of white greeted us because it has been snowing hard since breakfast. So basically the best day to have some homemade cocoa and marshmallows, and I was planning on this recipe post before I even knew the snow was coming ;)
Knowing you have a warm beverage treat at your finger tips really helps with the desire to keep carrying on...carrying on. Hot cocoa and marshmallows are essential tools for surviving winter if you ask me. I may just be a little obsessed though. And if you are a friend of mine on instagram, then you already know my love affair with hot beverages ;)
This combo is also a great gift. Whether you package it up in cute-sy jars and ribbons. Or whether you have it as an option for guests as they come in and warm themselves and share in holiday cheer. There's hot cocoa and marshmallows, and then there is... HOMEMADE cocoa and marshmallows. So, stop thinking about wanting to try these and make them already. Your life will never be the same.
Homemade Marshmallow Recipe
In a large mixing bowl, add the following ingredients and let the gelatin "bloom" and sit at the bottom on the bowl. You may need to whisk in the gelatin and water so that there are no clumps.
4 TB Great Lakes Gelatin (or the Knox gelatin brand works too)
2/3 cup of pure water

*sidenote* if you want to invest in buying the GMO-free gelatin I mentioned above. If you want to read more about the health benefits with adding gelatin to your diet, read more here. 

Now,

In a medium saucepan, add the following ingredients on medium to high heat:
3/4 cup of pure honey
1/2 cup of maple syrup
1/2 cup of water
pinch of sea salt

1/2 cup of tapioca flour

For best results, buy yourself a candy thermometer so that you can tell when the honey syrup mixture reaches a scalding 245 degrees, or the "soft ball" stage to candy making. This process is long and can take around 15 minutes on medium heat. You do this until the mix is somewhat foamy. I have made this recipe a dozen times without a candy thermometer and just waited until it got to the foamy soft ball stage, but to have the best results- get a thermometer and get it to exactly 242-245 degrees. This could take anywhere from 10-12 minutes on the medium/high heat. When you reach this stage/temp it is time to mix the burning sweet mixture into the gelatin mixture in the big mixing bowl. 


You will need to hand whisk the two mixtures together until mostly dissolved and it is amber brown color. Then, slowly use a hand held mixer and mix on slow until even more foamy, then raise the speed when it gets thicker to medium and then HIGH. You will start to notice the color changing to white-ish and thickening up. You may want to lick at this point. It is super yummy marshmallow fluff. Then when the marshmallow is stiff you pour the mixture into 9x13 pyrex pan dish that is first covered with parchment paper and then use 1/4 cup of tapioca flour to evenly cover the parchment. Then pour marshmallow fluff in the pan, spread evenly and try to make without too many lines. Then sprinkle another 1/4 cup of tapioca flour over the top- this does not get spread it- just sprinkle it over and then when it is time to spread after 4 hours you can. You have to let it sit alone for at least 4 hours and it stiffens right up. Then pull out the parchment from the pan, spread the tapioca all over and use a non-teeth knife and cut squares of marshmallow. Use the excess tapioca flour to help dust and keep each square less sticky. I stored my marshmallows in a quart/2qt ball jar on the counter for up to a week without problems. Let them sit out on the counter next to a jar of the following mix...

Homemade Cocoa Mix Recipe 
{dairy and gluten-free, VEGAN}
2 cups of coconut palm sugar
1/2 -3/4 cup raw cacao powder
1/2-1 ts. sea salt
optional addition of cinnamon or cardamon or other favorite spice combo

In a Vitamix (or other high powered blender), mix and blend and grind up the above ingredients until its all mixed up. Dump in a jar with lid and let it sit on counter ready to mix 2 TB for every 12 ounces of HOT water. 

My version of the BEST cup of hot cocoa will involve the dry mix (1-2 TB) with 10 ounces of boiling water, then 2 TB of cold coconut milk beverage to add in the mixing process, and then top with a few marshmallows and it doesn't get better!
It's the simple things, friends! These recipes can be found all over Pinterest and the internet if you go searching for them, but I still wanted to post "my versions" together and share what I have done because they have become a staple these past few weeks and have had many friends ask for the recipes. Also, as you can see from the pictures with my cinnamon rolls, another great addition to the cinnamon rolls for Christmas morning. I hope you invest in making these simple recipes and letting them sit on your counter for the Christmas season. They really are a gift- to yourself- to your friends and family coming over- and to the kids coming and going in and out through the snow. 

Much love as always, and stay warm xoxo

Wednesday, December 7, 2016

Cinnamon Rolls

I have been making these cinnamon rolls for a few years now and realized I didn't really share the details with you. How rude of me :) Seems like it was about time with Christmas morning right around the corner. So here my best take on the traditional magical treat of the cinnamon roll.
When our little family grew and we had little ones, we started the Christmas morning tradition of making cinnamon rolls or monkey bread for breakfast. Honestly the kids are more interested in all the presents (and why not ;) but eventually their stomachs remind them about breakfast. And they are super easy to make ahead and warm up if that works better for you. It's also a great treat for my husband and I to eat cinnamon rolls, sip coffee or cocoa and just soak in the magic of Christmas morning with little ones. 
Cinnamon Roll Recipe
{gluten, dairy, egg, yeast, soy, nut and seed-free}

3 TB of psyllium husk powder
1 1/2 cup of coconut milk beverage (I use So Delicious unsweetened)
1/2 cup of water
1/4 cup of apple cider vinegar
1 TB of blackstrap molasses
1 TB of pure honey
2 TB of olive oil

Whisk all the above ingredients together very well in a large mixing bowl. It will turn into a pudding-like substance. Then you can add the dry ingredients...

1 3/4 cups of certified GF oat flour *I grind my own from GF rolled oats*
1 1/4 cup of white rice flour
1/4 cup of tapioca flour
1/4 cup of potato starch
1 TB of baking powder
1 ts of baking soda
1 ts. of sea salt

*1/4-3/4 cup of extra flour (oat or rice/tapioca or a mix) for rolling out and kneading if need be

After you add in all the dry ingredients you will roll together, knead together and start to form a log or bad and you may need to extra flour (oat, rice, tapioca) in the kneading or rolling out process if your dough is extra sticky. So form a lump or log and start to roll out a flat dough piece on parchment paper. You want to roll out a 12x15-18 inch dough rectangle. Let it sit while you mix up the filling...
Cinnamon Spice Filling
1 cup of coconut palm sugar
5 TB of cinnamon or pumpkin pie spice blend
2/3-3/4 cup of coconut oil

In a small mixing bowl, or you can save a bowl and mix it up in your dough bowl. Mix up the above ingredients until it becomes a wet sandy mixture that you can evenly spread over the whole rolled-out dough piece. You can leave 1-2 inches without the filling at the end closest to your body. Then, at the end farthest from your body start to pinch the first few inches of the dough pieces into a roll. You want to evenly roll the whole 15 inches of dough into a roll towards you. There is a lot of technique here, but basically you want to stretch-then roll-stretch-then roll, and you will eventually get a TIGHT roll of dough swirled with cinnamon filling. Pinch the endings of dough on each side and at the end of the dough roll. This will help the dough stick together. Then take a bread knife and cut 1 inch cuts along the roll and separate each inched roll and place it on a parchment papered baking sheet. A 15x18 baking sheet works best, or 2 12x9 baking sheets would work too. Spread out 1/2 inch apart so they bake together but they will expand a little. Bake in a 350 degree oven for 25-30 minutes until bubbling and golden brown. The coconut oil sugar will and may be really melty and bubbling- so be careful because it could easily burn you if you touch it, but then let the rolls sit for 15 minutes and the oil will soak back into the rolls and make a very moist and chewy consistency that is great! 

This recipe can make 24 mini rolls or about 18 larger rolls. It just depends on how long you roll out your cinnamon log and how large you slice off the rolls from the log. If you have ever made homemade cinnamon rolls before you can use all the same techniques here with this recipe, but this dough is free of yeast, so no rising time, and free of the pesky allergens. They turn out fabulous though!
You can frost with a simple powdered sugar/coconut milk icing if you desire. Me and my kids just like topping it with regular or dairy-free butter or cream cheese. Or even just a swipe of honey butter, honey, or jam. So you don't really need the icing, but if you want that more traditional feel, then by all means. 
This recipe is gold I tell you!!!

Merry Christmas and happy planning for a special and meaningful-magical Christmas morning. 

Much love and light, friends  xoxo

Monday, December 5, 2016

Chocolate Cream Pie

A chocolate cream pie for a Monday morning. All seems right to post this recipe and pictures on such a day. Christmas is less than 3 weeks away and the season is in full swing with parties, tree lightings, and gift wrapping. I forget how fast this season comes every year, and then when it is here I want it to slow down so we can actually enjoy it. I always have the goal to be done with the busy shopping work by the first week in December, but then I always seem to keep going and stay busy. BLAH! This year I hope to get the busy-ness done by this week, and then spend more time baking cookies with my kids, and enjoying the company of loved ones. It may be just a dream though...kinda like this pie....

This pie was a part of the lineup for Thanksgiving this year. And I remember thinking this pie was maybe more liked by myself than all the other desserts. It was just a floating thought until I tried the pumpkin pie again :) But still, this pie impressed me with how creamy and fluffy it was. And of course I sunk my favorite ingredient in it....dates. Yes, dates again to the rescue. Maybe I should be thinking of a name change for this recipe blog...."Dates are the Hope for Healing ;)???" Well, it may just be a phase, but I cannot deny my love for dates in baked goods in who they offer so much wonderfulness with sweetness and texture. Yet another irresistible date-infused dessert recipe for you...

Chocolate Cream Pie Recipe
{gluten, dairy, soy, nut, seed, egg- free and vegan}

Crust Recipe:
3/4 cup oat flour
1/2 cup rice flour
1/4 cup tapioca flour
1/4 cup potato flour
1/2 ts. sea salt
2 TB of palm oil shortening
2 TB of room temperature coconut oil
2 TB maple syrup
2 ts. apple cider vinegar
1 ts. of water

In a medium bowl, mix all the dry ingredients together first, then add in the oil and shortening and make it a sandy mix, and then add in the syrup, water and vinegar and mix it well together. It may be a sticky dough but it will start to form a dough ball and you can knead it and let it sit for it to all meld together well. Then toss into a pie pan and press it into all the sides of the pan, or you can roll it out to size of a 9 inch pan, and put it into the pan and cut accordingly. Its a pretty easy recipe to do either way. Bake in a 350 degree oven for 12-15 minutes until lightly golden and slightly firm. Let it completely cool before putting the chocolate filling in and refrigerating.


Chocolate Cream Filling:
1/2 cup of dairy-free chocolate chips (I use Enjoy Life brand)
1 can of full-fat coconut milk, just the cream, save/discard the water
1 cup of coconut milk beverage (I use So Delicious)
1/2 cup of date puree (1/2 cup of boiling water poured over 1/2 cup pitted dates and blended)
1/3 cup of softened organic coconut oil
1/3 cup of cacao powder
1/4 cup of maple syrup/or pure honey
1/4 cup of coconut palm sugar
1/2 ts. of sea salt
2 TB of tapioca flour
juice from 1/2 of lime

In a medium saucepan, pour in the above ingredients and use a whisk to soften and melt all the ingredients together well. Do not let it boil or get too hot, just let it get warm and whisk together. Pull off the heat and let it sit for a few minutes and then pour it into the cooled pie crust and let it sit for a few minutes and then you can transfer the pie into a safe and flat spot in the fridge and let it sit overnight or for 6-8 hours for it to stiffen well. 
Then, after refrigerating for 6-8 hours it will be ready for serving. I like cutting into it and removing one slice so that the rest of the slices are easier to fork out. It is so good by itself, but if you are looking for a great dairy-free alternative to pure dairy fresh whipped cream-this Coconut Whip from So Delicious is fabulous and made from better ingredients and brings back all cool-whip-feelings from younger years. You can spread out the coconut whip on top of the whole pie and then sprinkle some chocolate chips or grated chocolate from a chocolate bar. It will look just as good as any restaurant pie and your guests will be surprised it is allergy-free. 

I hope you try this simple but wonderful pie out and add it to the holiday menu!

Much love to you! And much hope and peace to you as you enter and sit in this advent season.

xoxo