Pages

Thursday, August 31, 2017

Fresh Peach Pie

Ok, one last sweet peach recipe to say farwell to summer and hello to Labor Day weekend and the kickoff to the new school year and fall schedules. This one feels a bit over the top because it is so fresh and fabulous but let me tell you- it is actual a quite simple recipe.
Yep, the star of the show is peaches again. So using fresh, juicy and full of flavor peaches is a must! I don't think I would even attempt this recipe if I couldn't get my hands on the best local fresh peaches. I like to make recipes liek this as a celebration for the season. Its like like I would make this in the winter- it is truly an end-of-summer-kind of deliciousness.
It's also the best kind of dessert to make for a crowd. I don't think you could eat this pie alone ;) well maybe you could, but that's another story all together. Truly though- this pie is a beaut and deserves to be shared and loved by all. I love to top it with some fresh coconut cream whip and it's a party! I hope you have plans to savor these last few gifts to this summer season. I hope you take deep long breaths and enjoy the slowness of this weekend. I hope you don't feel the anxiety of what's next creeping in and I hope you can find joy in the simple rooting of good food with those you love. Happy baking and happy weekend!!!
Fresh Peach Pie Recipe 
(gluten, dairy, soy, seed, egg and nut-free)
This recipe is very similar and inspired by my My Fresh Strawberry Pie Recipe

Crust:
1/2 cup gluten-free oats
1/2 cup of shredded unsweetened coconut
1 1/4 cup of gluten-free oat flour ground 
(1 cup of oats in ground in high power blender to make 1 1/4 cup of flour)
2 TB of maple syrup
dash of sea salt
1/3 cup of organic extra virgin coconut oil

In a mixing bowl, mix the oats, coconut, salt and flour all together well and then add the syrup and coconut oil and mix with a fork. You should get a sticking pie crust batter that you will use your hands to press into a 9 inch glass pie pan. You will have to pressed firmly up to the tops of the pan and press firmly along the bottom. It doesn't have to be perfect looking, but do try and make the crust spread evenly over the pan. Then bake the crust in a preheated 350 degree oven for 16-18 minutes until golden brown. You may need to press a fork up to the sides again after you pull from the oven while it is still hot if the crust slide down a touch while baking. Then, let the crust cool on the counter until it is cold.
Fresh Peach Filling:
6 large fresh juicy ripe peaches (about 5-6 cups of slices), boil, blanch, to remove skins, and then slice up and mix in a bowl with 1/4 cup of fresh lemon juice and 1 TB of maple syrup, then spread out in an arranged fashion in the cooled pie crust from above...

Then in a small saucepan, finely chop up 2 MORE cups of fresh peaches with lemon juice, maple syrup, honey and pinch of sea salt and spice ...

2 cup of chopped fresh peaches
2 TB of water
2 TB of fresh squeezed lemon juice
pinch of lemon zest
1/3-1/2 cup of local honey or maple syrup or a mix of both
pinch of sea salt
1 ts. of cinnamon
1 ts. of nutmeg
pinch of cloves
pinch of ginger
pinch of cardamon 

In a separate bowl...
1/3 cup of water

When you crust is cooled, the you can place the 6 sliced peaches in the crust. Then set aside in the fridge or freezer to make the liquid sauce to pour over the peach slices...

First, put your chopped peaches and lemon juice in the pan and let cook down for a few minutes on low heat, then add your sweetener and water and keep simmering. Lastly add in the bloomed gelatin  and stir quickly to keep from clumping. Turn off the heat and let it cool down just a bit before you pour over the sliced peaches in the pie crust. 

Lastly pour the warm peach sauce over the fresh sliced peaches already in the pie crust. Use a spoon or brush to coat all the tops of the peaches and makes ure it is evening distributed. Then place in the fridge and chill for 3 hours before serving. 

When set, cut out pie slices, and then top with some whipped cream topping. A favorite easy option is using So Delicious's CocoWhip kinda like a cool-whip option. And then there is the homemade coconut cream whipping from a can ....
Homemade Coconut Whipped Topping:
1 can of full fat coconut milk (use the cream only)
2-3 TB of pure maple syrup

Chill the can of coconut milk for at least a few hours or speed up the process in the freezer. Then right before serving, open the can and scoop out the separated coconut cream on the top and pour all of the remaining coconut water in a separate container to keep and use for other baked goods or smoothies. After putting the coconut cream in a bowl with syrup, use an electric mixer and whip up the cream for at least 3 minutes until you get peaks and a thicker cream. Then you can top the pie with this cream however you like. I scooped the cream into a Wilton's pipping bag with a star tip and squeezed out some cream stars over the pie. But you can top however you like- it will taste superb no matter how you top it :)

You can sub 1-2 TB of honey for the maple syrup. And if you want, prefer or like dairy you can use just regular whipping cream whipped up to perfection. 

Well, that's a wrap on fresh peach pie! Much love and light to you as always, xoxo

Wednesday, August 23, 2017

Peach Cardamon Coconut Ice Cream

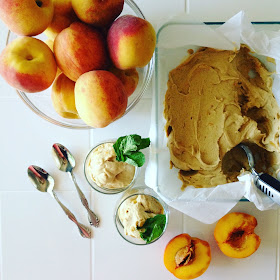
Welllllll...Peaches have made their way into one of my vegan ice cream experiments. Have you ever tried peaches with cardamon? It's gotta be one of my most favorite ways to spice up fresh peaches and once you try it...it's hard going back to plain ol' peaches. Such a cool and spicy way to enjoy this summer treat.
See those little spicy flecks of cardamon?!? and those chunks of fresh peaches?! Such a fantastic match! This ice cream creation was my favorite of the summer thus far. It was just the perfect treat on a warm summer night, watching the glow of the sun set, and the warm giggles of the kids and love of friends. I know it's just ice cream- but when were talking about cardamon and peaches too- well that's what sets this one apart from the rest :)
I didn't let this set long enough before taking pictures so you can see how the scoops were a bit runny or messy, but that doesn't change a thing! It is so creamy, refreshing, sweet and tangy and spicy in all the right ways. Maybe the reason I love this so much is because it touches on all the taste buds and satisfies all the flavors your looking for in an after dinner treat. I love sharing my experiements and treats and this one I am so excited for you to share-in and try- totally worth the time and GO get yourself some damn peaches! Happy last days of summer...and ENJOY all the bits!
Peach Cardamon Coconut Ice Cream Recipe
{gluten, dairy, egg, soy, nut, and seed-free}

2 cans of coconut cream (14 ounce cans, just scrap out the cream and discard/reuse water)
1 TB of tapioca starch
2 TB of coconut palm sugar
2 cups of fresh peaches
1 lemon squeezed and zested
1/3 cup of maple syrup
1 1/2 ts. of ground fresh cardamon
pinch of sea salt
pinch of cinnamon, ginger, nutmeg, cloves or 1 ts. of pumpkin pie spice

PLUS an extra 1-2 cups of diced fresh peaches, stewed with a drizzle of maple syrup and lemon juice for a few minutes on the stove and then cooled and mixed into the batter when being poured into the ice cream maker.

In a saucepan, put the coconut milk cream on low heat and let it get soft and liquid. Then sprinkle in the tapioca flour and put in the rest of the ingredients. Let everything get warmed and the tapioca thickened and then dump it all into a high powered blender and blend until frothy. Then pour into a cool down bowl and fold in the extra diced peaches and cover with wrap or lid and let cool down. 

When room temp or cooled down, add to a ice cream maker and let it do it's job for 20 minutes or so and then spread into a container to sit in the freezer for 1 hour or more. Then you can pull out and use a regular ice cream scoop to serve up perfectly. Serve up and share with all your people!
If you have not invested in the Cuisinart Ice Cream Maker- then you might want to in time for this summer. I got this as a birthday gift last year and have enjoyed using it. The instructions before you make the ice cream is to deep freeze the mixture container. It must be super cold! Then once you do that you can hook up the container and follow the instructions- which for this ice cream includes just pouring in the mixture while it has already started spinning. This will take anywhere from 20-30 minutes to thicken up the ice cream. It is like soft serve and ready to top or eat, but if you want a more scoop-able ice cream then let the machine run for the allotted time and then pour into a container and put in the freezer and within 60 minutes it will be a perfect scoop!

Much love and light to you, xoxo

Sunday, August 20, 2017

Summer Peach Crisp

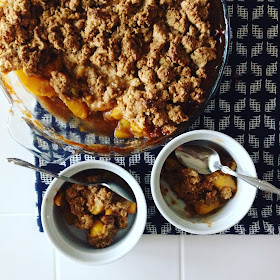
The key to this peach crisp is simplicity. But that's usually what I say when it comes to any fruit crisps. I love the flavor of the fruit to shine and the crispy bits to be a little like a cookie topping. And that's just how this one was... well is...? Well not anymore... I took a few pictures and by the end of the day it was gone ;) Yep, that's usually how these babies go...very quickly.
I picked up a bushel of these gorgeous gems last week from a local farmer. I go to him every year when it's peach season. These are Red Havens, one of my favs, because they are not horribly sweet and just the right texture and color for baked goodies and basically just to gawk at.
They kinda look like a gorgeous sunset this time of year, appropriate since we have been talking so much about the sun this month with the solar eclipse tomorrow and all the gorgeous August sunsets that I have witnessed this month. So much beauty and little reflections of summer.
The day I pick up a bushel is celebration crisp day! I also plan to try and make some peach butter and store some in a honey based syrup as well. We'll see how that goes :) But for now... let's make crisp and watch another fleeting summer sunset, shall we?!? 
Summer Peach Crisp Recipe
{gluten, dairy, nut, seed, soy, egg and refined-sugars-free}

6 cups of fresh pealed and sliced fresh and juicy peaches
1 lemon squeezed and zested
1 TB of sprinkled tapioca flour
3 TB of maple syrup (or a mix of honey)
pinch to 1 ts. of ground cinnamon
pinch to 1 ts. of ground nutmeg
pinch of cardamon
pinch of cloves

Put all of the above ingredients in a saucepan on medium heat and let the peach juices break down and the tapioca thicken the juice. Leave on medium to low heat for 7-10 minutes and then it is ready to pour into a 9x9 Pyrex pie pan or square dish.
In a small bowl mix together...
1/2 cup of quick cooking GF oats
1/2 cup of finely ground certified GF oat flour
1/2 cup of coconut palm sugar
2 TB of potato starch
2 TB of tapioca flour
pinch of sea salt
1/3 cup of Spectrum's palm oil shortening or extra virgin coconut oil 
drizzle of pure maple syrup

The above mixture will turn into a sticky cookie-like-batter and will be easy to sprinkle over the peaches. Then bake in a 350 degree oven for 30 minutes until there is bubbling peach juices coming from the sides.  Pull from the oven and let cool for 20 minutes before serving up warm. Which is the best way to serve in my opinion. 
This is the kind of recipe that is completely inspired and made possible by gorgeous fresh peaches. SO if you have fresh peaches available to you-then this little summer delight is a MUST! It is fabulous with a dollop of your favorite vanilla ice cream or whipped topping. But is also just fabulous as is :)
Hope you are hanging on to the best of what's left of summer and enjoying your people, nature and some gorgrous delicious food! Much love and happy baking, friends! xoxo

Saturday, August 19, 2017

Trailmix Cookies

These little cuties are another one of those cookies I have made for years but haven't actually posted or shared. They are based off of the same oatmeal cookie base that I make for all my favorite cookies... It's pretty simple, but can be made with a whatever fillings you got or want. These specific trail mix cookies can be easily made with your already pre-made or bought trail mix, or you can whip up a little mix of your own to add in. They are perfect this time of year for all those end of summer trips and adventures. They are good for breakfast lunch and dinner (and dessert ;) But the key factor is that you MUST make them to enjoy them :)

Make a big batch and freeze them. They are super easy to pull out and take on the go. When I make these I feel like you can pack in so many flavors and nutrients that you forget it started out as a cookie base- but I like to think of all my cookies as a little love from heaven. So just sharing that love with you xoxo Much love and HAPPY baking!
 Trail Mix Oatmeal Cookie Recipe
{gluten, dairy, egg and soy-free, VEGAN}

1 cup certified GF rolled oats
1 cup of certified GF oat flour
1/3 cup of tapioca flour
1/3 cup rice flour
1/3 cup of potato starch
1 ts. of sea salt
1/4 ts. of baking powder
1 1/2 ts. of baking soda
1 cup of coconut palm sugar
1/3 cup of date puree paste (or applesauce)
1-2 TB  of maple syrup
1/2 cup room temperature or very soft/warm coconut oil OR you can sub in
Organic Palm Oil Shortening or use a mix of both to make 1/2 cup

add last: 1 heaping cup of your favorite trail mix combo or....
1/4 cup of shredded coconut
1/2 cup of raisins, dried cranberries or dried chopped dates
1/2 cup of mixed pumpkin seeds, sunflower seeds, possible nuts
optional....add in a sprinkle of some dark chooclate chips ;)

Mix all the dry ingredients together first, then add the wet and mix well and add the oil and mix into a sticky dough. Use a TB to spoon the dough into balls onto a baking sheet. For best results one your baking sheet with parchment paper. Bake in a 350 degree oven for 15-18 minutes or until your desired crispy cookie liking. Let the cookies cool for at least 15 minutes before moving to platter because they will start to crumble if they are still warm. Store in a dry place or in the fridge for an extended period of time. ENJOY!

Much love as always xoxo

Thursday, August 17, 2017

Peach Crumble Muffins

You guys- the Great British Baking Show on Netflix has taken over my life recently. Have you seen this show?! It might bring up some sorrow because there is so much to be missed from glutinous baking. Like pastry. Oh my! But the other night I found myself crying through the season 3 finally because of some of the words the winner said about herself. Ones that she would not set up boundaries for herself anymore. Ones that she would believe that anything is possible for herself. I love this show for so many reasons. First one starting with all the UK accents (I LOVE THEM!) but also all of the creative, art, science, beauty, determination, and perfection that can come out of baking. It is something I can resonate with, and even enjoy, though there is past grief that there is so much because of Celiacs Disease I cannot enjoy anymore. But in the same vein- we can not limit ourselves and loose heart- we must have determination to keep going and not give up on finding joy out of all areas of life. For life is a gift!
And I think we know this even more than the next guy because of the art and science and experience it takes to actually produce and love GF baked goods. I had that on my mind as I whipped up these muffins this morning. It was a perfect morning to bake as it is raining here and staying inside in a cozy kitchen was just the right thing for today. I felt like maybe speaking with my own British accent and making comments about my bake would almost have me imagining I was in the white tent myself ;)
The fresh amazingly sweet peaches were my subject of creativity today. I was hoping to make a slightly spicy, but sweet tart muffin. Trying to get a crumble topping as if you were biting into a warm piece of peach crumble or pie. If you've got peaches- give this a try and happy baking, friends!
Peach Crumble Muffin Recipe
{gluten, dairy, soy, egg, nut, seed, and refined-sugars-free}

1 1/4 cup of finely ground certified GF oat flour
1/2 cup of white rice flour
1/3 cup of tapioca flour
1/4 cup of potato flour
1/4 cup of coconut flour
2/3 cup of coconut palm sugar
2 ts. of baking powder (I use corn-free Hain brand)
1 ts. of sea salt
1 ts. of baking soda
1 ts. of ground cinnamon
1 ts. of ground nutmeg
1 ts. of ground cardamon

3/4 cup of date puree paste
1/3 cup of maple syrup
1/3 cup of coconut milk
2 TB of apple cider vinegar
1 fresh organic lemon zested and juiced
1/2 cup of softened coconut oil or avocado oil

1 1/2 cup of cubed and slightly stewed peaches*
I cut up 3 peaches and warmed them on the stove and cooked them down for 5 minutes with a drizzle of maple syrup and lemon juice, then cooled them down and added them to the recipe last to fold in- there may be a little liquid with cooked down peaches, and that is ok.

In a large mixing bowl, whisk all the dry ingredients together first and then add in the wet and fold in together well, you will notice the baking soda/powders doing their job with the apple cider vinegar right away. Fold in the stewed peaches last and then scoop 1/3 cup of the batter into each muffin tin. This recipe should make 12-15 muffins. Then before you bake off sprinkle with the following crumble topping...

Crumble Topping:
1 TB of coconut oil
1 TB of rice flour
1 TB of potato starch
1/4 cup of coconut palm sugar
1/4 cup of quick cooking GF oats
1 TB of cinnamon or 1 ts of each:cinnamon, cardamon, nutmeg
pinch of sea salt

Mix all of the above in a small bowl and sprinkle over each pre-baked muffin in the tins right before you put in the oven. Bake in a 350 degree oven for about 25 minutes. Let cool for another 15-20 minutes before serving or moving for best results.
 I hope you give these little sweet and spicy treats a try. The peaches are just about perfect right now. I am hoping to have a few more peach recipes in the next few days as I am finding so much love and inspiration for them this season. Much love as always and happy baking, xoxo

Sunday, August 13, 2017

Blackberry Basil Coconut Ice Cream

Yessss, it's another vegan ice cream experiment!  Over the weekend, I was inspired by the plump gorgeous blackberries at the farmer's market and the strong aroma of fresh basil. My husband has been loving basil this season almost as much as me :) so it's also motivating to use it in just about every dish ;) 
Yes even in ice cream. Somehow that flavor of basil, almost liquorice-like, that adds just the right match to the sweet-tart of berries. I have added it to berry crisps before but to the coconut cream ice cream it is just about the perfect subtle touch. I didn't even add the leaves into the blend... just let them soak and simmer into the coconut milk before it's blended. Sooooo good!!! Be inspired by fresh colorful amazing food and let yourself be nourished and ENJOY!
Blackberry Basil Coconut Ice Cream Recipe
{gluten, dairy, egg, soy, nut, and seed-free}

2 cans of coconut cream (14 ounce cans, just scrap out the cream and discard/reuse water)
1 TB of tapioca starch
1 lemon squeezed
1/2 cup of maple syrup
1/4 cup of coconut palm sugar
pinch of sea salt
1 handful of fresh basil tied with twine

1 pint of fresh blackberries

In a saucepan, put the coconut milk cream on low heat and let it get soft and liquid. Then sprinkle in the tapioca flour and put in the rest of the ingredients. Keep the basil in the twine because it is just soaking in the cream and not being blended in. In a seperate saucepan, cook and mash blackberries until soft and juicy. Then pour over a micro-sieve and use all of the flesh and juices but omit the blackberries seeds to have a creamier ice cream finish. If you liek the texture of seeds then just add the berries right into the milk mixture. 

Take out the basil and cool down the coconut milk mixture and then add to the high powered blender with the berry mix and blend on high until creamy and smooth. Then pour into a container to cool down more if it is still warm, and if you need to refrigerate for a while that's fine. When room temp or cooled down, add to a ice cream maker and let it do it's job for 20 minutes or so and then spread into a container to sit in the freezer for 1 hour or more. Then you can pull out and use a regular ice cream scoop to serve up perfectly. Serve with fresh fruit or with or however you like ice cream best!


If you have not invested in the Cuisinart Ice Cream Maker- then you might want to in time for this summer. I got this as a birthday gift last year and have enjoyed using it. The instructions before you make the ice cream is to deep freeze the mixture container. It must be super cold! Then once you do that you can hook up the container and follow the instructions- which for this ice cream includes just pouring in the mixture while it has already started spinning. This will take anywhere from 20-30 minutes to thicken up the ice cream. It is like soft serve and ready to top or eat, but if you want a more scoop-able ice cream then let the machine run for the allotted time and then pour into a container and put in the freezer and within 30 minutes it will be a perfect scoop!

ENJOY and much love as always xoxo

Thursday, August 10, 2017

Refrigerator Dill Pickles

This is a little nugget of a recipe I have been making for a few years now. It isn't rocket science, and there are many easy peasy recipes for this out there in world wide web land and Pinterest... buuuutttt, I thought I would share my version anyways because I use a few substituted ingredients to help with yeast overgrowth in the gut.
This is the recipe I was inspired by years ago...
Shannon Martin's Recipe

I switch out white sugar and white vinegar for coconut palm sugar and apple cider vinegar. It's minor but for me and how I am conscience of the over use of vinegar in dressings and such. I always choose apple cider vinegar over any edible vinegar because I have found it to be not as aggravating to candida and high histamine issues I have had over the years. But I guess this is no surprise I use these ingredients in all my baking and they are staples in my pantry.
A wonderful gift in August in the large amounts of fresh fruit, veggies and herbs you can find at your local farmer's market, backyard or road side stands. I bought the above produce at my local farmer's market for a whopping total of TWO dollars. I am sure you could even find it cheaper or maybe you have a garden or access to a friends or family member's garden too. These are so easy and cheap to find right now. So basically you can make this whole quart of pickles for around 2 dollars- what a fun fresh bargain to enjoy this season!
Steph's Version of Refrigerator Dill Pickle Recipe
{gluten, dairy, egg, soy, nut, seed and refined-sugars-free}

2 TB of coconut palm sugar
1 TB of sea salt
1 ts. of whole black peppercorns
1/2 ts. of dry mustard powder (or whole seeds)
4 fresh garlic cloves chopped
1/2 cup of apple cider vinegar
3 cups of pure water
1 handful of fresh dill roughly chopped
1 quart small cucumbers

In a quart sized Ball jar put in the coconut palm sugar, salt, pepper, mustard, chopped garlic and vinegar and fresh dill. Stir if need be so that the sugar and salt dissolve into the vinegar. Then wash and slice up the cucs and layer them in the jar. When up to the top, stop and fill with pure water to cover all of the cucs. I usually give a little shake to let the fluids evenly cover all through the jar. Screw on a top and put in the fridge. I think they taste best after 24 hours and then you can keep them in the fridge for up to two weeks for best tastes in my opinion.

Hope you are enjoying the fresh summer produce from your garden and markets. Much love to you as always and let's enjoy these last few weeks of summer shall we?!? xoxo

Thursday, August 3, 2017

Zucchini Brownie Bite Muffins

Every year when zucchini is fresh and coming up abundantly I seem to remember again how much I love chocolate and zucchini together. It always turns out so moist and rich and chewy and wonderful.  So today when I woke up early ready to bake up a treat for my kiddos and some friends- it was this combo on my mind (and stomach!)
These minis could be a dessert, a treat, a snack...OR...breakfast ;) I am calling these little babies Brownie Bite MUFFINS instead of CAKES because that is just what they are of course.  Topped with a little sprinkle of mini chocolate chips :) So call them what you will, I decided to call them muffins because they are hearty and wonderful and full of goodness. The chocolate is just the disguise...and it sure is a trickster to mask a vegetable-filled muffin.
Zucchini Brownie Bite Muffin Recipe
{gluten, dairy, egg, nut, seed, soy and refined-sugar-free}

1 1/3 cup of fresh ground certified GF oat flour
2/3 cup of white rice flour
1/4 cup of tapioca flour
1/2 cup of cocoa/cacao powder
2 ts. of baking powder (corn-free Hain brand)
1 ts. of baking soda
1 ts. of sea salt
1/2 ts. of ground cinnamon
3/4 cup of coconut palm sugar

2/3 cup of coconut milk beverage (or other plant milk)
1/3 cup of apple cider vinegar
1/4 cup of maple syrup
2 TB of molasses
1/2 cup of date puree paste
optional addition: 1/2 cup of mashed cooked black beans
1/2 cup of soft melted coconut oil (or avocado oil)
1 1/2 cup of freshly shredded/grated zucchini

1 cup of mini-dairy-free chocolate chips (ENJOY LIFE brand)

In a large bowl, whisk all the dry ingredients together first, then add in all the wet and whisk together well. I grate 1 large or 2 small zucchini right before I add it to the bowl so it is super fresh and if it is super wet you can squeeze out some of the excess water. I lastly fold in the chocolate chips and then even save a little sprinkle of chips to top the unbaked muffins for the added touch of chocolate goodness. I made these as mini muffins so the recipe made a ton...36 minis. But you can make about 18 large mufins too. Bake in a 350 degree oven for 22 minutes until stiff and baked all the way through for the mini muffins and you may need to bake closer to 30 minutes for the larger regular sized muffins. Pull from oven and let cool for at least 15 minutes before you eat just so to don't burn your taste buds. You're gunna want to keep those safe ;)

I hope you give these sweet treat snacks a try. A special treat this time of year with zucchini coming up in droves and you're struggling to come up with ways to use it all. Seriously friend- this is a muffin to make... so stop now and make these and your day will be complete. Share with friends and bring joy- you won't regret it.

Much love to you as always xoxo