Wednesday, February 29, 2012

Ginger Molasses Cookies

Happy Leap Day! 
A day that doesn't come around but every 4 years. I always thought it would be fun to have a birthday today because even though you would get older every year you could really say you were like 7 years old when you turned 28. Well, maybe that wouldn't be so great if you wanted to go out an rent an "R" rated movie or vote. Yet, the older I get the more I value the younger years of yesterday. Is there is pause button I don't know about somewhere?
Life just moves too fast. I was just recently looking back on some wedding photos and was mesmerized on how I and my four siblings looked so young. It was only 7 years ago, but in seven years I now have three siblings that are at least half-foot taller than me now. That day is forever locked in my memory.

Or I just look at my growing son. I had to cut his hair the other day because he couldn't see with the hair dangling in his eyes. And now he looks less like a baby and more like a boy. How is it that he is so big? It was just 2 years ago that I found out that I was pregnant with him and now he is talking to me and finding new hiding places in the house. I now know what it means when others have said "It just goes so fast!"
I also recently lost an aunt to a short battle with cancer. Life is so fragile. My uncle and family are left only months after a diagnosis without their wife, mother, best friend. Life moves even faster sometimes and leaves you thinking that you have to treat every day as a gift. That every moment is living. And that we must not live bored or take love for granted. My uncle's words to me were to love those closest because you just don't know how long we all have together. Sobering words, but words of truth I am willing to swallow and live by.

And, because I can see the gift of today I celebrate by making some cookies with my sweet boy. He is my little chef already. Loves to mix with spatulas in the pots and pans. Not really knowing what he is doing only but imitating his momma. He loves food and loves to be in the kitchen... hmmm, I wonder where he gets that from?

So today we made a batch of some super yummy, baby-friendly, and not too sweet cookies. An all time favorite treat that is very simple and easy to whip up and enjoy.
Ginger Molasses Cookie Recipe (vegan)
1 1/3 cup of freshly ground buckwheat flour (1 heaping cup of groats finely ground)
1/3 cup of millet flour (or sorghum flour)
1/3 cup of tapioca flour
2/3 cup of sucanat or coconut palm sugar
1 ts. of baking powder
1 ts. of baking soda
1/2 ts. of sea salt
1 ts. of ground cinnamon
1 ts. of ground ginger
dash of ground cloves and allspice
1/3 cup of room temperature organic coconut oil
2 TB of blackstrap molasses
2 TB of fresh lemon juice (1 lemon squeezed)
3 TB of apple butter or apple sauce (I use homemade here)

optional additions:
*add a few TB's of finely chopped candied ginger to spice it up more
*add 2 TB of honey or maple syrup to make it softer and sweeter
*roll the cookies in a bowl of more sucanat or sugar before baking to create a crunchy crust

First, grind 1 cup of buckwheat groats in a magic bullet or high powered blender. Then mix the buckwheat flour with the rest of the dry ingredients in a large mixing bowl. Then add the oil and the rest of the wet ingredients. Mix well and let sit for a few minutes to soak up the moisture. The batter will be a tad wet, but that is just what makes these cookies chewy too. So try and press it down with a spatula, or if you must add a sprinkling of more GF flour of choice on the top of the dough to make it easier to handle. Then roll out little TB-sized balls in the palm of your hand and press down on a parchment paper cookie sheet. Bake in a preheated 350 degree oven for 12-14 minutes. Then pull from oven and let cool for 10-15 minutes before moving to a plate or container. Recipe makes about 3 dozen cookies. Then ENJOY!
Hope you find ways to celebrate life and breath today. 

Many blessings to you and yours!

Sunday, February 26, 2012

Sunshine & Lemon Shortbread Cookies (vegan)

Hmmm, I love lemon. I squeeze lemon in my water almost daily and as a child I used to ask for my birthday cake to be lemon with lemon frosting. Lemonheads and lemondrop candies were some of my childhood favorites as well. These days I enjoy stevia sweetened lemonade and squeezing fresh lemon into stews, breads and cookies. These lemony fresh cookies are melt-in-your-mouth delicious. I couldn't be happier with this new lemony creation, but the only problem was that I didn't know what to call them. Just plain lemon cookies...or maybe lemon shortbread...perhaps lemon meltaways or maybe lemon snap cookies...all of the above would do, but it just seems so boring for a special cookie like these. So I added some "sunshine" and that seemed to more accurately describe these gems. Or should I say the lemons added the sunshine...
Perhaps you're not as big as a lemon fan as I. But friend, let me just tell you about the greatness of lemons. They always bring a fresh taste to a dish that may seem original or without flair. They bring charm, life and brightness wherever they go and they do not give up on making you healthier and happier. They clean up your insides and give it more hope for tomorrow, so dearest, don't be so quick to dismiss the lovely lemon. It has life and smiles awaiting you. Don't shy away, the lemon will make your body want to clean up and make digestion smoother and even enjoyable. Lemons are your friends- full of contagious alkaline power and cheer!
Besides all of their healing charm, lemons remind me of sweet warm places where sunshine sparkles and sweet scents permeate the air. Which is especially wonderful this time of year when we haven't seen pretty green grass in months. So as I ponder their magic and stay cozy inside my snow-globe house, I'll slip another tasty lemon cookie to melt in my mouth.
Lemon Shortbread Cookie Recipe (vegan)
1 1/4 cup of freshly ground buckwheat flour
1/2 cup of tapioca flour
1/2 cup of millet flour
1 ts. of baking powder
1 ts. of baking soda
1/2 ts. of sea salt
2/3 cup of sucanat (or coconut palm sugar)
1/2 cup of organic coconut oil
3 lemons (1/2 cup) of freshly squeezed lemon juice (meyer lemons give the best flavor!)
zest of 1 lemon
First, grind your buckwheat groats in a magic bullet or high powered blender (Vitamix). Blend 1 cup of groats to get 1 1/4 cup of flour. Then mix the rest of the flours and dry ingredients in a bowl. Then add the coconut oil and mix well with a fork, then pour in the lemon juice and mix well. Let sit for a minute for all the moisture to be soaked in equally. 
Then you can either add some fresh lemon zest to the cookie dough or the tops of the cookies. Roll out 1 TB sized cookie dough balls in the palm of your hand and then press slightly on a parchment papered cookie sheet. I then sprinkled with some lemon zest and baked in a preheated 350 degree oven for 12-14 minutes until spread and golden and crisp. Pull from oven and to avoid crumbles you must let sit for at least 10 minutes before moving to a plate. This recipe makes about 2 dozen cookies. 
These cookies are very very simple to make. You just need to try and make it with some fresh ground buckwheat flour to really taste how wonderful they are. It really makes all the difference for the soft and crunchy flavor and allows the cookie to stick together quite nicely. No need for eggs either, they are a super simple gluten-free-vegan treat. I have fallen in love for the ground buckwheat and have also made a great ginger snap cookie that I will post soon. Something about this cookie base has me dreaming up many more good cookie recipes and baking fun. Not to mention that buckwheat is also packed full of nutrients that you just can't find in white flour baked gluten-free baked goods.

Hope you are all having a great weekend! Much love to you!

Wednesday, February 22, 2012

Gluten-Free Oatmeal Bread (vegan)

Everyone needs a good ol' oatmeal bread recipe. One that is moist and firm but still has lots of crunch goodness as well. One that reminds you of Gramma's house or a local bakery's treat. I made this recipe gluten-free as I revised a old family favorite. So, I used certified gluten-free oats as the main substitute, a simple gluten-free flour blend and less sweetener. I wanted it to be a touch sweet, but also not too much so that I could enjoy it with some apple-sweet apple-butter.
I even was able to put a slice in the toaster and toast it up just right. Who says you have to abandon a nice piece of homemade bread when you abandon gluten? Not me! It takes time when you start the gluten-free diet to feel comfortable to do your own baking, but when you decide to make this change you will be continually reminded that living a healthier life is better, and will bring more hope for your future. Don't give up.... keep up the good work... and maybe work up enough courage to try a new gluten-free bread recipe just for you.
This bread is not a yeast-bread, so I guess it would be considered a quick bread. It is very much like a basic quick bread, but is also thick and firm enough to toast. I like how it turned out and will be making it again because I really do think it is a nice staple, or basic gluten-free bread. You could add little tid-bits if you wanted as well. Maybe some craisins or walnuts or whatever you have on hand. I made it basic and simple without extras because that is just the kind of mood I was in...:)

Gluten-Free Oatmeal Bread Recipe (vegan)

1 cup of certified gluten-free rolled oats (I used Bob Red Mill's)
1 1/4 cup of boiling water
2/3 cup of non-dairy milk (I used So Delicious Coconut Milk)
1 TB of fresh lemon juice (or apple cider vinegar)

In a medium bowl, pour the boiling water over the rolled oats. Let sit for a few minutes and then add the milk and lemon juice. Continue to let sit for 5-10 more minutes until the oats are soft and you can see some cultured milk and water from the lemons. Then mix with the following ingredients...

3/4 cup of freshly ground buckwheat flour
1/4 cup of chia seed meal
1/2 cup of brown rice flour
1/2 cup of tapioca flour
1 1/2 ts of baking powder
1/2 ts. of baking soda
1/2 ts. of sea salt
1/2 cup of organic coconut sugar, sucanat, or your preferred powdered sweetener
1/3 cup of baking oil: grapseed, melted coconut oil or light olive oil
optional: 1 ts. of pure vanilla or 10 drops of pure vanilla stevia liquid (I used NuNatural's)

In a large mixing bowl, mix all of the dry ingredients with a whisk. Then add the wet oat mix and the oil.  Mix well and let the batter sit for just a few minutes to soak up the moisture. Then pour the batter into a well oiled bread pan and top with a sprinkle of dry oats. Then put in a preheated 350 degree oven and let bake for 45-50 minutes. Check then to see if the bread is baked through in the middle, if not, let it continue to cook for 5-10 more minutes until it is not gooey and golden brown. 


Pull from oven and let cool at least 15 minutes before pulling from pan to let it cool on a grate or plate.  This bread will make between 12-15 slices depending on how thick you like to cut each slice. 
Serve warm from the oven with a touch of vegan butter and your favorite jam or fruit butter. I waited a few hours before I sliced the whole loaf and then kept the spices in a air tight container in the fridge to save for breakfast and snacks in the days to come. It will be best eaten in 3-4 days, but could be easily frozen if you want to save for later use.
This recipe post is linked up to Allergy-Free Wednesday (2/22/12) at Real Food, Allergy Free. Please check out the post for more great recipes...:)

I hope you enjoy and have a day of hope, health and healing.

Much love to you,

Stephanie

Monday, February 20, 2012

Roasted Coconut Cereal (vegan)

At one point this past weekend, my oven was being overworked and abused for the sake of good food. And, if you were looking for me, you would've found me in the kitchen baking four things at once. My husband laughs at me, but this is what happens when you go grocery shopping and you still need to make some goodies to have around for the family to enjoy and actually feel like you went to the store for more food. I do not buy packaged products very often...mostly to avoid processing and preservatives, but also to save some hard-earned money. But because it's not as easy as opening up packages to produce some goodies for my family, this means I have to get to work. Work I don't mostly mind either. I baked some quick bread (recipe soon), pumpkin pie, pizza crust and homemade cereal. All good treats for a lazy winter weekend.
I made this cereal nut-free and with my favorite seeds and raisins, but the beauty of this cereal or other granola recipes is that you can most of the time throw in what you like and make it work. I call this recipe a 'cereal recipe' instead of a granola recipe because I think that the puffed millet and oat mix along with how it is less clustered makes it more a loose cereal than a clumpy clustered granola. But it still works the same way as granola with being a perfect addition to a bowl of your favorite non-dairy milk, yogurt or ice cream. It is flavored mostly with shredded coconut, coconut oil and coconut milk. Hence the name ;) But I did add a dash of cinnamon to spice it up and you could add what you like as well.
Roasted Coconut Cereal Recipe (vegan)
4 cups of gluten-free rolled oats (I used Bob Red Mill's)
3 cups of unsweetened puffed millet cereal (I used Arrowhead's)
1 cup of raw sunflower seeds
1/2 cup of raw pumpkin seeds
1 cup of unsweetened shredded coconut
1 cup of organic raisins
1/2 cup of organic coconut oil
1/3 cup of coconut palm sugar (you could use a liquid sweetener if you prefer)
1 cup of coconut milk beverage (I used So Delicious)
20-25 drops of pure vanilla stevia liquid (I used NuNatural's)
1/2 ts. to 1 ts. of ground cinnamon
optional: dash of sea salt

In a large mixing bowl mix together the oats, millet and seeds and raisins. Then mix the stevia into the milk. And melt the coconut oil with the sugar  for about 30-40 seconds. Then mix the milk and oil mixtures into the dry mix and mix everything else in and well together. Make sure to get all the dry covered with the wet ingredients and then let soak for a few minutes so the oats can soak up the milk mixture. Then pour out the cereal on a baking sheet covered with parchment. You will need either one large sheet (15x20ish) or two (9x13) pans. Bake at 350 for between 45 minutes and 1 hour. But pull from the oven every 15 minutes to stir the cereal around to mix the crispy with the soft. After 3 or 4 times of pulling from the oven to mix you will notice that the cereal is roasted enough and golden brown. Pull from oven and let cool for 1-2 hours before packaging up. Keep fresh in mason jars or ziplock bags. This cereal makes around 12 cups of cereal. I fill up 3 mason jars and keep them ready for use. Kinda different than stored cereal boxes....:) But still very homemade and very yummy!

Serve cereal in your favorite bowl of milk. Or of course make it a bit more special with adding it to a bowl of fruit, yogurt or ice cream. I love a hearty crunchy cereal blend and this just hits the spot. It's easy to over-eat it, so make sure if you want to keep it around one serving that you measuring out 1 cup's worth for each serving/meal. It also will last longer in the pantry if you try and measure it out as well.
What is your favorite ways to eat cereal or granola? And what are some of your favorite blends? I am really loving the addition of puffed millet in place of adding nuts. Some people love granola and cereal but can't do nuts....so this one is for us that prefer to add the seeds and grains rather than the nuts. I also love dried cherries, blueberries and cranberries, but there is something about the simple raisin that I absolutley love as well. It reminds me of my childhood and eating lots of raisins, but also of a nice bowl of raisin bran that I used to consume quite often in high school and college.
Storing the cereal in mason jars on the counter is also a nice little adding touch of decor to your counter or pantry. It's so pretty and tasty looking. So add a little love to your life and make some simple homemade cereal. You really can't go wrong with this gluten-free treat. Lots of goodness to go around!

Much love and life to you today!

Stephanie

Thursday, February 16, 2012

Spinach Quinoa Socca Cakes (vegan)

I had a AH-HA recipe-epiphany the other day while driving in my mom-van. I was thinking about dinner and thinking about making something with what I had readily available in my kitchen. Something quick and something toddler-friendly. Something that would be fulfilling by itself and of course have lots of great nutritional value. I do not know why it took me so long to put these super simple ingredients together: garbanzo bean flour, quinoa and spinach. These 3 wonderful ingredients are the base to these cakes and apparently are what I have floating around in my brain while out and about.
I make socca bread from garbanzo bean flour quite often for my son. (Favorite socca bread recipe- yet I do not soak for 8 hours and keep it less crispy so it is easier for my son to eat). It is a great finger food for babes and toddlers full of fiber, protein and lots of good vitamins. Along with garbanzo bean flour, I always seem to have quinoa either already made in the fridge or ready to quickly make in the pantry. So why not add these simple staples together, add a fresh handful of spinach and viola- a hearty healthy dinner recipe made in minutes. Plus, very friendly for the gluten-free budget and can be easily warmed up for leftover lunches and dinners.
Spinach Quinoa Socca Cakes Recipe (vegan)
1 1/2 cups of cooked quinoa (or 1 cup dry quinoa and 2 cups water cooked on stovetop accordingly)
1 cup of garbanzo bean flour (I use Bob Red Mill's)
1 cup of pure water
2 ts. of extra virgin olive oil
1/2 cup of shredded fresh carrots
2 cups of finely chopped and shredded fresh spinach
1/2 - 1 ts. of sea salt
1/2 ts. of garlic powder
1/2 ts. of paprika
1/2 ts. of ground cumin
1/2 ts. of dried rosemary
1-2 TB of fresh cut parsley (or 2 ts. of dried Italian seasoning herb blend)
optional addition: nutritional yeast

1 TB of sauteing oil: grapeseed oil, ghee or coconut oil

In a mixing bowl, mix together all of the above ingredients. Let sit for a few minutes to let the flour soak up the liquid and everything will mesh together real well. Then prepare a griddle or iron skillet to saute the cakes. Warm 1 TB of oil and have the heat at medium. Then use a 1/3 measuring cup to put the batter in the pan. Use the measuring cup to mold the cakes and then plop in on the pan and use the base of the measuring cup to flatten out the pattie. This seems to be the best way to form the cakes and keep it all together. Saute on each side for 3 minutes. It should be crispy on the outside and cooked in the middle. If you have the heat too high it will crisp up before the middle is cooked and that is fine if it happens, just then you will want to continue to cook the patties in the oven at 350 for another 10-15 minutes. This recipe makes about 8 cakes, so you can put 4 cakes in a pan and cook twice. Within 15 minutes your dinner should be done. Serve with your favorite condiments and a side of salad or veggie. A great finger food, but also could be made into a nice fork and knife dinner as well. 
I really love the flavor of these cakes, but you could add your favorite variety of spices or herbs. Plus, I love how you do not need any eggs or additional flour mixes to make this work and stick together. Garbanzo bean flour is amazing for cooking and has so much protein as well. Love it. This dinner (or lunch) doesn't need more protein or meat and you can make it for less than a dollar. Who said eating less meat or vegan was hard? Really?! It doesn't have to be. And it is amazing how much you will expand your palate and life to try new things.

I hope you have a yummy day planned ahead of you and much love as always!

Tuesday, February 14, 2012

Chocolate Covered Coconut Cookie Dough Bites


Happy Valentine's Day!
Hope you are all well and have plans for a fun day.
May many joys and moments of love fill your day
and much love from me to you! 
I wanted to share a little recipe I made special for this Valentine's Day. 
Inspired by some blog-friends and added a little twist of my own. 
I wanted to make something cute and easy, 
so I decided that a bitty cookie dough bite 
smothered in the 'good stuff' would hit the spot. 


Chocolate Covered Coconut Cookie Dough Bites 
(raw and vegan, nut-free and grain-free)

1/2 cup of natural sunflower seed butter (If you are using a non-natural version with not naturally occurring oils, then you will need to add 2 TB of grapeseed or melted coconut oil to loosen it up)
1-2 TB of pure water or non-dairy milk
10-12 drops of vanilla stevia liquid (I used NuNatural's)
2 TB of coconut palm sugar (or use honey or agave if you prefer)
2 TB of coconut flour
2 TB of shredded coconut flakes
2 TB of chia seed meal
dash of sea salt

Mix all of the above ingredients in a small bowl. Add the stevia to the water or oils of the sunflower seed butter so that is can mix well into the whole batter through the oils. If you just add it to one spot in the dry ingredients it might clump and not mix well. I added 2 TB of coconut palm sugar, but if you do not have stevia you can skip the stevia and add another TB of sugar and a teaspoon of vanilla instead. Mix everything and use your hands to mush well together then you should be able to start forming some cookie dough balls pretty simply. If the batter is dry then add a TB of water to soften it up. After you roll out your balls on a parchment paper you can melt your chocolate. I used Chocolove's Organic Dark Chocolate Bar to cover the dough bites. I melted the chocolate in a bowl over boiling water (or you can microwave it in 30 second increments until it is soft enough to stir into liquid). And then tossed each dough ball in the chocolate with 2 forks to cover the bites fully. Then pull the balls onto a parchment papered pan and then put the cookie bites in the freezer to harden up. After a few hours the chocolate will be stiff and they are ready to enjoy. You can store in the fridge or freezer for best keeping. This recipe will make about 1 dozen cookie bites.

Here are some of the other great recipes that inspired me:

Peanut Butter Chocolate Chip Cookie Bites by Love Veggies and Yoga

Cookie Bites from The Nourishing Home

Cookie Dough Bites by the Spunky Coconut

I wanted to keep my recipe nut-free so I avoided almond flour, peanut butter and other obvious nut ingredients, but I bet some peanut butter would make this recipe super delicious too.


Here are some more really great V-day treat ideas that I love...

Oatmeal Heart Cookies, by Whole Life Nutrition

Raw Chocolate Pie, by Whole Life Nutrition

Chocolate Dipped Sugar Cookies, by Real Sustenance

Raw Chocolate Fudge, by My New Roots

So-In-Love Dark Chocolate Brownies, by Me

Almond Shortbread Valentine Cookies, by Me

Well friends, I hope you have an amazing day with lots of magical bits of love, kisses and beauty.
May you find peace and joy amidst all of life's gifts today!


P.S.
I also wanted to let my readers know of a scholarship special being offered again this year through the school I went to, Institute of Integrative Nutrition. If you have been a follower for some time you probably remember me mentioning this offer last year about this time. Well, IIN is offering the scholarship again this year as well and will be offered through this Thursday, the 16th.

Here is the poem they sent me to share with you.... PLEASE contact me if you are seriously interesting in becoming a Holistic Health Coach- I would love to talk with you more about IIN and what it's like to be a Health Coach. Much love to you today!


Roses are red, violets are blue,
Health Coaches rock, and now, so can you!
Enroll at Integrative Nutrition to launch a new and exciting career,
Learn on the 
iPad 2, and graduate in just 1 year!
You will transform your life, to a new and healthier you,
And then inspire your loved ones to increase their wellness, too!
Before you know it, you’ll be in high demand,
To heal your familyyour community, and your land
If the feeling is right, then the time is now
Because we’ve created a scholarship that will make you say ‘wow!’
To honor the spirit of love this Valentine’s Day,
We are offering a special scholarship, so act right away!
Enroll at Integrative Nutrition 
between February 13th and February 16th
and we’ll give you a $500 scholarship.
If you pay in full at that time, we’ll take an additional $500 off the cost of the program. 
Just email Coach Julia and mention the “Feel the Love” Scholarship and that Stephanie Laidlaw sent you!

Sunday, February 12, 2012

Sunflower Cilantro Lime Slaw

February in Michigan = blah. This time of year I start to crave fresh produce. Maybe it's the garden planning or maybe it's just been way too darn long since eating something really fresh. Like crisp and freshly picked green beans from the plant to my plate. You can just taste the nutrients, flavors and perfection. I'm thankful that we live in a world where I am able to buy produce from the warm places I live not, but yet there is still something missing even from that produce. It may just be because that produce was picked days (or weeks) ago and still not really ripe. Or maybe I am just spoiled. Spoiled on fresh amazingly good food from my local farmers and backyard for most of the year. I guess I'm finding that I am truly grateful for fresh local produce, and I especially feel the thankfulness this time of year when it's lacking.
Either way, I have been craving fresh, crunchy and tasty produce. So I bought some colorful organic cabbage from my grocery store to suffice my dreams of a fresh and crunchy slaw. Cabbage is actually considered a 'winter food'. Maybe because it is such a hearty veggie that is can be grown in cooler weather towards the end of the warmer season. But it just sounded good and fresh to make a sweet and tangy slaw. Something to sink your teeth into and something to linger as we dream of the summer month's and harvest bounty.
I have mentioned before how I love cabbage. I like cabbage soups, wraps, and slaws. What is some of your favorite ways to eat cabbage? It seems to be a noble venture to try and eat more cabbage or at least veggies from the cruciferorus vegetable family. They have been shown to help colon health and prevent toxic cancer cells from forming. They contain many phytonutrients that play a large role in fighting against inflammation in the body. Cabbage is an amazing way to add nutrients to your life and preventative health plan. Here is my latest way to blend a few flavors to make cabbage more desirable and addicting.
Sunflower Cilantro Lime Slaw Recipe
1/2 head of finely chopped or shredded purple cabbage
1/2 head of finely chopped or shredded green cabbage
2-3 large carrots shredded on grater
optional: 2-3 finely chopped scallions or shallots

dressing:
2/3 cup of raw sunflower seeds
2/3 cup packed of washed and chopped fresh cilantro leaves
1/2 ts. of each: ground ginger, turmeric, garlic powder, and ground mustard seed
1/3 cup of grapeseed oil or olive oil
1/3 cup of pure water
1 large lime juiced (about 1/3 cup)
1 TB of apple cider vinegar (add more if you want it more tangy)
1 TB of wheat-free tamari sauce
2 TB of sucanat or other sweetener (honey or sugar)
sea salt and black pepper to taste

optional ingredients: top with a sprinkle of raw sunflower seeds, more cilantro or raisins

Shred your washed cabbage how you prefer: extra thin, chunky or a little of both. Then toss the cabbage together in a large bowl with your shredded carrots and scallions. Then in a high-powered blender or magic bullet put all of the dressing ingredients. Blend on high until everything is liquid and then pour the dressing over the shredded veggies and mix and toss well. Make sure the dressing is evenly spread and let sit in the fridge for a little bit to let the flavors sink in. You can serve right away or let sit, whatever works or you prefer. It will keep in the fridge fresh for a few days and is enjoyable with most any meal.


Serve with a topping of more raw sunflower seeds or add some more sweetness with a toss of raisins. Plus you can make it look pretty for serving with a fresh sprig of cilantro if you want. This slaw would work perfect for any BBQ, sandwich, wrap, burger or on the side of a hearty stew or winter meal. 

I hope you are finding ways to enjoy something colorful and fresh this week. And...I haven't forgotten that the day of love is this week. I hope to post a simple yummy v-day recipe tomorrow :)

Much love as always!

Stephanie

Thursday, February 9, 2012

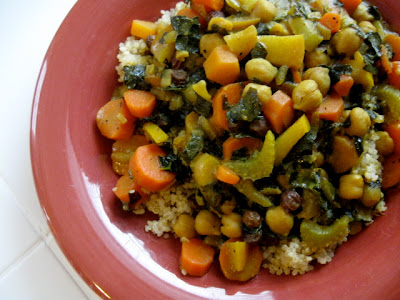
Carrot-Apple-Kale Chickpea Curry

Twas the night before grocery shopping day, and all that could be found in the fridge was an apple, a pound of carrots and some wrinkling kale. What to do? Well, yes, calling the husband about ordering  some Thai take-out definitely crossed my mind. But, I was determined to make it to pay-day and it doesn't hurt to empty the fridge to do a little cleaning either. So what could I make?
Well, what would you do with some fresh carrots, an apple and some leftover kale? Would you try and make a soup or stew or what? I decided that a curry was a fresh and warm combo that could be made with my simple ingredients. Along with some staple, on-hand ingredients like homemade stock, raisins, canned chickpeas and quinoa I was able to whip up a fabulous, budget friendly dinner in no time at all. Another bonus: my toddler loved it! He loves to pick out all the pieces and ate two servings without a fuss. And when you find a healthy meal that is kid-friendly... you quietly rejoice to have another great dish to serve your family of three.
Carrot-Apple-Kale Chickpea Curry Dish
1-2 TB of olive oil or other cooking oil
1 large yellow onion finely chopped
3-4 garlic cloves, minced
optional: 2-3 stalks of chopped celery
1 inch of freshly grated ginger
1-15 ounce can of organic chickpeas (garbanzo beans)
2 TB of curry powder
2 TB of garbanzo bean flour (tapioca or rice flours could sub here)
1 pound of pealed and chopped carrots
1 large apple chopped
4 cups (1 quart) of stock (I used my homemade chicken bone broth)
splash-1/2 cup of non-dairy milk (I used So Delicious Coconut Milk)
2 cups of finely chopped kale (or other favorite green leafy veggie)
optional: handful of fresh cilantro or other fresh herb
1/2 cup of raisins (or other favorite dried fruit, apricots, dates)

squeeze some fresh lemon or lime to serve
pour curry over a bed of freshly cooked quinoa or brown rice

In a large pot, saute the chopped onion, garlic, ginger in the oil. Let saute for a few minutes and then add the washed chickpeas, curry powder and flour and continue to stir continually over medium heat. Then after a few minutes of cooking those flavors together add your chopped carrots and apples, stock and milk. Then let cook and bring to a boil and reduce the heat just a bit and add the kale, herbs and raisins. Let cook and reduce the broth until it is a thick and creamy sauce. This cooking process will be over low to medium heat for anywhere from 30-45 minutes. The carrots and apples will be extra soft and the curry-broth will have reduced by half. Cover and keep warm until serving. Serve over a bed of freshly cooked quinoa or rice and top with some fresh herbs or a splash of fresh lime or lemon juice if you desire. This recipe will easily serve between 4-6 people. Also, it can be easily doubled to make for a crowd.
It is thick, creamy, hearty and fresh all in one. It is a simple meal if you are like me and have many of these staples on hand. I love using the homemade broth in this meal because it only adds to the nutrients and vitamins my family is consuming. You can add more or less of the veggies if you prefer, and that goes for the chickpeas as well. I just used what I had and made do what with I didn't. The above measurements worked out perfect for my dish and it was a very yummy winter comfort-foods-kind of meal. And the combo of the sweet and savory really melts your heart (well stomach I guess). Maybe this would be a good dish to make for your valentine... a little sweet and a little spicy... :)
Plus, if you have leftovers- it works as a perfect warm up lunch or leftover dinner. You won't be missing any meat with the chickpea, veggie and quinoa combo. Lots of protein nutrients and flavor. If you haven't made a curry dish before and you must try this dish because it is so simple and delicious. Really, just as good as take-out, and not too much clean-up with an almost one-pot meal.

Hope you are having a fabulous week- Much love to you!

Tuesday, February 7, 2012

Blueberry Banana Buckwheat Babycakes

Well, that is quite a mouthful...blueberry...banana...buckwheat- babycakes...try saying that 3 times fast. Ah! Well, the name for these sweet muffins fits the bill because they are amazingly filled with blueberry and banana sweetness with the perfect blend of fresh buckwheat and whole grains. And why not call these sweet little muffins 'babycakes'? That's really just what they are, a sweet little 'baby' cake. Not too big and not too much, just a sweet touch of goodness.
I made these for my toddler. Okay, who am I kidding?  I made these for my toddler... and myself. So sweet and cute in every way, and the muffins are pretty good too. I made these on a whim the other day when me and my son were looking for some fun in the kitchen. I forget how much I love to make a yummy blueberry muffin with lots of texture and flavor. These just hit the spot. Perfect muffin. After having another, I declared to my family my newest favorite muffin recipe.
This recipe contains all whole grains and less sugar than the average cake. You could easily have these muffins pass as cupcakes with a little frosting, hm maybe a lemon frosting or glaze? Or next time I think I will try and make this recipe in a sweet bunt cake pan or coffeecake tin. They are so moist, sweet and hearty- such a great healthy combo.
I used some freshly ground buckwheat flour that I ground myself from buckwheat groats. I used my magic bullet, but you could use any high-powered blender or if you have a Vita-mix- then you are truly blessed. I blend the groats at about 1 cup at a time to get about 1 1/4 cups of flour. It may seem like I am making it more difficult than it needs to be, but trust me it is very simple. And, nothing beats fresh ground flour in baked goods. Especially gluten-free baked goods.
Blueberry Banana Buckwheat Babycakes Recipe
1 1/4 cup of freshly ground buckwheat flour (1 cup of buckwheat groats ground in grinder/blender)
3/4 cup of whole grain sweet sorghum flour
1/2 cup of organic millet flour
3/4 cup of sucanat or coconut palm sugar
3 TB of chia seed meal
2 ts. of baking powder
1 ts. of baking soda
1/2 ts. of sea salt
1/2 ts. of each ground: cinnamon, nutmeg and ginger

1/3 cup of baking oil: grapeseed, light olive oil, or liquid coconut oil
3 ripe mushed bananas (1 cup of banana puree)
20-25 drops of pure vanilla liquid steiva (I used NuNatural's)
*buttermilk mixture*
1 cup of non-dairy milk (I used So Delicious Coconut Milk) -mixed with 2 TB of fresh lemon juice
1 heaping cup of frozen blueberries

optional: zest of 1 lemon

First, to make the buttermilk mixture pour 1 cup of non-dairy milk (I love using So Delicious' coconut milk beverage) in a small bowl, pour 2 TB of fresh lemon juice over the milk and let sit by itself for 5-10 minutes until cultured. Then, in a large mixing bowl, blend all of the dry ingredients together well. Then add the oil, bananas and stevia. Then add the buttermilk mixture and mix well together. The batter should be not too wet, and have some texture. Then fold in the frozen blueberries- and be careful not to mix too much to let the berries bleed all over the batter. Then scoop the batter with a 1/3 cup measuring cup into either greased or papered muffin tins. This recipe will make 12 muffins. 


Bake in a preheated 350 degree oven for 20-25 minutes. Until they are golden brown and baked through. Check with a toothpick to make sure. Let cool 10-15 minutes before moving from the tins. 
Some notes:
-You can omit the stevia and add another 1/2-3/4 cup of more sugar if you desire. I prefer to keep as little sugar as possible, so I enjoy the use and flavor of the stevia. If you do omit the vanilla stevia, then I suggest adding a teaspoon of pure vanilla extract as well.

-You could fresh blueberries if you want. Or add a different berry if you prefer- this recipe is perfect for the addition of a berry because it is so hearty and filling.

-This recipe is easily made vegan with the addition of the chia seeds and coconut milk, but if you want to add eggs you can add 2 eggs and omit 1/2 cup of milk and half of the chia seed meal. That will allow you to add eggs without having too much liquid in the batter.

-You could try making this recipe with 2 1/2 cups of your favorite GF flour blend, but I really recommend trying to make it with fresh buckwheat flour and a whole grain combo like I created. Lots of nutrition and whole grain goodness without making a dry and crumbly muffin. If you need a sub for either the sorghum or millet flour, then brown rice flour will work well.
I was going to say that this recipe would be best if enjoyed within a few days of baking, but then I thought about how you probably won't have any left laying around. But, if for some reason you do... :) Then you can freeze these muffins as well. Great for an easy pull from the freezer breakfast on the go. I would also recommend this recipe as an easy GF whole grain muffin mix for any beginner gluten-free bakers out there. It really is great being gluten-free with these babycakes.

Hope you have a great day!

Much love, as always,

Stephanie