Monday, February 27, 2017

Ginger Carrot Muffins with Raisins

It's been awhile since I posted a muffin recipe. So here's my latest- still on the theme of raisins and roots that have been getting me through the cold winter weeks and months. I would not even really be aware of this until I look back on my recipe posts and creations over the past few months and they  come back to ginger....roots...and raisins... and now look here's a muffin recipe that involves them all ;) The more you eat with the seasons the more you notice what your body loves and needs through the differing seasons.  
These muffins are kinda like a little carrot cakes- but without the frosting and the feeling of eating a slice of cake- but still with all of the moist gingery goodness to feel satisfied and a little bit of comfort with the warmth and spice. I seem to talk a lot about being comforted by food- and you might take this as an unhealthy connection- but I like to see it as a relationship of love. Yes you can have a love relationship with food that does not involve over-eating and obsession. This conversation about loving food can take over your life- but, you can also see it as only a varying piece of love in your life and still live fully into that love when you do enjoy food. It is so easy to feel anger, hate, fear, shame and guilt towards food when you are on a restricted diet and had a loss in your food life. And this loss can take away all enjoyment from when you do create and eat food- and this is a loss- a deep loss that takes away the truth the food is a gift for our lives. Yes, a necessity too. But also a true and honest gift that is offering to us something to be enjoyed and loved. Even in its simplest forms of fresh plants...or rice and beans...or looking outside our windows to what the great wide world of food has to give to us. So yes, food is something to be enjoyed- it might take a bit of working through the guilt, shame, fear and whatever emotions do come when it comes to food and eating- but that journey  and hard work is worth it when you come to the other side of seeing it as enjoyment and a gift.

This is my hope for you- that your healing can bring you to a place of enjoyment and love for food rather than fear and hate. And that's what keep me posting these recipes...much love, as always, xoxo
Ginger Carrot Muffins with Raisins Recipe
{gluten, dairy, egg, soy, nut and seed free}

1 1/2 cup of certified gluten free oat flour*
*(I grind rolled oats in a high powered blender to make flour)
1/2 cup of rice flour
1/3 cup of tapioca starch
1 TB of potato starch
1 TB of coconut flour
1/2 cup of coconut palm sugar
2 ts. of baking powder
1 ts. of baking soda
1 ts. of sea salt
2 ts. of ground ginger
1 ts. of ground cardamom

1/2 cup of date puree--This involves pouring 1/2 cup boiling water over 1/2 cup of pitted dates and letting it sit for 5 minutes and then blending in a high powered blender to whip up a creamy date-pudding like substance

1/4 cup of applesauce
1/4 cup of maple syrup or blackstrap molasses
2/3 cup of non-dairy milk (I used So Delicious Coconut Milk Beverage)
----mixed with 2 TB's of apple cider vinegar
1 organic orange zest (2 TB) and juiced (1/3 cup of juice)

1 1/4 cup of fresh grated carrots
1/3- 1/2 cup of organic raisins

Mix all the dry ingredients together in a large mixing bowl. Then add in the date puree and the rest of the wet ingredients. Whisk together well and lastly fold in the shredded carrots and raisins. Pour into 12 muffin tins and bake in a 350 degree oven for 25-28 minutes until browned tops and stiff to touch. Let cool 10-15 minutes before serving. Store in a cool dry place to last longer.
...some steamy carrot moist goodness. The carrots help hold moisture and texture into these sweet muffins. So perfect right from the oven too, but they also are a great muffin to make before a trip or to keep for days because they stay so moist and fresh for days.

Don't let a Monday get you down- start new, start fresh and hopefully that involves some nourishing, grounding food that keeps you strong and going! Much love as always... ENJOY xoxo

Tuesday, February 21, 2017

Sweet and Salty Caramel Date Candy Bars

I better post this recipe before the chance escapes me. I have been making this 'candy bar' combo in pie form for a few years, but this time around I decided to make them into bars in a 9x13 pan and I loved it even more. Something about the flavors and the shape. It kind feels like you really just did serve up a real candy bar, but with the best possible ingredients of course! It is the best kind of sweet and salty combo--- with delectable dates as 'the caramel', a little bit of course sea salt and...creamy chocolate- it meets all those tastes you could ever wish for in a little dessert. Perhaps thats why candy bars were invented originally ;)
These are super simple to make and super simple to serve up and not to mention get better as time passes from making them. My kind of treat! I love to share goodies and this one is now at the top of my list! You must try this combo- it truly is a surprising and desirable treat! Totally addicting....
Sweet and Salty Caramel Date Candy Bar Recipe
{gluten, dairy, nut, seed, and soy-free, vegan}

Crust:
3/4 cup of oat flour
1/2 cup of tapioca flour
2/3 cup of coconut flakes
pinch of sea salt (1/2 ts.)
1/4 cup of coconut sugar
2 TB of maple syrup
1/2 cup of softened organic coconut oil

Mix the above ingredients well together and press into a parchment covered 9x13 pan. Press in evenly and then bake in a 350 degree oven for 15 minutes. Then let it cool before adding the next 2 layers.

Date Cream:
2 cups of date puree
1/3 cup of canned coconut cream
pinch of sea salt

First, date puree can be made by pouring boiling water (about 1 cup or more to cover the dates) over 2 cups of pitted dates and letting them soak for 15 minute or even overnight. Then blend the dates when soft to make a creamy pudding like cream. After its made you can use in your required recipe or store in an airtight container in the fridge to add to recipes or dishes in place of sweetener.  But for this recipe.....Put the above ingredients in a small saucepan and warm but don't boil. I used a full-fat canned coconut milk, chilled so that the coconut cream is separate from water and use half of the can's cream in the date mixture and save the rest for the following chocolate topping....

Warm enough for the coconut cream to melt into the date paste and whisk together to get a creamy pudding like mixture. Then pour over and spread evenly over the cooled crust. 

Chocolate Topping:
1 heaping cup of dairy-free chocolate chips
1/3 cup of canned coconut cream
additional: course seas salt for last sprinkle on top

Then in a small glass bowl, melt the chocolate chips and leftover coconut cream over a boiling water pan to get a creamy chocolate ganache. When smooth and creamy and only warmed not too hot- pour over the date mixture evenly and spread as smooth as possible- being careful not to overly spread or mix the layers. Then put in the fridge in a safe, even location for 1 hour. Then you can sprinkle the course sea salt on it so that it will not melt into the warmed chocolate. Then you continue to refrigerate for 4-6 hours and then pull from the fridge, pull out the parchment from the pan and use a knife to put your bars. You can cut small or large. I can get 24 or 16 bar with ease. Keep bars refrigerated for best shelf-life. 

additional options:
This totally satisfies the "candy bar" craving without cuts or seeds...but if for some reason you want to add some of that real flavor in you can add a little nut or seed butter to the date cream.... or you can sprinkle some crushed nuts (peanuts or almonds over the date cream before you spread out the chocolate topping. 

I hope you have fun, experiment and find new ways to make new treats in the kitchen. Changing your outlook on your time and efforts in the kitchen is not easy if you are down and sad about loosing your favorite treats. But I must tell you that it is worth the effort- in time you will be able to find more joy in your relationship with food because you are no longer afraid, guilty or in actual physical pain. This does not happen over night- like any relationship- it takes time to cultivate this relationship and space to explore food without fear and loss.

Hope you are well and sending much love to you, xoxo

Friday, February 17, 2017

Vegan Creamy Tomato Bisque

Tomato goodness! This is the kind of soup that you can truly savor sip by sip and be mindful of the textures and flavors. I was craving a thick...and creamy... tomato bisque and wanted to try something with adding white beans and cauliflower to make it creamy instead of the thick cream. To my surprise, I loved it and it was actually a quick cooking time meal as well. But shhh.... don't get my kids there is 'beans' in this soup. They are so well hidden no one would ever know ;)
This soup is made with mostly pantry items and a few fresh ingredients so hopefully can be made more on a whim when you are feeling the craving for a good, satisfying soup. I did that a few days ago with this one and have been enjoying 'living on a whim' of tomato bisque ever since. I love being surprised again and again by a few ingredients that make something so wonderful and nourishing. Simple in the kitchen always brings be so much joy! And now I can share the love and joy with you too...
I have memories of canned tomato soup with grilled cheese sandwiches. A great American classic combo. But I think I mostly remember a cafe I used to frequent in college that made a weekly tomato bisque that got me through the days of coffee-shop studying when I would 'forget' to eat for hours. So I think this kind of soup brings up the kinds of love and emotion that makes me feel cared for and nourished. Another great thing I love to share :)
Vegan Creamy Tomato Bisque Recipe
{gluten, dairy, nut, seed, egg-free, and vegan}

1/2 cup of chopped sweet onions
1/2 cup of chopped celery
1 heaping cup of chopped raw cauliflower
1 TB of grated fresh garlic (or 1 ts of dried powder) 
3 TB of avocado or olive oil
1/2 cup of a mix of fresh chopped Italian herbs (oregano, thyme, basil, marjoram, rosemary)
 (or you can use 1/2-1TB of dried Italian herb blend)
28 ounces of organic fire roasted canned crushed tomatoes (I used Muir Glen)
15 ounces of cooked canned navy or white beans
2 cups of vegetable or chicken broth
1 cup of non-dairy-milk beverage (I used coconut milk beverage)
2 TB of coconut palm sugar
1/2-1 ts of sprinkled sea salt
squeeze of fresh lemon

In a medium pot, saute the chopped onion, celery, cauliflower and garlic in 3 TB of avocado or olive oil. Saute until soft and then pour in the canned crushed tomatoes, broth, and the rest of the ingredients. Let it all come to a boil and cook for 15 or so minutes on medium heat. Then you can carefully pour all the ingredients in a high powered blender- OR use an immersion blender right in the same pot, which is what I used... to blend up all of the contents of the soup. Everything should be cooked so soft that it will easily blend and cream up. It will become a thick and creamy soup that is ready to serve.

Serve with homemade bread or crackers, or even if you desire grilled cheese sandwiches or a alternative sandwich. Serve with a sprinkle of fresh basil or thyme to make it fresh and fancy. 
I hope you are finding way to make living the gluten-free or more allergy-free life easier. It is recipes like this that keep me inspired to keep it simple and enjoy the small things in the kitchen that create  so much love and nourishment. Don't give up on the journey. Keep going!

Much love as always, xoxo

Wednesday, February 15, 2017

Gluten-Egg-Dairy and Nut-Free Homemade Chicken Tenders

Years and years ago when I started this food blog I put up a favorite recipe at the time for making homemade chicken tenders. I made this dish all the time back then to add to salads, pasta, and leftover lunches. But since then I have needed to find a way to make them without corn or almonds because of allergies. So---I have been making this version of chicken tenders for the past few years and realized I never shared it with you. How selfish of me! So here it is.
I love making food that my people love. And my people love 'chicken nuggets' and 'chicken tenders' and so that is what I make for them. I love it that you can make these tenders without any added allergens of eggs, nuts, dairy and you still get the crispy crust over the chicken. Who would have thought?! And you think kids love 'from the freezer section' chicken nuggets- well the real deal it that more wonderful! I makes me feel like I did something great in the kitchen that day... homemade goodness that didn't really take much more than a few simple steps. {side note: if you are feeding your kids freezer section GF nuggets- NO JUDGEMENT to you- you are a fabulous mom and doing the best you can for each today--- I GET IT!- I also use freezer section goods for my kids and so much love to you!!!}
I truly like to keep things pretty simple in the kitchen. Yes, I do love to experiment with new flavors, spices and world foods...but when it comes to getting my kids to eat something more than just applesauce and potatoes.... I gotta  keep trying to find ways to get a balanced source of proteins and nutrients into their little bodies. This is a recipe I find myself making once a week or every few weeks. The tenders keep great in the fridge after baking for a few days to warm up and eat for lunches or dinners. It is just a great addition to salads, sandwiches and whatever you might want to add chicken too. I hope you give this creation a try if you haven't made this up yourself already :)
Gluten-Free, Dairy-Free, Egg-Free, and Nut-Free Chicken Tender/Nuggets Recipe

Chicken soak mix:
3/4-1 cup of dairy-free milk (So Delicious Unsweetened Coconut Milk Beverage is my first choice)
1/4 cup of apple cider vinegar (or sub fresh lemon juice)
2 pounds of organic or free range antibiotic free chicken tenders

Dry mix:
1 cup of white rice flour
2/3 cup of tapioca flour
1/2 TB of each: garlic powder, Italian herb season blend, smoked paprika, sea salt
plus a pinch or two of black pepper

9x13 pan glass pan with 3-4 TB of avocado oil or a mix of olive and avocado oils

In a medium bowl, dump in your raw chicken and then cover with the milk and vinegar. If you want to have more of a nugget sized chicken piece then use a kitchen scissors and cut each tender into 3-4 pieces and you will have a more bite-sized nugget. Let sit for 5 minutes and stir- you will see how the mixture turned into a buttermilk type mixture and is soaking into the chicken. Then in another medium bowl, pour in your dry mixture and stir together. Then set up stations of the chicken mix, dry mix and your oiled pan. 
 
Use your hands and grab the raw chicken, dunk in the flour mix and then shake off and place each tender in the pan. Fill up your pan, it might be snug and it doesn't have to be perfect. Then bake in a 375-400 degree oven for 25-30 minutes or until they are golden brown to your liking. Let the sizzling chicken rest in the pan for at least 15 minutes before serving. This will allow the crust to stick better and oils to soak into the juices of the finished product. 
Then you can assemble your salad bar. I usually have a bed of greens, cucumber, carrots, peppers, tomatoes, herbs or green onions, and whatever other veggie is in-season as a favorite salad topping. Then I also like to add some warm rice or quinoa for added texture or warmth. In these pictures I had a black rice veggies dish that I re-warmed and sprinkled over the salad. I also like to add roasted sweet potatoes or other roots as toppings as well. If you are crouton lover- this will totally do the trick to get rid of the crusty chunks to add in some crispy roasted roots! 
So pile up greens, chopped veggies, warmed GF whole grain, warmed roasted roots, a few chicken tenders and a killer house dressing and you've got yourself a meal that will share with you for days to come. I love whipping up a simple house honey mustard salad dressing to dip tenders into or drizzle over your salad. Here is the estimated amounts to make that yourself...

Honey Mustard Homemade Salad Dressing
1/3 cup of pure raw honey
1/4 cup of mustard (any variety works)
1/4 cup of apple cider vinegar (or lemon juice)
1/4 cup of olive oil
pinch of sea salt
pinch of black pepper
pinch of dried thyme

Whisk quickly by hand all the above ingredients together in small bowl, or put all the ingredients in a Ball jar and shake up until it is emulsified together well. 
My kids love organic ketchup and the honey mustard dressing for dipping as well. This is a meal I can get the whole family to eat and is great throughout the summer months to just pull from the fridge or pack for a picnic. But it is also a great winter meal to remind yourself of what a fresh and warm salad tastes like. About this time of winter I start to crave greens and any veggie with a little crunch. This means spring must be coming... at least thats what I tell myself or my body is trying to tell me. 

I hope you are finding ways to keep things simple in the kitchen and ways to love on yourself and family with food choices. You deserve it!

Much love as always! xoxo
Sunday, February 12, 2017

Valentine Heart Shortbread Cookies

Trying to get festive over here... making some valentine's treats and goodies for the kids while we decorate the house in hearts and make little notes for school friends and loved ones. Once February rolls around,  I am sooooooo ready to add some pink and red hearts to our home to add some color and 'LOVE'. It is usually pretty grey and blah outside this time of year so it helps to feel warm and cozy and full of so much love on the inside. I guess I am a lover for Valentine's Day then... I know it can be a touchy day of love or hate or something in-between. But seriously- why not embrace all of the love, chocolate and flowers you can... sometimes my hubs gets mad at me because I occasionally even buy them for myself ;) I do.... no shame or guilt!
I made this shortbread recipe just out of the flours I had a lot of in the pantry, and they turned out pretty wonderful. But you could also use one of the below Shortbread/Cut Out Cookies Recipes if you have those flours on hand as well.


Or maybe you are looking some something a little more chocolaty and indulgent :) I get it. I do. Here are a few more chocolate goodies I made in the past for valentine's treats... and HERE is my archive of CHOCOLATE recipes.... 


Gluten-Free Vegan Cut Out Shortbread Cookie Recipe
{nut-free, seed-free, gluten-free, vegan}

1 cup of coconut flour
1 cup of sprouted brown rice flour
1 cup of millet flour
1 cup of tapioca flour
1 ts. of baking soda
1 ts. of baking powder
1 ts. of sea salt
1/2 cup of unsweetened applesauce
1/2 cup of avocado oil
1/2 cup of maple syrup
1/2 cup of softened coconut oil

In a large mixing bowl, mix together your dry ingredients first...then add the applesauce, maple syrup, and oils. Mix well with a fork or to be honest, your hands and fingers do the job best. Knead the lump of cookie dough in your hands for a few minutes until you get a perfectly mixed ball of cookie dough. If your dough is a touch sticky, then sprinkle some more tapioca flour to stiffen it right up.

Roll out the ball of dough on a parchment paper. Try and keep the thickness around 1/2 inch and roll out as evenly as possible. Then start cutting with heart cut out or whatever cutouts you prefer. Put the cookies in a preheated 350 degree oven for 12-14 minutes. I like my cookies a bit crispier, so I stay around 14 minutes baking time. This recipe should make about 2 dozen cookies but really depends on the size of your cutters and how big and small you want your cookies to be.

The icing I used was just a mixture of palm oil shortening(1/3 cup), maple syrup (1/4 cup), organic powdered sugar (1/4 cup), and a pinch of sea salt and plant based food dye. I used red for these hearts and it came out a nice pink ;) I whisk with a hand blender and pour into an icing bag and then you can write, trace or do whatever you like. You can also just spread on with a knife. I also have just melted Enjoy Life chocolate chips before and just drizzled melted chocolate over the cookies and let them cool too. So do whatever sounds good!

Well I hope you find some time to make a few treats in the kitchen so that you do not have to feel like your diet is so limited that you cannot have a little fun and enjoyment too. You deserve it!

And now I leave you with...

Love and kindness does not equal weakness...and LOVE starts within and for yourself...

"...stop acting so small...you are the universe in ecstatic motion...your task is not to seek for love, but merely to seek and find all the barriers within yourself that you have built against it."
---wise words from Rumi---

So dear one, find the love and care you ache for within yourself. How are you to give and receive love if you are not showing it to yourself ?!

Much LOVE to YOU, as always xoxo

Thursday, February 9, 2017

Parsnip and Sweet Potato Fries

Here in the dreary cold city of Grand Rapids, Michigan, we have a winter farmer's market and if you are fervently looking for some persistent hope and metaphorical sunshine this is the place to visit. As I was in search of such last Saturday, I ventured out to grab some hope and goodies. Which included some of these beauties.
Roots. Parsnips and sweet potatoes to be precise. Root vegetables are grown under the earth and are ready to eat in the late fall and can also be stored throughout the winter months. They "ground and root" us and offer pure love and nourishment to the whole body. The flighty feeling of being blown around by the cold billowing winds whatever which way they might take you can be calmed and soothed by such root vegetables. So you may be tempted to find comfort with caffeine or fake sugar, but go to the roots instead. They bring a sense of warmth and depth...and shed light on the deeper connection to what your body needs.
Sometimes going inward and digging deep is the only way to bring a sense of clarity and truth. The uncovering of one's roots of truth is what one might need to feel one's own strength and power. If you are feeling cold and exposed to wind this season, I encourage you to find some grounding respite and hope in roots.
This recipe is not really rocket science. It can be made in a variety of ways. You can add in some other roots like carrots and beets if you desire. Or if you have some potato loving kiddos in the house that think every meal should consist of white potatoes this might be a fun way to switch out some of those for some other colorful root fries (I speak from a place of love and experience as I have one of theose in my house ;) Roots are a simple way to bring vitamins, nourishment and so much warmth and comfort in the kitchen this time of year.
Parsnip and Sweet Potato Fries Recipe
{gluten, dairy, soy, egg, seed, nut and sugar-free}

6 parsnips
2 large sweet potatoes
1 large bunch of fresh thyme
1 large sprig of fresh rosemary

3-4 TB of avocado oil
1 ts. (or more/less depending on your tastes) of course sea salt

Clean, peel and cut parsnips and sweet potatoes into 3-4 inch stick pieces. Not more than an inch thick for best results. Spread out roots on a parchment covered 11x15 baking sheet. Drizzle with 3-4 TB of avocado oil and use your hands to rub the oil into the roots and spread out evenly over the baking sheet. Then finely chop the fresh rosemary and thyme and sprinkle evenly, along with a generous sprinkle of course sea salt. Use a sea salt that still contains rich minerals and nutrients to get the most out of the salt. Our bodies need salt and if we choose ones that are from the sea with rich minerals our body will thank us for the gift.

Bake in a preheated 375-400 degree oven for 25-30 minutes. Just depends on how crispy and brown you want the fries. When crispy to your liking- pull from oven and let cool for a few minutes before serving. Serve as a side or maybe just make them the main dish too :) 

Sometimes I whip up an easy dipping sauce mixture of organic ketchup and organic mayonnaise for serving. We usually have the vegan-no-egg version on hand but there is some other great avocado oil based mayos out there that can also add some more great fats to your life. 

Another great way to enjoy these fries is over a leafy greens salad with quinoa and kale. Or maybe even add in a protein of meat, fish or beans. Such a great balancing mixture of flavors and nutrients. I have such a deep love for roots, it's hard not to want to add them to every meal.

If you are feeling a bit tossed around by the winds, I hope you find respite in some roots. 

Much love and light, xoxo

Monday, February 6, 2017

Good Ol' Chicken Noodle Soup for the Soul

I felt it coming on last week. A sniffle...which led to a stuffed nose... which led to a slight headache... and I knew exactly what I was dealing with. I started drinking fresh grated ginger tea and some elderberry syrup and decided it was the perfect day to make a pot of soup to remedy the situation (and the soul, really!) Why does it do the soul good anyways? Why does it make one feel so warm and comforted? I'm not sure if I know the perfect answer to that, but there is something about 'chicken noodle soup' that presses all the right buttons when your feeling under the weather...
Well, I guess you can 'google' reasons of how the nutrient-dense and well-balanced chicken-noodle-soup triggers an anti-inflammatory immune system migration of the cells in the mucus membranes that need the immune response. Or something like that ;) So there is actual research and science backing it up. Which I just think is so amazing and hilarious at the same time because there is also the part beyond the research that the soup just is that.... a warm, comfort medicine for the soul and body when one's feeling low and grey. I don't know if I actually need the research here, and maybe it is just nostalgia for nourishing food while sick, but I would say that there is something the body does indeed love about the combination of the broth, herbs, chicken, veggies and noodles. It's just nourishing...magic.
My secrets to a good pot of chicken noodle soup include:

-Big chunks of carrots and chicken. I like a 'meaty' chunk of carrot and a hearty bite of chicken. Ones that you can easily scoop out of the broth so you can get a perfect bite. I even shop at the market and grocery store for carrots imagining how they would look in soup. No itty bitty chunks here. Good big-full-mouthful chunks, baby.

-Fresh herbs! This seems like it might not matter. But I am telling you- it really does! I use not so traditional herbs for chicken noodle soup too because I love them so much. I chop fresh sage, fresh rosemary, fresh thyme, fresh parsley and fresh leeks. I really think it makes it better. I also grate in fresh juicy tumeric, ginger and garlic. These add so much color and flavor as well. The kind of juicy flavor you sometimes miss in dried spices and herbs. Obviously, if I don't have fresh in the kitchen while I am stirring up a pot, I improvise with what I got and it's usually a mix of whatever herbs I can find in the fridge, freezer or pantry. But I know- if I really want to do it well. Fresh herbs just make it.

-Bone broth. Here is where you can pack nutrient dense collagen and proteins to help the immune system jump back faster after it has been challenged. And the flavor...it is where it's at when it comes to equal flavors of chicken and salt and depth of deliciousness. I make my own usually whenever I have extra meat bones and leftover veggies and greens. So I have a few jars stashed away in the fridge and freezer. I have also found that organic Costco chicken stock is a super great easy alternative if you don't have bone broth.

Stephanie's Chicken Noodle Soup Recipe
{gluten, dairy, nut, seed, egg, sugar and soy-free}

1 large onion finely chopped
1 cup of celery finely chopped, about 6 stalks
1 bunch of green onion or leeks, finely chopped
2 inches of fresh turmeric, finely grated, about 1 heaping TB
1 inch of fresh ginger, finely grated, almost a TB's worth
6 large garlic cloves finely grated, about 2 TB's worth of garlic
2-3 TB of avocado or olive oil
sprinkle of sea salt and black pepper (1/2 ts. of each)

In an 5-6 quart pot, saute the above ingredients to get your soup base cooking. Saute until everything starts cooking down and getting soft and coming together. Then add the...

2 cups of chopped carrots, about 6 large carrots
8 cups of broth (bone, veggie, chicken)
possible additional water if you want the soup a little more soupy or brothy

After you add the carrots, let them cook into the saute mix, then after a few minutes... add the broth. This is usually when you need to wait a little bit for the broth to cook with the carrots and get the heat back up to a boil temp. Keep cooking and you may need to turn down the heat if it starts boiling too crazy...and thats when you can add in the fresh herbs and greens. Pour them all in and keep stirring. Let sit and simmer for another 30 or so minutes after that...

fresh sage, 1-2 TB finely chopped
fresh rosemary, 1-2 TB finely chopped
fresh thyme, 1-2 TB finely chopped
1/2 cup of finely chopped fresh parsley
1/2 cup of finely chopped lacinato kale

While the soup is cooking ands simmering you can bake the thawed out or fresh chicken in the oven and then cut up into big chunks to then pour into the simmering soup not long after you add the greens....

2 pounds of chicken tenders/breasts pre-baked in salt/pepper and olive oil and a little broth then chopped in chunks to pour into soup

Add a sprinkle more of sea salt and black pepper here. Not too much- just a pinch really.

Then lastly you can either add your noodles 2 ways: 
You can  pre-cook your noodles and only add them in when you serve ups bowl to avoid them getting mushy in the soup over time. Or if you do not mind your noodles being cooked in the soup you can add about 8 ounces of your favorite GF pasta to the soup right after the chicken was added and all the carrots are soft. You could even turn off the heat here because the noodles will just soften in the boiling broth and be fully cooked within 10-15 minutes. I use usually a spiral or tube brown rice noodle... but have also used macaroni or spaghetti or whatever noodle I have on hand... 

You can see from my pictures (take on day 2 ;) that  the noodle have broken up a bit. I don't mind the broken thick noodles too much, but if you do... I would suggest just keeping them separate and adding them in whenever you serve up the steamy hot soup...

After all the parts come together, give a good stir to the pot and get ready to serve. I serve with a good hearty slice of my bread... or rolls....and a large soup spoon to do some slurping on ;)

I hope you are not under the weather and wishing someone would make you some soup- I hope that you maybe give this soup a try without the sickies connected to it. But if some some reason you feel that sniffle coming on- I hope you have enough strength to make a big pot of chicken noodle soup to get you through it.

Much love and light to you, xoxo

Saturday, February 4, 2017

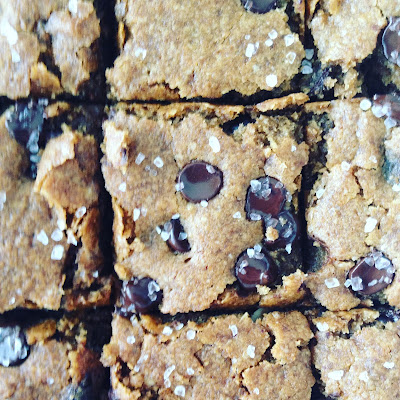
Chocolate Chip Date Cookie Bars

A little dark chocolate, a little course sea salt, and all the sweet and salty goodness one could ask for in a little dessert. These cookie bars have been experimented on more than a few times now and I am finally posting the best recipe version I came up with. Just in time for Super Bowl Sunday tomorrow, of course ;) 

 
The delectable dates offer once again some moisture, some texture and most of all a rich caramel-like flavor that stays with you. And a little square is all you might need to satisfy that after dinner craving for a little sweet and salty. Some say you don't need dessert while trying to live a healthy life. Obviously I beg to differ with the need to have balance and a healthy relationship with such good ingredients like dark chocolate and dates. You can have an opinion of your own of course ;) But I would maybe wait until you give this one a try...haha :)
This recipe is super easy too. Just whip up the batter and then pour in your parchment 9x13, bake, wait and enjoy. I am almost sure you could roll out eat cookie from the dough as well, but when you can spread it out and cut into each chewy bite like this, I would say make it easy on yourself, friend... Seriously. Why take on any extra stress these days, amiright?!? I hope you give it a whirl and ENJOY!
Chocolate Chip Date Cookie Bars Recipe
{gluten, dairy, egg, soy, nut, and seed free}

3/4 cup of rice or millet flour
3/4 cup of GF certified oat or buckwheat flour (I grind my own out of whole groats)
1/2 cup of tapioca flour
1/3 cup of potato starch flour
2 TB of coconut flour
3/4 cup of coconut palm sugar
1 ts. of baking powder
1 ts. of baking soda
1 ts. of sea salt
1/4 cup of maple syrup
1/2 cup of coconut oil (or sub avocado oil here or half of each)
1/2 cup of date puree (or sub 1/4 cup for applesauce)
1/2-3/4 cup of dairy-free chocolate chips

Mix all the dry ingredients together first in a large mixing bowl, then add in the oil and blend it well and then mix in the wet date paste and syrup and it becomes a carmel-ly color and that is when you can fold in the chocolate chips. I usually add 1/2 cup chips to the batter and sprinkle a few more on top after it is spread out in the pan. You can cut and place a piece of parchment in a 9x13 pan and then pour in the batter and spread even. It is like a brownie/blondie batter and use a spatula to evenly smooth through the pan. Bake in a 350 degree oven for 25  minutes and then sprinkle very course sea salt on top for a finishing touch. If you are not a fan of that flavor with dark chocolate then I would omit. Let cool for 3-4 hours before you cut into! This is very important to avoid crumbling and a messy finish. I know it will be hard to do this (yep, I cheated here ;) But it will bring out a better final product to serve in the end. 

I love how easy these are to mix up and serve. You can lift out the parchment after fully cooled and use a chef knife and cut into even squares. I get 24 bars out of the pan usually. 

Serve and ENJOY!

Lots of love and light to you....xoxo