Showing posts with label ice cream. Show all posts

Wednesday, August 23, 2017

Peach Cardamon Coconut Ice Cream

Welllllll...Peaches have made their way into one of my vegan ice cream experiments. Have you ever tried peaches with cardamon? It's gotta be one of my most favorite ways to spice up fresh peaches and once you try it...it's hard going back to plain ol' peaches. Such a cool and spicy way to enjoy this summer treat.
See those little spicy flecks of cardamon?!? and those chunks of fresh peaches?! Such a fantastic match! This ice cream creation was my favorite of the summer thus far. It was just the perfect treat on a warm summer night, watching the glow of the sun set, and the warm giggles of the kids and love of friends. I know it's just ice cream- but when were talking about cardamon and peaches too- well that's what sets this one apart from the rest :)
I didn't let this set long enough before taking pictures so you can see how the scoops were a bit runny or messy, but that doesn't change a thing! It is so creamy, refreshing, sweet and tangy and spicy in all the right ways. Maybe the reason I love this so much is because it touches on all the taste buds and satisfies all the flavors your looking for in an after dinner treat. I love sharing my experiements and treats and this one I am so excited for you to share-in and try- totally worth the time and GO get yourself some damn peaches! Happy last days of summer...and ENJOY all the bits!
Peach Cardamon Coconut Ice Cream Recipe
{gluten, dairy, egg, soy, nut, and seed-free}

2 cans of coconut cream (14 ounce cans, just scrap out the cream and discard/reuse water)
1 TB of tapioca starch
2 TB of coconut palm sugar
2 cups of fresh peaches
1 lemon squeezed and zested
1/3 cup of maple syrup
1 1/2 ts. of ground fresh cardamon
pinch of sea salt
pinch of cinnamon, ginger, nutmeg, cloves or 1 ts. of pumpkin pie spice

PLUS an extra 1-2 cups of diced fresh peaches, stewed with a drizzle of maple syrup and lemon juice for a few minutes on the stove and then cooled and mixed into the batter when being poured into the ice cream maker.

In a saucepan, put the coconut milk cream on low heat and let it get soft and liquid. Then sprinkle in the tapioca flour and put in the rest of the ingredients. Let everything get warmed and the tapioca thickened and then dump it all into a high powered blender and blend until frothy. Then pour into a cool down bowl and fold in the extra diced peaches and cover with wrap or lid and let cool down. 

When room temp or cooled down, add to a ice cream maker and let it do it's job for 20 minutes or so and then spread into a container to sit in the freezer for 1 hour or more. Then you can pull out and use a regular ice cream scoop to serve up perfectly. Serve up and share with all your people!
If you have not invested in the Cuisinart Ice Cream Maker- then you might want to in time for this summer. I got this as a birthday gift last year and have enjoyed using it. The instructions before you make the ice cream is to deep freeze the mixture container. It must be super cold! Then once you do that you can hook up the container and follow the instructions- which for this ice cream includes just pouring in the mixture while it has already started spinning. This will take anywhere from 20-30 minutes to thicken up the ice cream. It is like soft serve and ready to top or eat, but if you want a more scoop-able ice cream then let the machine run for the allotted time and then pour into a container and put in the freezer and within 60 minutes it will be a perfect scoop!

Much love and light to you, xoxo

Sunday, August 13, 2017

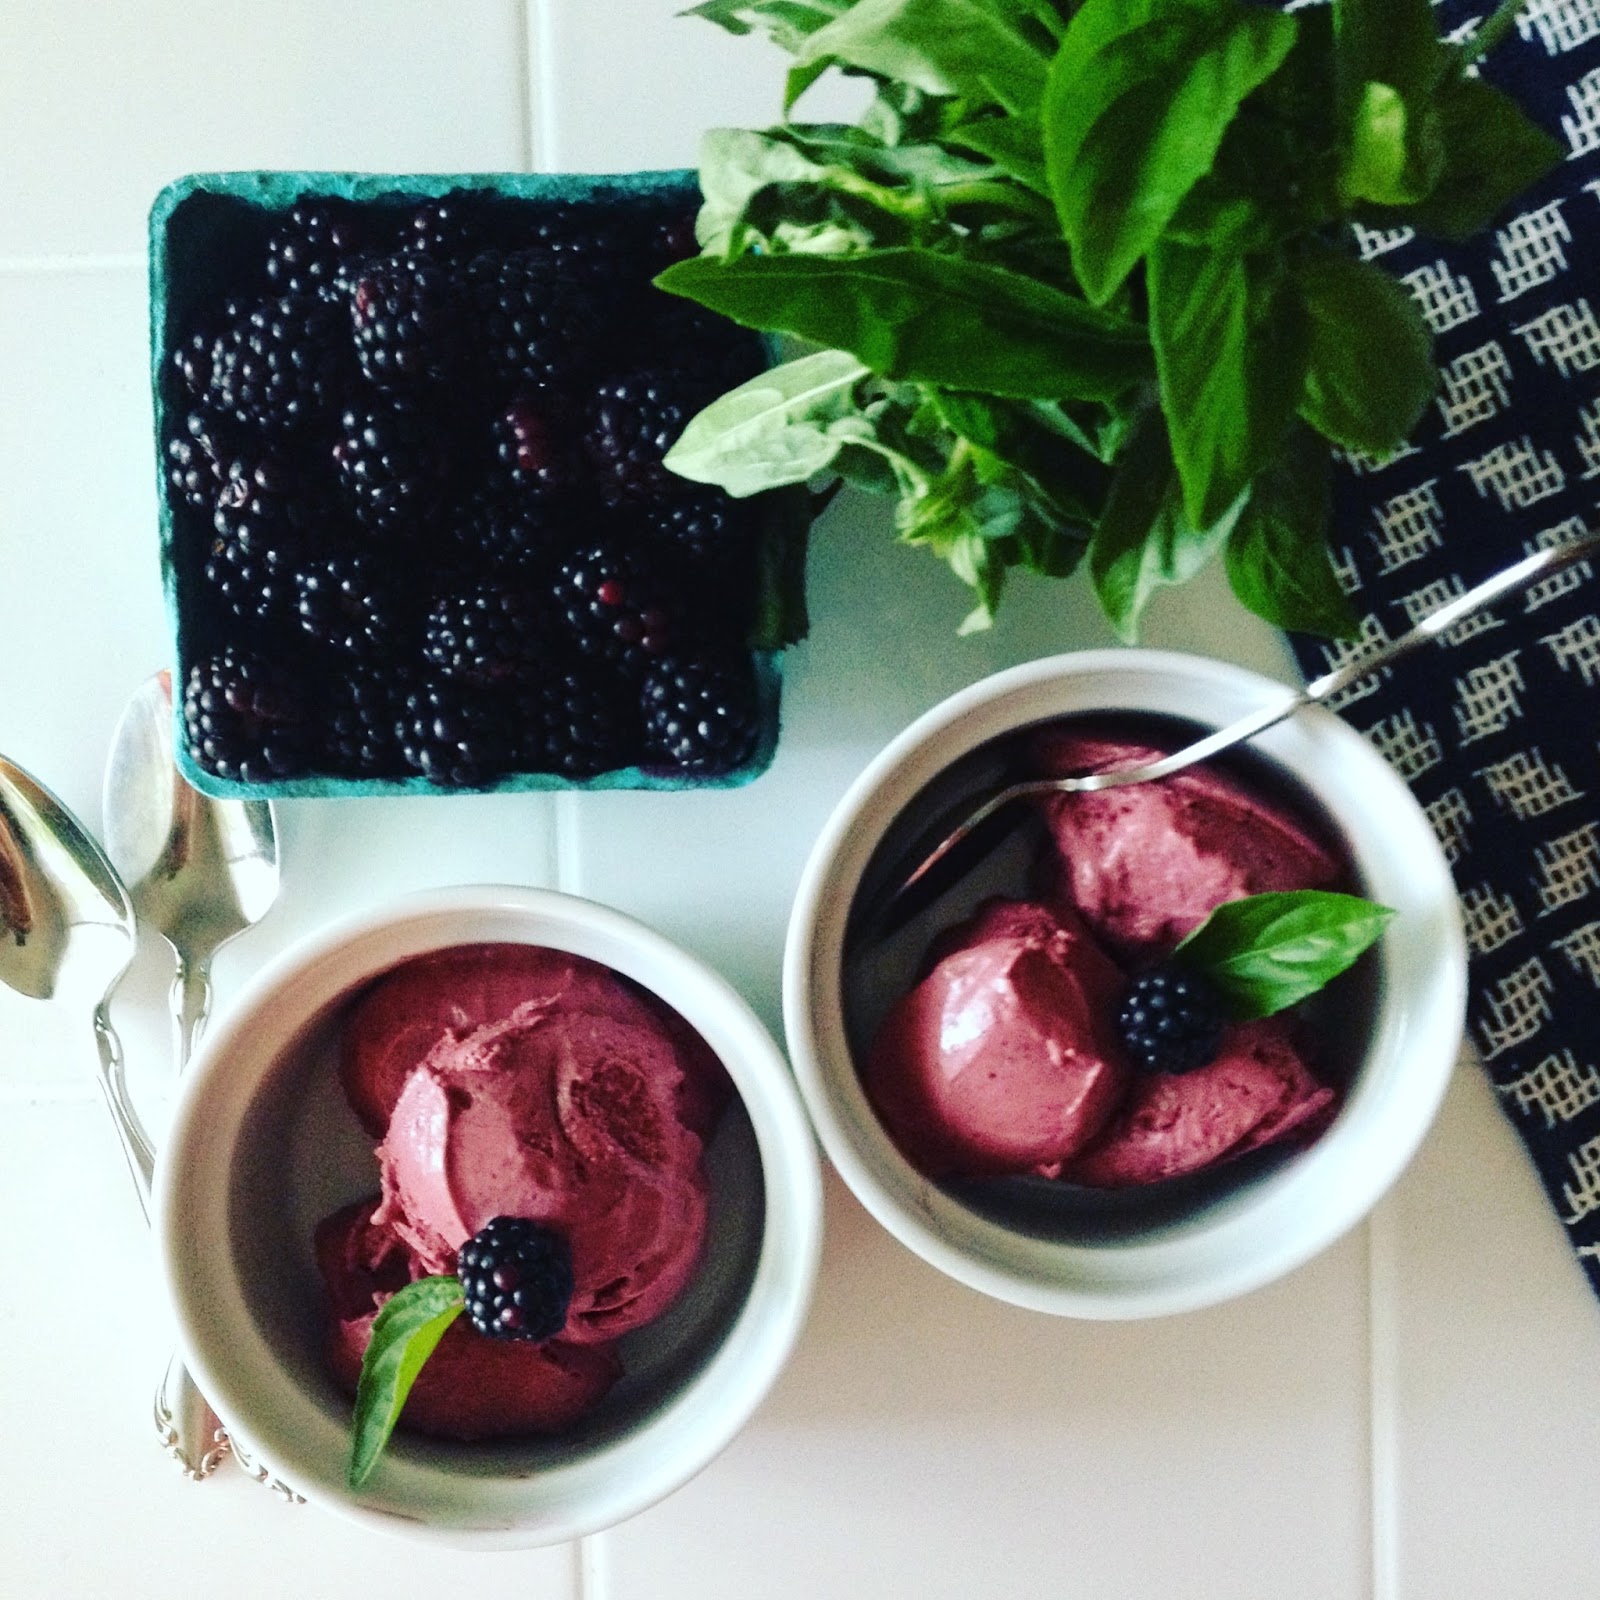
Blackberry Basil Coconut Ice Cream

Yessss, it's another vegan ice cream experiment!  Over the weekend, I was inspired by the plump gorgeous blackberries at the farmer's market and the strong aroma of fresh basil. My husband has been loving basil this season almost as much as me :) so it's also motivating to use it in just about every dish ;) 
Yes even in ice cream. Somehow that flavor of basil, almost liquorice-like, that adds just the right match to the sweet-tart of berries. I have added it to berry crisps before but to the coconut cream ice cream it is just about the perfect subtle touch. I didn't even add the leaves into the blend... just let them soak and simmer into the coconut milk before it's blended. Sooooo good!!! Be inspired by fresh colorful amazing food and let yourself be nourished and ENJOY!
Blackberry Basil Coconut Ice Cream Recipe
{gluten, dairy, egg, soy, nut, and seed-free}

2 cans of coconut cream (14 ounce cans, just scrap out the cream and discard/reuse water)
1 TB of tapioca starch
1 lemon squeezed
1/2 cup of maple syrup
1/4 cup of coconut palm sugar
pinch of sea salt
1 handful of fresh basil tied with twine

1 pint of fresh blackberries

In a saucepan, put the coconut milk cream on low heat and let it get soft and liquid. Then sprinkle in the tapioca flour and put in the rest of the ingredients. Keep the basil in the twine because it is just soaking in the cream and not being blended in. In a seperate saucepan, cook and mash blackberries until soft and juicy. Then pour over a micro-sieve and use all of the flesh and juices but omit the blackberries seeds to have a creamier ice cream finish. If you liek the texture of seeds then just add the berries right into the milk mixture. 

Take out the basil and cool down the coconut milk mixture and then add to the high powered blender with the berry mix and blend on high until creamy and smooth. Then pour into a container to cool down more if it is still warm, and if you need to refrigerate for a while that's fine. When room temp or cooled down, add to a ice cream maker and let it do it's job for 20 minutes or so and then spread into a container to sit in the freezer for 1 hour or more. Then you can pull out and use a regular ice cream scoop to serve up perfectly. Serve with fresh fruit or with or however you like ice cream best!


If you have not invested in the Cuisinart Ice Cream Maker- then you might want to in time for this summer. I got this as a birthday gift last year and have enjoyed using it. The instructions before you make the ice cream is to deep freeze the mixture container. It must be super cold! Then once you do that you can hook up the container and follow the instructions- which for this ice cream includes just pouring in the mixture while it has already started spinning. This will take anywhere from 20-30 minutes to thicken up the ice cream. It is like soft serve and ready to top or eat, but if you want a more scoop-able ice cream then let the machine run for the allotted time and then pour into a container and put in the freezer and within 30 minutes it will be a perfect scoop!

ENJOY and much love as always xoxo

Saturday, July 15, 2017

Cherry Chocolate Chunk Coconut Ice Cream

Remember all those cherries I picked a few weeks ago- well they are showing up once again with their partner in crime....chocolate. This time in a cool melty treat, but now that I htink about it, could be a nice topping to my latest brownies too ;) 
Cherries are such a treat by themselves. You can make them a meal and dessert just by washing them off and making them the centerpiece to the kitchen table. But this creation was just a fun treat we had this last week. My kids and I decided that we can never have too much cherry ice cream. It's been our dessert of choice lately and I'm not sad about it one bit!
One bite at a time. You don't need much to feel satisfied with such a delacacy. A little bit goes a LONG way and once you start making your own dairy-free ice cream- it's hard to go back and it's easy to imagine and want to create a 100 new combinations.  
This is a pretty standard combo and since we have all those fresh cherries to use up this was a no brainer. I would usea bit more maple syrup that my vanilla version since it helps sweeten the cherries just the right amount. I also think if almonds or amaretto don't bother you that they would be an ammazing addition as well. Here's my simple combo and hope you give it a try xo

Cherry Chocolate Chip Ice Cream Recipe
{gluten, dairy, soy, egg, nut, seed, and refined sugar-free, VEGAN}

2 cans of full fat coconut milk cream - should amount to 2 cups of cream
(scoop out the cream and save/discard the water in the can)
1/2 vanilla bean pod scraped
1/2 lemon squeezed (1 large TB of juice)
1/3 cup of pure maple syrup or a mixture of honey/maple syrup if you are not vegan
hearty pinch of sea salt
1 TB of tapioca starch (this ingredient helps the ice cream to be so much easier to scoop from the freezer and even I think allows it to be creamier and melt just the right way instead of it being too hard or icy- you can omit it too, but from my experiments I like it better added!)

1 1/2 cup of finely chopped cherries (fresh or frozen)

1/2 cup of dark chcolate chunks or use mini chips by ENJOY LIFE

In a small saucepan, warm up the coconut cream with the rest of the ingredients, make sure to whisk in the tapioca starch well and as the milk warms under the flame it will slowly thicken the cream. DO NOT warm too much to a boil. Just warm enough for the starch to thicken and turn off the heat and let it cool off. 

Then use an immersion or regular blender and blend the mixture to get a bit frothy and bubbly. 

You can stir cherries into already mixed cream mixture or blend together with cream when you blend it all together. I usually add in half of the cherries before blending and then have half of the mixture just stirred in last. 

Pour into a container and let full cool off in the fridge for 2 hours- overnight, or in the freezer for 30 minutes. After the cream has cooled down a bit you can add the chocolate chunks or chips right before you process together in the ice cream maker. 

Then if you have not invested in the Cuisinart Ice Cream Maker- then you might want to in time for this summer. I got this as a birthday gift last year and have enjoyed using it. The instructions before you make the ice cream is to deep freeze the mixture container. It must be super cold! Then once you do that you can hook up the container and follow the instructions- which for this ice cream includes just pouring in the mixture while it has already started spinning. This will take anywhere from 20-30 minutes to thicken up the ice cream. It is like soft serve and ready to top or eat, but if you want a more scoop-able ice cream then let the machine run for the allotted time and then pour into a container and put in the fridge and within 30 minutes it will be a perfect scoop!

Hope you are enjoying summer for all it's fresh and warm gifts! Much love as always xoxo

Wednesday, June 28, 2017

Vanilla Bean Vegan Coconut Ice Cream

Summer brings about the love and craving for ice cream more than any other season. Not sure if it's just part of our American heritage or the fact something cold and creamy just tastes better while we sweat and soak in the summer sun. 
This recipe is basic. A classic. A plain-Jane-vanilla-bean ice cream kinda recipe. But maybe plain, simple, classic and basic is where it's at! This recipe also serves as a good base for almost any vegan ice cream and then when you want to take away the vanilla and add in more or differing flavors....you got it!  This one is my absolute favorite to top all the summer fruit crisps and crumbles. Or just keep it even easier and top (or mix-in) all the fresh berries you can get your fingers on. 
This handful of berries came from a friends backyard that backs up to a bike trail that has dozens of wild bushes of wild black raspberries growing. My daughter thought this find was the best thing ever- some how it brought out her own independent declaration of not needing me anymore for snacks :) I'm glad she loves to pick berries as much as I do. Hopefully you can hunt down some berry goodness this summer for yourself. For most of us GF or allergy people berries are a great treat just by themselves. Focus on the sweet treat and beautiful food you CAN have and forget about the sweet and sugary foods that hurt and harm you. This simple berry and coconut ice cream treat will have you forgetting any past desserts you can no longer enjoy. If you are looking to make some homemade vegan ice cream I'll share a few of my secrets below... 
Vanilla Bean Coconut Ice Cream Recipe
{gluten, dairy, soy, egg, nut, seed, and refined sugar-free, VEGAN}

2 cans of full fat coconut milk cream - should amount to 2 cups of cream
(scoop out the cream and save/discard the water in the can)
1 vanilla bean pod scraped
1/2 lemon/lime/orange/grapefruit squeezed (1-2 TB's of juice)
2-3 TB of pure maple syrup
hearty pinch of sea salt


optional: 1 TB of tapioca starch (this ingredient helps the ice cream to be so much easier to scoop from the freezer and even I think allows it to be creamier and melt just the right way instead of it being too hard or icy- you can omit it too, but from my experiments I like it better added!)


In a small saucepan, warm up the coconut cream with the rest of the ingredients. DO NOT warm too much to a boil. Just warm enough for the starch to thicken and turn off the heat and let it cool off. Then use an immersion or regular blender and blend the mixture to get a bit frothy and bubbly. Pour into a container and let full cool off in the fridge for 2 hours- overnight, or in the freezer for 30 minutes. 
Then if you have not invested in the Cuisinart Ice Cream Maker- then you might want to in time for this summer. I got this as a birthday gift last year and have enjoyed using it. The instructions before you make the ice cream is to deep freeze the mixture container. It must be super cold! Then once you do that you can hook up the container and follow the instructions- which for this ice cream includes just pouring in the mixture while it has already started spinning. This will take anywhere from 20-30 minutes to thicken up the ice cream. It is like soft serve and ready to top or eat, but if you want a more scoop-able ice cream then let the machine run for the allotted time and then pour into a container and put in the freezer and within 30 minutes it will be a perfect scoop!
Once you got your ice cream steps down- you will be willing to make this more often and enjoy it's creamy presence in your life. This recipe can be easily doubled and this recipe recipe makes about a pint of ice cream. This is a great 4th of July treat paired with fresh fruit, picked cherries or wild black raspberries...Did you notice the red white and blue happening here ;) haha!

I hope you give it a try and truly ENJOY it's wonderfulness :)
Much love as always xoxo

Tuesday, May 30, 2017

Basil Mint Chocolate Chip Ice Cream

Sooooooo, it's been a dream 10 years in the making, but I finally can say I am a proud owner of a Vitamix. It came last week. I opened the giant box, unwrapped each piece and almost had tears in my eyes. Like a kid on Christmas morning. I have waited so long for one of these. I had been saving and it always seemed like I found another reason to spend the money, but the time had finally come.

It feels magical. Like I manifested some kind of magic in the world to make this dream finally come true. Makes me feel like I should start writing down and manifesting other dreams and ideas I feel that are way out of reach at this point. The feeling of waiting for something, dreaming about something, and seeing it through is incredible.

Also, if you were wondering if dreams do come true- sometimes... they really do ;)
So far so good- I have made a handful of smoothie creations, ground up many GF flours, and made some ice cream :) To say the least this Vitamix has found a place in our happy home and I cannot believe it took so long to get her.

Last week I made this ice cream combo because of a fresh basil plant on had on hand and was inspired to try a little basil in my ice cream. I know... it was much more green on the front end but maybe not so much in the pictures. You can add more or less of the basil if you desire a more or less green color and herby flavor. You can also do this recipe in a regular blender or even if you have an immersion blender. I just have been excited to try out some of these ideas in my new Vitamix- so I'm sorry for gushing :)
Basil Mint Chocolate Chip Ice Cream Recipe
gluten, dairy, soy, nut, seed and egg-free, vegan  

2 cans of canned coconut milk, just scoop out the cream and save or discard the water
1/4 ts. of sea salt
squeeze of fresh lime (1 TB)
1/3 cup of maple syrup
2 TB of tapioca flour/starch
1/4- 1/2 ts. of peppermint oil flavoring

Whisk all of the above ingredients in a small sauce pan over a medium heat until it is warmed and blended good. The tapioca will thicken the milk a bit once the mixture starts to heat up. Be careful not to boil, just warm and whisk together and then turn off the heat once the mixture starts to thicken. Then transfer the warm mixture to your high powered blender and add....

1/2 cup of fresh basil leaves
(more or less depending on your preference)

And then blend on high for 1 minute until frothy and then let it cool down completely and then add in the chocolate chips.... you can either just fold them in, or you can also blend for 5 seconds and have the chocolate chips get mixed in a bit. Then immediately transfer the mixture into a well covered container and transfer to the fridge for a few hours or even over night.

1/2-3/4 cup of dairy-free chocolate chips

Then after the mixture has been sitting together for more than a few hours, transfer the mixture to a ready to use ice cream maker. I own the Cuisinart Ice Cream Maker and have to chill the container in my deep freezer for over 24 hours- so you have to think ahead for this version of ice cream making and make sure you have the maker's part freezing and getting ready. After all that prep, just pour the mixture into the maker and within 20-30 minutes you will have perfect ice cream. We ate some right after it was done. But I also pour the rest of the ice cream in a leftover ice cream plastic container to serve more later and it worked amazing- it was ready made, ready to scoop ice cream, ready in the freezer.

If you do not own a ice cream maker- then after blending in the high powered blender, pour into a container that can be covered and pour in and let freeze in the freezer for at least 4 hours- then you can use an ice cream scoop and form ice cream balls from yoru scoop and it is just about as perfect too. 

Best part is that it is vegan and fresh tasting and no fillers and no refined sugars- you can control the sweetness and you could even add a few dates or a banana in place of the maple syrup and before blending :) 
This delicious vegan ice cream is so decadent and fabulous- I may never make another baked dessert ;) OK we all know that is not true- but this one is a special treat- especially as summer rolls around and starting up the oven is a lot more heat and work in the summer- and with this treat- a little goes a LONG way. I hope you give it a try- and ENJOY! 

Much love as always xoxo

Monday, August 29, 2011

Blueberry Pie Ice Cream (vegan)

Can you believe this is the start to the last week of "official" summer? It is just crazy how fast summer flies. I always think we have more time to go to the beach or pick more berries, but then before you know it, summer winds down and it's back to the fall routine. So much to savor about the summer months; long days of sunshine, campfires, and my all time favorite...homemade ice cream and berries. When the long hot days of summer got you sweating and ready for something cool, it's time to make a batch of ice cream.
I think it is pretty obvious how much I love blueberries, and even so cobbler, pies and such, but what about mixing up a blueberry pie into your homemade ice cream? Would is be yummy as one dish? I have tried and proven this answer to be, YES! Just add a touch of cinnamon and some crunchy graham crackers or granola and you have frozen blueberry creamy pie.

The base of this vegan ice cream is frozen bananas and full fat coconut milk. They are a perfect mix to making a soft serve type ice cream, and if you want it to be more solid, then just let it hang out in the freezer for a while and you will have hard serve in no time. It is really so easy to make dairy-free ice cream at home on your own, especially for a group of people. I made a similar ice cream a few years ago about this time of summer. Kinda like the last hurrah before we settle in to more routine. Of course, for me, I am just looking forward to apples, pumpkins and cider...I truly fall in love with each season for what it brings.

Blueberry Pie Ice Cream Recipe (vegan) (serving for 6 people)
6 cups of (or 6 rough chopped) frozen banana pieces
1 can of chilled coconut milk (full fat is best)
splash of fresh lemon juice
1/4-1/3 cup of coconut milk beverage (So Delicious brand is best)
1 ts. of ground cinnamon
dash- 1 ts. of ground nutmeg
1 cup of fresh or frozen blueberries ( I prefer frozen here)

Put all of the above ingredients in a high-powered blender and mix, blitz and do what it takes to get the texture of ice cream. Add the coconut milk beverage (or other non-dairy milk product) slowly to get things moving. You may need to stop and stir a few times to get everything moving through the blades. I like to add the frozen blueberries to this mix because you are making something frozen anyways, but then add the fresh berries to top for a little extra something and for looks. Serve right from the blender for soft serve ice cream, or if you want it to stiffen up a bit, then put in a steel or glass container in the freezer for best results. Let it hang out in the freezer for no more than 2 hours for a hard ice cream, and to keep you can keep freezing, but you may need to set it out to "defrost" a bit before you spoon up some more for another time. This recipe makes a one cup serving for about 6 people.

For serving:
-a few more fresh berries to top and serve, maybe some mint or basil for looks :)

A personal review of the Kinnikinnick graham crackers is that they are a great convenient way to have a GF graham dessert. They are tasty, perfect for this ice cream, would be a fabulous pie crust, and of course to make the beloved campfire favorite s'more. So, they are (in my opinion) a great GF alternative, yet, I would only buy them for special occasions. Not an every day kind of treat. The Kinnikinnick Co was kind enough to send me some samples of their product for tasting and review. And, the other great thing about this product that it is on a 10% discount for the remainder of the week. So if you are interested in trying these out, go to their website and order a box while it's on sale. I was pretty impressed with this product for what it is, and was thankful to try it out in this new ice cream of mine. Pretty perfect match for taste. Thanks, Kinnikinnick for being dedicated to GF people!

This ice cream is a fabulous way to have a decadent dessert without the mention of chocolate. So creamy and fresh. If you haven't made your own vegan dairy-free ice cream before... I am telling you that you must. Get some overly ripe bananas in the freezer for a day and a can of coconut milk getting chilled in the freezer and then you have all you need to get started. If you don't have blueberries, try another berry or fruit and get creative. There are literally hundreds of flavors you can make. You may even want to start your own vegan ice cream shop for your friends. So fun!

I hope you enjoy this last week of official summer and plan to make this delicious treat before summer us up.... perhaps a labor day weekend treat? I think so!

Much love to you today.