Showing posts with label warming foods. Show all posts

Friday, December 9, 2016

Sweet Potato, Kale and Turkey Meatball Soup

This not-so-great picture was snapped on my iPhone a few months ago, it was my last bowl of soup from a magical masterpiece soup I made out of what was leftover in my fridge one day. I snapped a photo as a way to say- "Goodbye...I thought you were amazing! I hope we meet again". I savored and looked forward to every bite. Yes, it was one of the first pots of soup I made in a while since it was newly autumn and I don't tend to make many soups during the hot summer months. So maybe it was just that... "a magical moment of time", loving the fact that "soup season" had returned, OR maybe it was just the perfect amount of leftover ingredients that made this combo so great!

Like I said, it was thrown together with ingredients to empty and clean out the fridge. That is one way to make the grocery budget to last a little longer! I chopped it all up and stirred it all together and I was surprised at it's deliciousness- I savored each bowl for 3 days and then when it was gone....I licked the bowl clean... and cried. So a few weeks later I tried to re-create it, trying to remember exactly what I did and what I added. It just wasn't exactly the same the second time. And I already knew going in...that magic could only happen once in a great while :) BUT it was still pretty fantastic, so I thought it would be worth writing down and sharing with you dear friends. You deserve to give it a whirl too, right?!? Maybe your leftover's soup will give way to a magical moment in time. The take-away is that you should most definitely use up and get creative in the kitchen with your leftovers- you may just never know what could conspire. Happy cooking, friends!
Sweet Potato Kale Turkey Meatball Soup Recipe
1 medium onion finely chopped
1 handful of green onions finely chopped
1-2 TB of grated fresh ginger
1-2 TB of grated fresh tumeric
4-5 garlic cloves finely minced
2-3 cups of bite-sized chopped carrot circles
4-5 cups of bite-sized cubed sweet potatoes
3 TB of finely chopped fresh parsley
3 TB of finely chopped fresh cilantro
2-3 TB of fresh thyme leave
1 TB of dried Italian herb seasoning blend
pinch of (about 1/4 ts.of each) cinnamon, turmeric, ginger, paprika
2 cups of tomato sauce or leftover marinara pasta sauce
3 cups of finely chopped kale
4 cups of vegetable or chicken broth
4 cups of water
juice from 1 lime
spoonful of honey
splash of apple cider vinegar

1 pound organic (or free range) ground turkey
1 pound of free range ground turkey breakfast sausage(seasoned with paprika, garlic, sugar, oregano)

8 ounces of rice pasta noodles (spiral, spaghetti, whatever)


First, chop up your onion and garlic and the rest of the veggies and get them sautéing in a large 8 quart soup pot. Saute until onion and garlic are soft and then add the herbs, kale and keep cooking for a few more minutes and then add in all the liquids. Let cook on medium heat until the sweet potatoes and carrots are soft. While this is cooking together you can...

Mix your thawed ground turkey and sausage together, and add a pinch of sea salt and ground pepper. Then add a sprinkle of Italian seasoning blend and a little ground garlic, ginger and paprika. I add about a 1/2 ts. of each spice and a drizzle of olive oil and mix it all up together and then scoop out 1 TB-sized amounts of meat and roll them into a meatball. Place them on a parchment baking sheet and 2 pounds should make about 24 meatballs. Bake in a 375 degree oven for 20-25 minutes. 

About the time the meatballs are done, they will be ready to add to the soup. Dump those in hot from the oven and add the pasta. Stir in the pasta and let it get soft in the broth from the soup for 10-15 minutes. Then the noodles will be soft and you are ready to serve up. You can top with a fresh herb for serving. I would say parsley or cilantro would taste best. 

I made this soup with turkey meatballs because I had those in the fridge to use up. But you could easily make this soup vegan by taking out the meat and adding in leftover pre-cooked beans (garbanzo or white would be my first choices) or cooked green lentils. It would be easy to dump those in from the cans too if you have those as pantry items. 

A great thing about this soup is the leftovers. The sweet potatoes start to break down and make the soup very creamy and thick. The first day cooking you can still get it to be a little creamy if you start to mush up some of the cooked sweet potatoes. But over time the sweet potatoes just start to melt into the soup by themselves and it makes it extra yummy!

Happy cooking, let those creative juices flow and make a masterpiece soup out of what you got!

Much love, xoxo

Sunday, November 3, 2013

Butternut Squash Mac and Cheese


So for those of you that have noticed....it's been awhile since a recipe. Six months to be exact. And because of lots of friendly nudging and bugging I decided it was about time to get back into posting recipes. A lot has happened sine I last posted. Let's see...I missed the whole summer on the blog. I passed 1,000 likes on my Hope for Healing Facebook Page. (That's just crazy to me!!!) Then, oh yeah, I had a beautiful baby girl and she is just gorgeous and perfect in every way. An angel baby. Yes, a miracle in more ways than one, and has left me enjoying every second of her new born world. I had bit of a traumatic birth and have needed the time to recover and spend no time thinking about recipes and blogging and only about healing and figuring out life as a new mommy again. I won't get into details about my birth story, but I am grateful to be alive. And I'm not being dramatic. 
And I am reminded of the birth of this blog as well...trying to spread a little more HOPE for the HEALING journey towards health and life after going gluten-free (or whatever health and healing journey you are on!) So I decided to pick up my pen and apron again... I may a bit slower to post with two little ones, and there may be less small talk and just recipes, but I'm pretty sure that's what keeps you coming back for more anyways ;)
We have been eating lots of simple meals and old favorites of late. Lots of my go-to meals and trying to get my 3 year old to eat anything fresh. We have been eating lots of fresh foods from our backyard and local farmer's market. There is no food better than the one's from your backyard. Fresh, ripe and perfectly delicious. And now here we are fully into the fall season with gorgeous squash and pumpkin to add to everything. Including a vegan mac and cheese to make it fall-licious!
Here is a simple fall favorite that I have been making at my house for a while now, but haven't posted for some weird reason. And as we have had it a few times already this fall, I thought it would be a good easy recipe to post after such a long leave of absence. And, my favorite comfort food for sure would be mac and cheese. No questions asked. It was my favorite food as a child. My quick answer to the 'favorite food' question and now as an adult it has only morphed into something creamier, more nutritious and with no actual cheese!
Butternut Squash Mac and Cheese Recipe
(gluten, dairy and nut-free)

1 medium yellow sweet onion
3 finely minced cloves of garlic
2-3 TB of olive oil, ghee, or even leftover bacon grease to add extra flavor

2 TB of white rice flour (or tapioca or arrowroot flour work just as well)
2 cups of non-dairy milk (I like to use So Delicious coconut milk beverage here)

1 ts. of sea salt
1/2 ts. of fresh ground black pepper
1 ts. of ground paprika
1/2 ts. of ground tumeric
1 ts. of Italian seasoning blend or just ad a dash of dried rosemary, oregano and basil
1/3 cup of nutritional yeast
optional: 1- 1 1/2 cups of Daiya shreds 'cheddar flavor' cheese

2 cups of butternut squash puree 
(make ahead of time by blending a medium baked butternut squash with a splash of water)
2-3 cups of fresh pure water
1 16 ounce package of elbow rice noodles. I only use Tinkyada brown rice elbow noodles here

Fresh chopped parsley to serve.

In a large pot or dutch oven (10-12 quart), saute the chopped onion and garlic until translucent and soft. Then sprinkle in the flour and make a little bit of a rue substance, then add the milk and wisk fast to blend in the flour and milk with the onions and garlic. You should get a thickened cream-looking sauce. Then add the seasonings, nutritional yeast and dairy-free cheese. Let the sauce come to a boil and then  add in the creamy butternut squash puree, water and dry pasta noodles. You are going to cook the noodles in the sauce. To do this, you need to turn the heat to medium and stir CONSTANTLY to make sure the noodles don't stick and to ensure a creamy mac and cheese. It should take 12-15 minutes until the noodles are cooked and you will notice they start to plump and add thickness to the sauce. It's a marriage of dry and wet and ends in a creamy goodness. I said to add 2-3 cups of water because depending on how thick your butternut squash puree is you may need a little more water or "wet" to get the noodles to soften properly. When the noodles have taken over the sauce. It is finished. Take off the heat completely and let sit for 10-15 minutes to soak together and cool off. Then ready to serve! Serve with a big sprinkle of fresh parsley or other favorite fresh herb blend. 

You can also pour into a 9x13 pan, top with your favorite GF bread crumbs and olive oil, and then save or freeze to bake in the oven for a later date. Serve big boy slices after warmed in the oven for 30 minutes with a sprinkle of fresh parsley.

Happy Fall and Enjoy!

Tuesday, January 15, 2013

Oatmeal Chia Bread

About this time every year, I start dreaming and trying to make lovely loaves of bread to eat with comforting bowls of soup. Or just to have around as a lunch or snack topped with sunflower seed butter and homemade pear butter or whatever fruit and nut you like. It's funny because when I looked back the past 3 years I have posted some form of "protein" bread in January, so I guess my instinct for bread making in January cannot be denied. This bread is no different. It is full of whole grain goodness and protein along with a hefty helping of chia seed meal to make it full of fiber, antioxidants and even more protein.
There is something about making your own bread as a gluten-free lady that makes you feel like you conquered some law of science that said it can't be done. It isn't easy, but it can be done and this one is also done without yeast, eggs, dairy and any kind of gummy addition, which is also a challenge these days. Regardless if you have failed before in the GF bread baking dept. I challenge you to try again and try and make it interesting and not always compare it to the bread from Italy, France or gourmet local bakery. Because we all know that you just can't completely compare, you are using different flours and how could you come up with the same exact result, right?! The goal is to find a bread that makes you feel like you are not settling, one that you really can say you love and that the best part is it is gluten-free.
I do have some days where I just want to stroll along the brickroad street and pick up a hearty loaf of goodness from the local baker. Especially after living over seas in the Middle East and seeing parts of Europe it seems a special simple novelty that should happen on a daily basis. I haven't found a local gluten-free bakery yet here in Grand Rapids that offers that same feel, and have only experienced once or twice in other cities while traveling. So instead of mopping and crying about it, why don't you try and make a loaf yourself. It does take some patience, and possibly some skill, but when you complete it the result is something of a feeling of accomplishment that you can only sense ever so often. Like building something from nothing or finishing a race worth running.
It is worth it. But don't take my word for it, try it out and see what happens. I bet it may not be perfect or what you intended, but just trying it will help you see that it is possible and you may find yourself trying again to perfect a recipe or try new recipes as well. I made this loaf last week to get through another gloomy day here in Michigan. Where is the snow people?! At least  if the grey was covered in white I think I could feel more romantic about winter.
In the meantime, I will be coping with some fresh homemade bread a pot of homemade soup and possible a book late into the evening. I think it is the only way to really feel the rest that winter intends for us. I hope you are finding new hopes this 2013!

Oatmeal Chia Bread Recipe
[gluten-free, vegan, nut-free and yeast and gum free]

2/3 cup of freshly ground buckwheat flour
1/2 cup of organic millet flour
1/2 cup of tapioca flour
1/2 cup of organic brown rice flour
1/2 cup of chia seed meal
1/4 cup of coconut sugar
1 1/2 ts. of baking powder
1/2 ts. of baking soda
1/2 ts. of sea salt
1/3 cup of olive or grapeseed oil
1/4 cup of blackstrap molasses

In a large mixing bowl, blend all of the gluten-free flours together with a whisk and then with the rest of the dry ingredients. You can add the oil and molasses in a pool in the middle of the dry. Then pour in the following mixture after it has sat for 5 minutes.

Separate wet ingredients:
1 cup of gluten-free rolled oats
2/3 cup of coconut milk beverage (I used So Delicious. Or sub other dairy-free milk)
1-2 TB of lemon juice
1 1/4 cup of boiling water

In a small glass bowl, pour the boiling water over the dry oats and then add the milk and lemon as well. Let it sit for 5 minutes or so to get soft and have the milk and lemon culture just a bit. Then add it to the above mixture of ingredients. Mix well and then let the batter sit for 5-10 minutes for the flours and chia to soak up the moisture and become more thick. Then grease a bread pan with coconut oil and a gluten-free flour. Pour the batter into the bread pan and smooth over like a quick bread and then top with some more flour, gluten-free oats or seed of choice.

Bake in a preheated 350 degree oven for 45-50 minutes until the bread crust is hard on top and the middle of the bread is NOT gooey to the toothpick test.

Pull from oven and let cool for 15-20 minutes before sliding from pan and continuing to let cool on a bread or cookie cooling rack. When mostly cool, then you can use a bread knife and slice thin or thick slicing depending on your preference. This bread stays well for 3 days and is great toasted the next day in a toaster oven to warm up and spread some of your favorite toast goodness on top.

Enjoy!

Much love to you and may you find rest and peace today!

Saturday, September 8, 2012

Garden Fresh Lentil Chili

I'll be honest. I'm not a big fan of the month of September. If it wasn't for my husband's birthday landing in this month I would boycott the 30 days all together. But alas, I'm just being childish and need to get my act together. September is here whether I fight it or not!

So here we are. Going into the 2nd week of September and I am trying to be brave and make it through to October. I have been asking myself why I dislike this month for a few years now, and I think I figured out maybe a few reasons this past week. 

One reason being that it is a month of starting back at school, routines, and the "normal" week. I love and savor the summer weeks of no where to be and yet plenty of places to explore. {Yes, I still live within the school-world-schedule because of my husband's job and love a summer holiday.} 

So when September shows her face I am usually willing to ignore it for a few days and then have to except it as real. Yes, September usually is a month of beginnings as well, and that is definitely something to celebrate, so I guess there is good and excitement amidst the flurry. But there is definitely a call for bravery in the discovery in how to live in that tension of the old and the new.
This month also reveals other frustrating visual tensions. Like the tension between hot summer weather and the cooler fall tempts. It has been raining on and off here the past few days and the cool brisk fall air has arrived (for a few days at least!). It seems as if summer is having her last fight and eventually gives into the cool fall breeze making itself known. I am looking forward to the cool tempts. Actually praying and dreaming for them, but the on and off hot switch leaves me a bit crazy. I rather pull of the band-aid with a rip and have us fully into cool and colorful October already!

I guess I'm discovering that I am the kind of person that doesn't do well with tension. For better or worse, this is just the kind of person I am. The healing journey will bring you to many places in the road where you start to learn more and more about yourself. More of what you can handle and more of how you need to push yourself to be something more (or less) depending on the truth you are finding in yourself. You have to be willing to live in the tension of letting go of the old and embracing the new.

This is a part of this gluten-free journey as well. Many of us have bad days with our health, diet or gluten. It's how we are wired. We are sensitive inside and out and this will show us new experiences and we have to learn how to be brave, cope and learn from the old and the new. We have to learn how to live in the tension of our gluten-free being in a gluten-filled world. We have to try and be flexible when we feel the need to live in a rigid world most of the time. Don't let bitterness, pain and frustration keep you stuck in the old. Embrace, explore and strive to discover the new. You might just find that the new can be better than you ever imagined. 

My hope for you is that you find yourself on the healing journey working through the tensions. So that you can live, celebrate and thrive actually living in the tension.  Not wishing for the life before or the life ahead. That you live fully present and live discovering more about yourself in this great amazing world.  
And that is where this lovely vegetable chili becomes a part of my September wailings. It represents the bounty still coming from my garden's womb and also the need to cook a pot of warming and inviting chili for comfort. It is a representation of hope for the fall, and a way to cope with the endings and beginnings of this time of year. 

Also, almost all of the veggies in this chili are from my own backyard and was a great use of the tons of green bell peppers I have in every corner of my kitchen counter. Which is something I needed to embrace and celebrate as well!
Garden Fresh Lentil Chili Recipe
(gluten, dairy, nut, and meat-free {vegan})
2-3 TB of olive or coconut oil for sauteing
1 large sweet yellow onion diced
1 ts. of grated fresh ginger
3-4 large garlic cloves, minced or grated
1 large cup of chopped celery (3 stalks)
1 medium-large chopped zucchini or summer squash
3 large bell peppers (or 6 small sweet peppers)
1 large cup of chopped carrots (3-4 carrots)
6 cups of roasted fresh tomatoes and juices (8-10 medium tomatoes)
2 medium roasted ancho or pablano peppers
4 cups of vegetable stock or broth
4 cups of pure water
2 cups of soaked and rinsed dry green lentils
2 cups of cooked chili bean mix  (black, kidney and pinto) 
or use 1 can of black beans and another can of bean of choice
handful of fresh chopped cilantro (or 1 TB of dried)
2 TB of chili powder
1 TB of ground cumin
1 ts. of ground cinnamon
sea salt and black pepper to taste

First, roast 8-10 medium to large tomatoes and 2 ancho peppers in the oven on 400 degrees or under a broiler for 10-15 minutes until the tomatoes and peppers skins shrink down or are a bit charred. Cool off and remove skins from the tomatoes and put the tomatoes in a blender if you prefer a smoother sauce. Then chop the peppers with or without the seeds to add the the chili. If you like spicier, keep the seeds in. Hold on the side until you are ready to mix together.

In a large 8.5-12 quart pot, saute the onion, garlic, ginger and celery in the oil for 5 minutes or until soft. Then add the peppers, zucchini and carrots and cook for another few minutes until color changes a bit. Then add the tomatoes (puree or roughly chopped) and the anchos. Stir well and then add the rinsed lentils, beans, broth and water. Stir well again and then add the rest of the seasoning ingredients. 

Cook on medium to high heat until a boil, then turn down the heat to a simmer and let cook for 50-60 minutes until the lentils are soft but not too mushy and the sauce is cooked and blended well together. 

Serve warm. Some options to serve up a nice bowl of this chili are over a bed of cooked quinoa or brown rice. Top with chopped avocado and fresh cilantro or herbs. Or if you prefer extras like organic corn chips, vegan sour cream or cheese those go well with this too. My favorites are cold avocado and fresh herbs. Also a fresh squeeze of some lime or lemon juice is always a nice last touch as well!

Some other additional ingredients that I did not have on hand or in my garden would be to add 1 cob of organic sweet corn kernels. Or sub the zucchini for 1-2 cups of small diced pieces of a winter squash like butternut. I will add that next time when I buy some at the market. Otherwise the zucchini or summer squash work perfect too.

I hope you enjoy this hearty bowl of delisiousness and find comfort, peace and hope for the journey today!

Much love as always!

Thursday, February 9, 2012

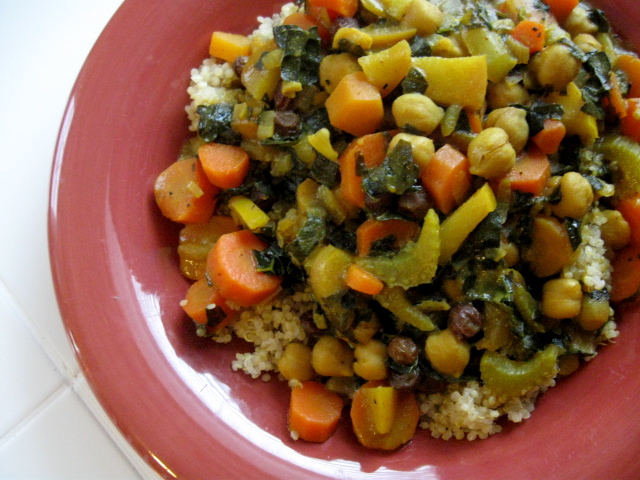
Carrot-Apple-Kale Chickpea Curry

Twas the night before grocery shopping day, and all that could be found in the fridge was an apple, a pound of carrots and some wrinkling kale. What to do? Well, yes, calling the husband about ordering  some Thai take-out definitely crossed my mind. But, I was determined to make it to pay-day and it doesn't hurt to empty the fridge to do a little cleaning either. So what could I make?
Well, what would you do with some fresh carrots, an apple and some leftover kale? Would you try and make a soup or stew or what? I decided that a curry was a fresh and warm combo that could be made with my simple ingredients. Along with some staple, on-hand ingredients like homemade stock, raisins, canned chickpeas and quinoa I was able to whip up a fabulous, budget friendly dinner in no time at all. Another bonus: my toddler loved it! He loves to pick out all the pieces and ate two servings without a fuss. And when you find a healthy meal that is kid-friendly... you quietly rejoice to have another great dish to serve your family of three.
Carrot-Apple-Kale Chickpea Curry Dish
1-2 TB of olive oil or other cooking oil
1 large yellow onion finely chopped
3-4 garlic cloves, minced
optional: 2-3 stalks of chopped celery
1 inch of freshly grated ginger
1-15 ounce can of organic chickpeas (garbanzo beans)
2 TB of curry powder
2 TB of garbanzo bean flour (tapioca or rice flours could sub here)
1 pound of pealed and chopped carrots
1 large apple chopped
4 cups (1 quart) of stock (I used my homemade chicken bone broth)
splash-1/2 cup of non-dairy milk (I used So Delicious Coconut Milk)
2 cups of finely chopped kale (or other favorite green leafy veggie)
optional: handful of fresh cilantro or other fresh herb
1/2 cup of raisins (or other favorite dried fruit, apricots, dates)

squeeze some fresh lemon or lime to serve
pour curry over a bed of freshly cooked quinoa or brown rice

In a large pot, saute the chopped onion, garlic, ginger in the oil. Let saute for a few minutes and then add the washed chickpeas, curry powder and flour and continue to stir continually over medium heat. Then after a few minutes of cooking those flavors together add your chopped carrots and apples, stock and milk. Then let cook and bring to a boil and reduce the heat just a bit and add the kale, herbs and raisins. Let cook and reduce the broth until it is a thick and creamy sauce. This cooking process will be over low to medium heat for anywhere from 30-45 minutes. The carrots and apples will be extra soft and the curry-broth will have reduced by half. Cover and keep warm until serving. Serve over a bed of freshly cooked quinoa or rice and top with some fresh herbs or a splash of fresh lime or lemon juice if you desire. This recipe will easily serve between 4-6 people. Also, it can be easily doubled to make for a crowd.
It is thick, creamy, hearty and fresh all in one. It is a simple meal if you are like me and have many of these staples on hand. I love using the homemade broth in this meal because it only adds to the nutrients and vitamins my family is consuming. You can add more or less of the veggies if you prefer, and that goes for the chickpeas as well. I just used what I had and made do what with I didn't. The above measurements worked out perfect for my dish and it was a very yummy winter comfort-foods-kind of meal. And the combo of the sweet and savory really melts your heart (well stomach I guess). Maybe this would be a good dish to make for your valentine... a little sweet and a little spicy... :)
Plus, if you have leftovers- it works as a perfect warm up lunch or leftover dinner. You won't be missing any meat with the chickpea, veggie and quinoa combo. Lots of protein nutrients and flavor. If you haven't made a curry dish before and you must try this dish because it is so simple and delicious. Really, just as good as take-out, and not too much clean-up with an almost one-pot meal.

Hope you are having a fabulous week- Much love to you!

Monday, January 9, 2012

Creamy Buttercup Squash Risotto

Time for some comfort food. It has been a pretty warm and sunny winter here, and with less than an inch of snow thus far you would think I wouldn't need much hibernating comfort food to get by. Well, I don't think I am suffering from seasonal depression, but some days you just need a little extra warmth from your kitchen and food. I love a warm gooey risotto with lots of flavor and the extra bonus is that this risotto doesn't need any cheese or cream to make it scrumptious. The creamy squash and coconut milk make it absolutely divine. 
Also, if you haven't tried buttercup squash yet, you must try it soon. It is so creamy and sweeter than you think. The butternut squash would be the best substitute if you cannot get your hands on some buttercup, and I think I would try a pumpkin squash next. I still have pounds and pounds of squash in the freezer that I decided to bake, puree and freeze for the winter months. Yes, you could just let your winter squash sit in a cold dark room over the winter months. But, out of convenience I decided to get a head start and just have to defrost the squash to use. So not only is this meal comfort for a weary soul, but it is also a great meal for budget-friendly and convenience purposes. But I didn't tell you that. You won't be thinking about that after your first bite. You will be thinking about a divine second and third bite.
This risotto recipe is also extremely simple to make with just a few ingredients. Then pair this with a side spinach salad or brussels sprouts and you have yourself a nutritious and delicious meal. I also used a whole grain rice instead of a white or enriched version. So this risotto is packed full of whole grain goodness, fiber, lots of vitamins from the squash, and not to mention some healthy fats from the creamy coconut milk. It is satisfying and filling and will not have you looking for more a few hours later. That is a good test to see if your body is getting the nutrients it needs. If you feel hungry a lot and even after a large meal a few hours later then your food may be lacking nutrients and your body may be still "hungry" for more. More nutrients, vitamins and fiber.
So, you can't go wrong with a dish like this. Especially in the middle of winter. No need for extra calories or meat here, just a bowl of some sweet creamy goodness to fill you up. Seriously you won't regret this dish. You will thank me later.
Creamy Buttercup Squash Risotto Recipe (vegan)
1 medium to large sweet or yellow onion, finely chopped
1 TB of finely minced fresh garlic
2-3 TB of olive oil
4 cups of buttercup squash puree (butternut or pumpkin squash could be subs here)
1 can of full fat coconut milk (or use half of the can if you want to lower the calories)
6-7 cups of vegetable broth or homemade stock
2 ts. of wheat-free tamari sauce
cracked black pepper and sea salt to taste (start with 1/2 ts. of each)
2 cups of sweet short-grain brown rice ( I used Lundberg's)
3-4 TB of fresh thyme leaves
2-3 ts. of dried Italian herb blend (or use fresh herbs: oregano, basil, sage, margoram)

In a large pot (8 quart), saute the chopped onion and minced garlic in olive oil. Then when soft add the squash puree, coconut milk, broth, and tamari. It will look like you are making a soup and then you will add the rice and herbs. The amount of herbs you use may vary on your own liking. I like it full of herbs so I go a little bit overboard. Then stir and cover until it comes to a boil. Then turn down the heat and stir every few minutes until the rice is completely cooked and the liquids have been soaked up by the rice. This will take about 45-50 minutes completely. You do not need to constantly stir, but you do need to keep the heat lower and a close eye on it to make sure it doesn't cook too quickly or burn. Then when the rice is cooked through, turn off the heat and let the risotto sit and cool for 10-15 minutes. This remaining time with really thicken it up. Then stir well and serve warm with a sprinkle of fresh herbs, pine nuts. If you like dairy, then a sprinkle of some Parmesan cheese would be fabulous as well. 

This recipe serves 6-8 people.

Now, serve and enjoy. This dish is so simple and yet so decadent. It almost seems like it should be dessert, which is a good thing if you are trying to avoid desserts, sugar or sweet treats. A sweet and savory combo really hits the spot.

Hope you have a warm and cozy Monday.

Much love to you!

Tuesday, September 27, 2011

Butternut Squash Cream Pasta Sauce (vegan)

FYI: I posted this recipe 2 years ago, but I made some changes to the post and thought I better re-post it to make it's comeback special... besides... this recipe is a must with all the butternut squash and fresh herbs you have laying around. You.Must.Make.Now!
Fall is best known by it's smells and flavors. Apple cider brewing, pots of applesauce simmering, and not to mention pumpkins and squash finding room in the baskets and random floor space in my kitchen. It must be fall. Most people I know in Michigan enjoy fall and claim it to be the best season of the year. The leaves are changing and the cool morning air smells of their falling. I do enjoy this season, but it feels like there is not enough time in the day all of a sudden. I am used to the sun setting around 9pm, and now it's just after 7pm. Which doesn't help because there is so much work this time of year to prepare for winter. I am trying to can and store mounds of apples, pears and whatever fresh and ready to be frozen vegetable I can find. Yes, it is a busy time. So busy that I haven't been doing a lot of cooking, just a lot of canning and winterizing.
Except, for squash pasta. It was time. Time to bake some butternut squash and pour it's creamy luscious flavor over some traditional gluten-free spaghetti. How I love this meal! So, this is the beginning of many more days to enjoy the great taste of sweet and hearty squash.
Butternut Squash Pasta Recipe (vegan)
4 cups of pealed, cubed and baked till soft butternut squash (or butternut squash puree works too) This is about 1 large butternut squash or 2 small.
1 can of pure coconut milk- full fat for the most flavor, nutrients and creaminess
2 cups of vegetable broth/stock
1 medium yellow onion
4 garlic cloves minced
2-3 TB of olive oil (or ghee) for sauteing
1/2 cup of fresh diced sage leaves
Fresh finely chopped thyme, parsley and oregano (about a TB of each or more if you like)
(if you must, use dried herbs work fine, just cut the amounts in half)
1 ts. freshly ground black pepper
1 ts. sea salt

***Optional additions: You can add steamed broccoli, green beans, mushrooms, or carrots to this dish. The added greens or veggies smothered with the sauce is also divine!***

First of all, you will need to cut the butternut squash in half and spoon out the inside seeds and guts. Put on a baking sheet and bake on 350 for about 60-90 minutes. Or until it is soft to slice through with a knife. Let it cool and then peal off the skin.

Second, in a large blender or food processor blend 4 cups of baked butternut squash (or butternut puree) with the coconut milk and broth. Blend until smooth and you may have to do this in 2 batches if you have a small blender.

Then in a large soup pot, saute the onion and garlic in the olive oil or ghee for a few minutes. Then add the blended squash and coconut milk mixture with the broth and the rest of the fresh herbs. Cook for about 15-20 minutes until the color of the sauce has taken a bright orange-yellow color (depending on the color of your original squash). You do not have to cook too long, basically just getting it hot enough to eat and letting the herbs blend well.
Then to serve, pour over a bed of your favorite gluten-free pasta (mine of course is Tinkyada) top with some pine nuts or roasted pumpkin seeds, freshly cut herbs, or even diced apple if you really want to add some more fall flavor. It is so great and creamy you will think you will be eating dairy cream, but no... just the delicious flavor of the squash. If you are one of those people that cannot stand veggies, or you can't imagine how squash sauce would even taste good on pasta... I dare you to try it.
It is so good I share it with friends and they always ask...."What is this?!?" and I tell them, and they are surprised because they never knew they could like squash so much.

And because I love squash so much, just look HERE for more squash recipes. I have more than I thought. Chili, quinoa salad, and more. All favorites this time of year!

So enjoy friends and happy eating to you!

Monday, September 26, 2011

Pumpkin Chai Cookies (vegan)

When the weather turns a bit chilly in my neck of the woods, most people head to the closest coffee shop and order a pumpkin pie latte, or chai latte or whatever other concoction they can come up with that will warm you with that fall-nostalgic feeling. You know you are guilty of this too. I mean hello, the main coffee chains aren't stupid, they market on this special feelings this time of year. And even if you live in southern regions closer to the equator, I have heard they also try to bank on this feeling and will make you that pumpkin latte on ice, just to feel like you are apart of that fall spirit without the heat. Oh joy!
Ok, so that's the silly frilly feelings behind the pumpkin chai lattes... but there is some logic to this.

Really, you could convince yourself that you need that chai after I tell you this...:)
The spices in a traditional chai...cinnamon, cardamon, cloves, ginger and possibly even fennel, are the warming spices. The spices that create warmth and a sense of comfort for your weary cold soul. I don't have some research to prove that these spices will warm you up, but I know that for hundreds (probably thousands) of years people have been making brews, teas and stews with these spices to warm their body, soul and spirit. I don't think that you can deny that there is some truth to this old fireside tale. There is warmth in the chai, and you start to naturally crave these spices when the temperature drops and the cool fall air wisps around your chapped face. You need that cup of goodness to sooth the cold nose and drippy sinus. You really could say that there is healing in the chai. These spices are known to calm, relax and enhance the digestive process. And, for this reason alone, you may need to start a pot to make your own chai concotion, or head to your favorite local chai-stop. I have a local place that I go to--you can smell the chai brewing in a big pot before you enter the door. So fabulous. I also have a friend that just posted a nice pumpkin latte, that I think I would like to try myself soon.
In the meantime, I have been dreaming about chai cookies, and with an touch of added pumpkin puree (why not!?) you get a pumpkin chai cookie that will have you wishing for some warm coconut milk or a chai latte for sipping on the side. So good! And, don't forget that these cookies are packed with these perfect warming spices to usher you into fall and a life with more flavor, healing and hope.
Pumpkin Chai Cookie Recipe (vegan)
2 1/4 cup of Bob's Red Mill GF Flour mix (or other GF flour mix of--- 3/4 cup of each brown rice flour, millet flour and tapioca flour---should work just the same)
3 TB of coconut palm sugar
2 ts. of baking powder
1 ts. of ground stevia powder
1/2 ts. of sea salt
2 1/2 ts. of ground cinnamon
1 1/2 ts. of ground cardamon
1 ts. of ground ginger
1 ts. of ground cloves
1/2 ts. of ground fennel
1/4 cup of pumpkin puree
1/4 cup of maple syrup 
1/4 cup of warmed coconut oil
1/4 cup of vegan butter (Earth Balance-soy-free)

Mix all of the dry ingredients first, then add the wet syrup, pumpkin, oil, and butter...mix well and it turns into a wet dough. It should be pliable and easy to mold in the palm of your hand. I rolled out quarter-like balls and smooshed them down on a parchment papered pan. And then poked them with a clean fork to add to the look and decor. You could also roll each ball in a touch more coconut sugar or sucanat for a lasting touch of sweetness and cuteness. I decided to just add a touch with the fork. Bake in a 350 degree oven for 18-20 minutes until golden brown and stiff. These cookies will not spread or rise too much so you can put them pretty close together. This recipe will make about 2 dozen cookies. They will last on the counter for a few days, but get more crumbly in time. Would be good with some pumpkin ice cream, or coconut ice cream, or any cup of hot beverage.

I hope you find ways to warm your chilled bones this week, and enjoy the fall warming flavors of cinnamon, cloves and such....Much love as always!

Cheers to chai!

Monday, March 7, 2011

Millet Morning Glory Muffins (vegan)

It's March and I have had my fair share of oatmeal, rice porridge and hot cereal this winter. All breakfast options that I truly love. A bowl of hot wholemeal goodness is truly what satisfies me in the winter months and sustains me to the lunch hour. But still, a girl sometimes gets bored. So, today I decided I was going to venture out and eat some millet. I just learned yesterday that millet is the only grain that is alkaline compared to the other "acidic" whole grains. So basically this means that if you are looking to lower your acidic food intake and add more balance into your life, millet may be a good choice of grains for you. Variety is always good when it comes to eating grains, especially adding an option of a protein and fiber packed millet.
Millet is actually very easy to make. You basically cook it the same way you would rice. 2 cups of water to 1 cup dried millet. Add a dash of salt or pepper and then you have it. It cooks much quicker than rice, probably about half the time of what it would take rice. It could be used as a cereal in the morning to make porridge, it could be made in salads like you would use quinoa, and then you could add it to a breakfast muffin as I did today...
It has a very earthy taste, but also soft and sometimes crunchy. I bet this would be a good substitute for a couscous recipe or even a bulgur wheat recipe. If you haven't tried millet yet and you are looking to try something a little different then this is a cheap option. I can buy millet at my local market in bulk for about a dollar for 2 cups. That is pretty darn cheap. Millet is packed with a good amount of your essential B vitamins and is also a good source of iron, magnesium and potassium. Eating whole grains is usually cheaper than eating any processed box of sugar cereal, so no excuses! :)
Millet for some reason just had me thinking about morning glory muffins. They are kinda like a bowl of porridge in a muffin and that is exactly what I was looking for. No need to fill up on white flours and sugar- just add some millet and nuts and fruit and you have a nutritious punch of goodness to start the day.
Millet Morning Glory Muffin Recipe
2 cups of cooked millet (see cooking directions below)
1/2 cup of buckwheat flour
1/2 cup of tapioca flour
1/2 cup of brown rice flour
2 TB of flaxmeal
1 cup of shredded coconut
2 ts. of baking soda
1/2 ts. of sea salt
1 ts. of ground cinnamon
1 ts. of ground ginger
1/2 cup of craisins or raisins
1/2 cup of raw walnut pieces
1/2 cup of shredded carrot
1 cup of diced apple pieces
1/3 cup of light olive oil or other baking oil
1/3 cup of agave nectar or maple syrup
1/3 cup of shredded pineapple with juice (or applesauce)
1/3 cup of So Delicious coconut milk beverage (or other non-dairy milk)
1 ts. of pure vanilla


Cook the dry millet separately ahead of time. Cook one cup of dry millet with 2 cups of water. This should produce 2-3 cups of cooked millet. Then add two cups of cooked millet to a large mixing bowl, add the dry ingredients first, and then mix, then add the wet ingredients and mix all together well. You can either save the raisins/craisins to add on top of the muffin before baking, or add into the batter. This batter will start to gel a bit after you mix it, and then use a 1/3 cup to scoop out batter into the muffin tins. Either oil your muffin tins with coconut oil/palm oil, or use paper muffin paper. This recipe should make 12 medium/large muffins. Bake in a preheated 350 degree oven for 30 minutes.
As you can see, these muffins are a hearty muffin with lots of textures. They are not meant to be overly sweet, and if you want to add some sweetener or almond butter for topping that is up to you. I will enjoy mine for breakfast with a cup of tea and a snuggle from my son. I love knowing that eating this healthy hearty muffin will also be giving my son a healthy 'breakfast' in his breastmilk. Still eating healthy for two :)

I hope you have a healthy happy day!

Much love to you!

Stephanie

Saturday, March 5, 2011

Curried Sweet Potato Quinoa Patties (vegan)

Quinoa and sweet potatoes. Hmmm, yumminess in their purest form. These two whole foods are nutrient dense and some of the cheapest health foods you can buy. Because of that, I make them every week, sometimes more than once or twice. And the usual favorite is sweet potato baked fries. They seem to never get old. And then there is quinoa, the super-food-seed. Quinoa makes it's way into our lives as a pilaf, salad or extra side many days of the week. Separately, I can find so many ways to enjoy them. Yet, this little mash-up of ingredients led me to believe they may be best when put together. A perfect union. A sweet and nutty romance. A love that doesn't fade fast, but grows as time passes. True love.

I have been making myself get creative with some of the same ol' good ingredients that I have in my kitchen. It is easy to get into a rut with your favorite foods. And it isn't always easy to find alternatives or move past what you know and love. Yet, wanting to save a few bucks on the grocery bill by making my pantry food last (and not at the expense of good nutrition) forces you to get creative. I think this usually leads me to a fine moment of discovering there is so much more to whole foods than carrots and rice. So my friends, I literally mashed some quinoa and sweet potatoes together to get this little es amble and I promise you the mix of flavor, spices and texture will not disappoint those taste buds of yours.

Curried Sweet Potato Quinoa Patties Recipe
3 cups of sweet potato puree (just boil diced potato until soft, drain and then mash)
2 cups of cooked quinoa (1 cup of dry quinoa with 2 cups of water, cook like rice for 20 min.)
3-4 minced garlic cloves
1/2 cup of finely chopped sweet onion
1/2 cup of millet flour
1 TB of olive oil
1 ts. of sea salt
1 ts. of black pepper
1 TB of paprika
1 TB of ground cumin
2 ts. of curry powder
1 TB of dried cilantro
1 TB of dried oregano

optional ingredients/changes:
-1/2 cup other GF flour (b.rice, almond, corn) to add more stiffness, instead of millet.
***Also, the pattie CAN be made without flour, it is just a bit gooey- and you have to let it cool to have it be more manageable.
-1 cup of cooked/washed black beans
fresh herbs instead of dried.

Mix all of the ingredients together in a large mixing bowl. Then form large patties in your hands, almost like burger patties. Then place the patties on parchment paper on a baking sheet and bake at 400 degrees for 20 minutes. You can flip them half way if you want them to have even crispy sides. This recipe should make about 10-12 patties depending on how big you make them.

Also, if you want to make these in muffin cups, that will work beautifully as well. It may be a good option if you want this to be a side-dish or cute "muffin" as a side with a BBQ dish or salad.

Remove from oven and let cool just a minute before serving. Or wait a while...:)

***If you want the outside of this pattie to be crispy when you eat, then put a TB of olive oil in a skillet and crisp each side for 2-3 minutes until crispy and to your liking***

The best ways to eat this pattie:

-wrapped in a GF wrap with veggies and your favorite dressing or sauce
-fit between two pieces of GF sandwich bread or bun with ketchup, lettuce and tomato
-as a side dish to a nice BBQ chicken meal
-placed on top of a spinach and veggie salad
- just eat on a plate with a fork :)

There are a few ways to enjoy this pattie, and additional veggies could be added to make a "veggie pattie" I am going to experiment more next time I make these and see what I come up with. But for now I am truly happy with this new combo with so much flavor and spice. It will have you asking for more... here is my lunch today, some leftover chicken bbq with a sweet potato quinoa pattie and a spinach salad on the side. Love this combo! And it left me full and satisfied.

I hope you find new ways to use your favorite ingredients... and in the meantime, why not try these! They will make so many that you will have some for leftovers, or to put in the freezer. Eating healthy doesn't have to be rocket science or expensive. This little recipe would cost you around 3 dollars to make and you end up with 12 patties, that is 40 cents per pattie... then add all the fixin's with it and viola you have a very inexpensive healthy and vegan meal. This post and recipe is linked up with The Nourishing Gourmet's 3/10/11 Pennywise Platter.

I hope you have a fabulous day!

Much love,

Stephanie

Tuesday, February 8, 2011

Coconut Cashew Crusted Chicken

If you are a gluten-free, dairy-free momma like me you may be looking for some extra protein to get you through breast feeding, sleep deprivation and loosing extra pregnancy pounds. I do not eat meat every day, or sometimes not every week, but I do know when my body needs some. It seems more common lately that my body is aching for higher amounts of protein. I have noticed that with breast feeding that my baby seems to be happier and less gassy as well, so maybe the protein is getting to him to help him grow stronger. My body type also thrives on a high protein diet, so I focus on getting as much whole grain, and whole plant food protein as possible, but sometimes I admit I just feel my best when I get a serving of chicken or salmon. It just does my body good. It is a bit more expensive to add organic or free range hormone free meat to your plate, but when you only eat it a few days a week it isn't as expensive and it is more about quality than quantity in this case.
I don't ever want to come off preachy about 'to eat meat' or 'not to eat meat'. I truly 100% believe that is all about what makes your body feel best.

And balance. Extremism has never been good for anyone.

Yet, I do know that the American diet over eats meat like crazy. We eat meat and dairy like we have endless amounts, and I guess in America it is some of the easiest food to buy. Still, imagine if you had to get your own dairy and meat from your own animal or farm in your backyard- I guarantee you would not be eating steak every night. You wouldn't be eating cheese at every meal either. Mostly because you now how much time and energy it would take to make a nice quality slab of cheese. It's a treat and a delicacy for sure!

If you had your own farm, you would have a more balanced approach to how much animal protein you were consuming. If you had that one cow or a few chickens you would make sure you didn't kill them only after a week of having them. Not to mention- after killing and cleaning a chicken you may have a different mindset all together about eating too much meat and what that all entails.

Basically, I think my approach now is to be more connected to where my food is coming from and not engage in the mass-producing-factory growing-meat market. That means if I am going to be a meat eater, I need to be a conscious buyer and know where my meat is not being fed chemicals and hormones. Buying from not only healthy, sustainable farms, but ones that care about God's world and environment.

I share all of this because I truly think it is important to think about. Consider the options and decided what is best for you and your family. I do enjoy a chicken meal when I make one because it seems more like a special occasion or feast to be enjoyed instead of an everyday occurrence. I like feeling that way. Like it should be something to be more thankful for in a grateful sort of way. Every food and every meal is a gift. Lest we forget!
So, with all of that said, here is one of my newest and most favorite recipes to make with some quality chicken. And if you are GF like me, you will enjoy this recipe more than the average person. Mainly because it is like a crispy chicken strip recipe that you may have not enjoyed since becoming GF. It is crunchy and then with the Thai seasonings you will be in heaven!
Coconut Cashew Crusted Chicken Recipe

1 pound of quality chicken cuts (boneless breast or thigh meat)

2 cups of coconut milk beverage (or other non-dairy milk)
2 TB of fresh lemon juice, about the juice of one lemon
pinch of sea salt and pepper

Wash, clean and cut the chicken into strip sized pieces. I usually get about 6 pieces from one breast and if you have 2-3 breasts with a pound of meat then you should get about 12-18 strips of chicken. Soak the raw chicken in a bowl with the non-dairy milk, lemon juice and TB of red curry paste. Mix all together and set aside for 30-60 minutes in the fridge to marinate and season.

Then mix up the following ingredients in a separate bowl to dip the chicken in...

1/2 cup of tapioca flour (add a little bit more if you need it)
1 cup of ground-up raw cashew pieces (you can grind whole cashews in a grinder or food processor to achieve a good consistency)
1 cup of unsweetened shredded coconut
1 TB of dried cilantro
pinch of sea salt

Olive oil or coconut oil for pan

Drop the wet chicken pieces into the bowl of the mixed dry ingredients. Roll and cover the piece of chicken fully with the dry ingredients. And then lay in a oiled baking pan. If you use a large 9x13 glass pyrex pan then make sure you put a got amount of oil on the bottom so that it doesn't stick. Then bake the battered chicken uncovered at 375 degree oven for around 25-30 minutes. Check the chicken strip to see if it is fully cooked. The chicken should be tender and the crust crispy brown when done.

Also, I have cooked this chicken on the stove top in a skillet. Do the same step above of battering the wet chicken in the dry ingredients, but then fry them in a skillet of oil for about 4-5 minutes on each side. This is a bit more messy and takes a bit more time, but if you are looking for a crispy version of the chicken this is the way to go. Make sure to not over use oil or you may turn out with a deep fried version. :)

I made this chicken recipe with my almond butter vegetable curry the other night and it was a perfect match for the curry. That is what is pictured in the pictures of the chicken strips.

I hope you give this recipe a try and enjoy!

Much love to you today!