Showing posts with label calcium-rich. Show all posts

Thursday, December 8, 2016

Homemade Instant Cocoa and Marshmallows

Yes, it is the simple things in life that make the day seem kinder and more gentle sometimes. Like your favorite cozy blanket or book of poems in your favorite chair or "spot". A candle lit kitchen and the smell of bread coming from the oven. These simple joys that offer a sense of what real life is made up of. It's not really about the "job", the "money", and all the "drama" :) It's the simple things that make up the parts of life that you share with those you love so enjoyable. Like hot cocoa and marshmallows on a snowy winter day, am-i-right?!?
Here in Michigan it's cold this time of year, and it is only going to get colder and more grey for the next 3-4 months. And just today, a fresh new world of white greeted us because it has been snowing hard since breakfast. So basically the best day to have some homemade cocoa and marshmallows, and I was planning on this recipe post before I even knew the snow was coming ;)
Knowing you have a warm beverage treat at your finger tips really helps with the desire to keep carrying on...carrying on. Hot cocoa and marshmallows are essential tools for surviving winter if you ask me. I may just be a little obsessed though. And if you are a friend of mine on instagram, then you already know my love affair with hot beverages ;)
This combo is also a great gift. Whether you package it up in cute-sy jars and ribbons. Or whether you have it as an option for guests as they come in and warm themselves and share in holiday cheer. There's hot cocoa and marshmallows, and then there is... HOMEMADE cocoa and marshmallows. So, stop thinking about wanting to try these and make them already. Your life will never be the same.
Homemade Marshmallow Recipe
In a large mixing bowl, add the following ingredients and let the gelatin "bloom" and sit at the bottom on the bowl. You may need to whisk in the gelatin and water so that there are no clumps.
4 TB Great Lakes Gelatin (or the Knox gelatin brand works too)
2/3 cup of pure water

*sidenote* if you want to invest in buying the GMO-free gelatin I mentioned above. If you want to read more about the health benefits with adding gelatin to your diet, read more here. 

Now,

In a medium saucepan, add the following ingredients on medium to high heat:
3/4 cup of pure honey
1/2 cup of maple syrup
1/2 cup of water
pinch of sea salt

1/2 cup of tapioca flour

For best results, buy yourself a candy thermometer so that you can tell when the honey syrup mixture reaches a scalding 245 degrees, or the "soft ball" stage to candy making. This process is long and can take around 15 minutes on medium heat. You do this until the mix is somewhat foamy. I have made this recipe a dozen times without a candy thermometer and just waited until it got to the foamy soft ball stage, but to have the best results- get a thermometer and get it to exactly 242-245 degrees. This could take anywhere from 10-12 minutes on the medium/high heat. When you reach this stage/temp it is time to mix the burning sweet mixture into the gelatin mixture in the big mixing bowl. 


You will need to hand whisk the two mixtures together until mostly dissolved and it is amber brown color. Then, slowly use a hand held mixer and mix on slow until even more foamy, then raise the speed when it gets thicker to medium and then HIGH. You will start to notice the color changing to white-ish and thickening up. You may want to lick at this point. It is super yummy marshmallow fluff. Then when the marshmallow is stiff you pour the mixture into 9x13 pyrex pan dish that is first covered with parchment paper and then use 1/4 cup of tapioca flour to evenly cover the parchment. Then pour marshmallow fluff in the pan, spread evenly and try to make without too many lines. Then sprinkle another 1/4 cup of tapioca flour over the top- this does not get spread it- just sprinkle it over and then when it is time to spread after 4 hours you can. You have to let it sit alone for at least 4 hours and it stiffens right up. Then pull out the parchment from the pan, spread the tapioca all over and use a non-teeth knife and cut squares of marshmallow. Use the excess tapioca flour to help dust and keep each square less sticky. I stored my marshmallows in a quart/2qt ball jar on the counter for up to a week without problems. Let them sit out on the counter next to a jar of the following mix...

Homemade Cocoa Mix Recipe 
{dairy and gluten-free, VEGAN}
2 cups of coconut palm sugar
1/2 -3/4 cup raw cacao powder
1/2-1 ts. sea salt
optional addition of cinnamon or cardamon or other favorite spice combo

In a Vitamix (or other high powered blender), mix and blend and grind up the above ingredients until its all mixed up. Dump in a jar with lid and let it sit on counter ready to mix 2 TB for every 12 ounces of HOT water. 

My version of the BEST cup of hot cocoa will involve the dry mix (1-2 TB) with 10 ounces of boiling water, then 2 TB of cold coconut milk beverage to add in the mixing process, and then top with a few marshmallows and it doesn't get better!
It's the simple things, friends! These recipes can be found all over Pinterest and the internet if you go searching for them, but I still wanted to post "my versions" together and share what I have done because they have become a staple these past few weeks and have had many friends ask for the recipes. Also, as you can see from the pictures with my cinnamon rolls, another great addition to the cinnamon rolls for Christmas morning. I hope you invest in making these simple recipes and letting them sit on your counter for the Christmas season. They really are a gift- to yourself- to your friends and family coming over- and to the kids coming and going in and out through the snow. 

Much love as always, and stay warm xoxo

Monday, November 11, 2013

Homemade Dairy-Free Hot Cocoa Dry Mix

There's something about drinking something steaming hot on a cold winter day. It's sustenance. Snow and hot cocoa go hand in hand, and since today marks the first day of snow for this coming winter....yes, it is ONLY November 11th. We are going to have many many more days of cold and snow ahead of us before next spring. And that is why this cocoa dry mix is a fabulous addition to your pantry. Mix up a big batch and have it there ready to drink when you need some encouragement or have a moment of creativity or quiet "you" time.
Or perhaps you will want to share some of this great mix and bottle it up in some pint jars with a cutsie note and some peppermint candies and viola, you have a super cute and special homemade christmas gift for friends, teachers and grannies.
I made this mix from 3 main simple ingredients. The main difference than any other homemade mix is that I used rice milk powder. Like milk powder, but from rice milk and of course dairy-free. I was impressed with its taste and texture. Super fine and silky. So a perfect addition to a hot cocoa mix.

I bought this rice milk powder from Vitacost, but I bet you can find some at a local health store if you are desperate to search for it and buy it right away.

FYI: Now is the time to stock up on healthy holiday baking alternatives from Vitacost. Order today to guarantee you get it here before the holidays and to get the best sale and supply. I buy my coconut palm sugar, coconut oil, and some favorite GF flours. I bet you could find anything you usually bake with around the holidays...except cheaper than the "health" grocery store and maybe you'll even find a healthier alternative too!

Right now a great sale you can buy Wholesome Sweeteners Coconut Palm Sugar, 1 and the other 50% off. Vitacost brand is also offering their organic coconut oil for $16.99 right now which is a great price (5 dollars less than the usual price). There is also Enjoy Life chocolate chips that I love to use because they are allergy-friendly and good.

Also, if you are a first time buyer, you can get a $10 dollar coupon from me for your first order HERE. Super awesome to have a free $10 towards your grocery order, so take advantage and then spread the savings yourself!
Homemade Dairy-Free (vegan) Hot Cocoa Dry Mix Recipe
2 cups of rice milk powder
1 cups of dutch processed dark cocoa
3 cups of powdered coconut palm sugar
  (blend the 2 1/2 cups of sugar with 3 TB of arrowroot powder in high powered blender)
1 ts. of sea salt
1/2 - 1ts. of ground cinnamon
optional additions:
 1 ts. vanilla powder
 1 ts. of pumpkin pie spice
 1 ts. of ground ginger or cardamon
Mix all of the dry ingredients together in a large bowl with a whisk. Then use a funnel to scoop the mix into a canning jar to keep in the pantry or to share as a gift. The mix makes about 3 pint jars full and can easily be doubled or tripled to make enough if you use for gifts. 

To make the hot cocoa, put 2TB of the mix into a 8 ounce mug and pour boiling water or non-dairy milk into the  mix and stir quickly to have it dissolve.  Add some cold non-dairy milk to cool it down and cream it up.

Stay warm and enjoy!

Thursday, February 7, 2013

Date-Sweetened Chocolate Donuts

Hello sweet delectable chocolate donuts! So good without toxic sugar and nothing fake or horrible for you in these sweeties either. Dates are the reason behind their great flavor and perfect sweetness and texture. Dates have become one of my most favorite additions to gluten-free baking. They add moisture, texture, and nutrition to your efforts to make a baked good that doesn't crumble like sand or feel like a gummy mess. 
Dates are also a little food that I have on my mind and will especially be on my plate for the next few months as well. Since I read this study about dates for the last few months of pregnancy, and have to think that it wouldn't hurt to eat more dates if it helps me try for a better delivery with baby #2. It may be just one of those "health foods" that makes you "feel" better about yourself for consuming, but I say it can't hurt to try and have less pain in childbirth, can it?!
I have been making these sweet donuts for a while now and just haven't posted the recipe. Seems about time since Valentine's Day is around the corner and finding special chocolate treats is part of the fun. I have made these donuts without the bit of coconut sugar in the past, and I have also played around with the flour combos. I will list some of the subs at the end of the recipe. Either way, these babies are so worth the time and purchase of a donut pan. Seriously. It really helps a gluten-free friend feel like missing out on trips to the bakery a thing of the past. These donuts may just help your grieving gluten heart move on....just maybe.... 
Just maybe you can let the healing of eating gluten-free sink into your whole being. You need to love your body for it to love you back. You can expect adding gluten-poison and crap to your being will allow you to just function normally. Yes, I am talking to all you Celiacs out there, but also those of you that have noticed how wheat and gluten causes you to have pain, anxiety and in general troubles. Don't let yourself justify cheats and treats. You have to make an effort and in the end I know the grieving process takes time, but you must know that there is hope in the journey as well. Let yourself be your own valentine and make it these sweet treats. You won't regret it!
Date-Sweetened Chocolate Donut Recipe
{gluten, nut, dairy and refined sugar-free, vegan options}

1 cup of packed, chopped, pitted dates
1 cup of chocolate chips (I prefer high cacao content and no dairy/ or fake stuff in them)
1 1/4 cup of boiling water

Chop the pitted dates to a packed 1 cup amount and put in a blender (or magic bullet) with 1 cup dark chocolate chips and boiling water for at least 20 minutes, or until the water is cooled. You can soak for longer, but at least soak for 20 minutes to soften the dates. Then blend mix in the blender or magic bullet until it is a liquified mixture that resembles pudding or a thick chocolate smoothie. It should add up to close to 2 cups of mixture after blended. Then add it to the rest of the better when the following is mixed well together...

1/2 cup of tapioca flour
1/2 cup of millet flour
1/2 cup of brown rice flour
1/2 cup of coconut flour
1 1/2 ts. of baking powder
1 ts. of baking soda
1/2 ts. of sea salt
dash of cinnamon or nutmeg
1/4 cup of cocoa powder
1/4 cup of coconut palm sugar
1/3 cup of chia gel  (1 TB of chia meal + 2 TB of water)
1/3 cup of melted organic coconut oil (+ more for greasing pan)
1/3 cup of coconut milk beverage (I used So Delicious)

In a large bowl, mix all of the dry ingredients together first, then add the wet with the blended date mixture, chia gel and the rest of the wet ingredients. Mix well  all together and then let sit for a few minutes for the batter to come together. Then use a rubber spatula to pour the batter in a gallon-sized zip lock bag. Make sure to get all of the air out and then press the bag shut and the batter to the bottom of the bag. Then use a kitchen scissors and cut a 1-2 inch slit off one of the bottom corners of the bag. Then in a non-stick donut baking pan-I have a Wilton's brand pan. (I also coat mine with some coconut oil), squeeze out the batter into the donut sized holes in the pan. Fill the batter to the tops of the holes and then bake in a 350 degree oven for 22-25 minutes, until the donuts rise and are stiff. This recipe will make 12-15 large donuts, or 24 smaller mini-donuts. Pull donuts from the pan when they have cooled for at least 5 minutes, then pull donuts from pan and continue to let cool on a cooling rack or plate.

Baking Notes:
*I have omitted the coconut sugar before to have just dates and it turns out, just a bit less sweet. Also, if you avoiding sugars all together then you will want to stay away even from the chcolate chips because the ones I use contain a little amount of sugar.

*I like to use dark chocolate chips (70% cacao and no dairy)

*I have used a gluten-free flour blend for this recipe as well, and you can sub all the flours except the coconut flour for a mix. I would just use like 1/4 cup less to start and see how think the mix makes your batter. Just because some mixes contain a lot of starch and even gums sometimes. I like using Bob's Red Mill all-purpose flour best for this recipe. Too start, I would use 1 1/4 cup of Bob's mix in place of the tapioca, millet and brown rice. And have 1/4 cup more flour on hand if it seems too sticky.

When the donuts are cooled you will want to pick a frosting or make a few of each as I did :)

Chocolate glaze:
1/3 cup of chocolate chips melted with 1 TB of coconut oil

Melt the chips in a glass boil and coconut oil over a double boiler, or for 33 seconds in the microwave. Stir til melted and a thick chocolate glaze. Then drizzle or coat the donuts how you want. If you want the glaze to harden quickly, then put the donuts on a try in the fridge or freezer and within minutes your glaze will be stiff and not wet and messy.

Sunbutter frosting:
1/4 cup of sunbutter (I used SunButter or can use other favorite nut butter)
1/4 cup of room temperature organic coconut oil
1-2 TB of raw honey (or use agave or coconut nectar for vegan option)

I especially love this frosting because I have been over-eating and craving sunflower butter this whole pregnancy. Must be all the folate and vitamins in it! You can mix almost equal parts to the honey, sunbutter and coconut oil to whisk into a thick frosting. Then I add it to a piping frosting bag with a decorative tip and put the frosting on the donuts with whatever fancy idea you got. The above amount should make enough for about 6-8 donuts depending on how much you put on. But you can easily half/double the amount to make more or less if you prefer. 

If you don't have a donut baking pan, I say this recipe is enough to go invest in one. I used Wilton's and love it. Plus, baked cakey donuts are superb and you won't be wishing for the greasy fried counterpart.

I hope you enjoy!

Much love to you and your body as always!

Saturday, July 14, 2012

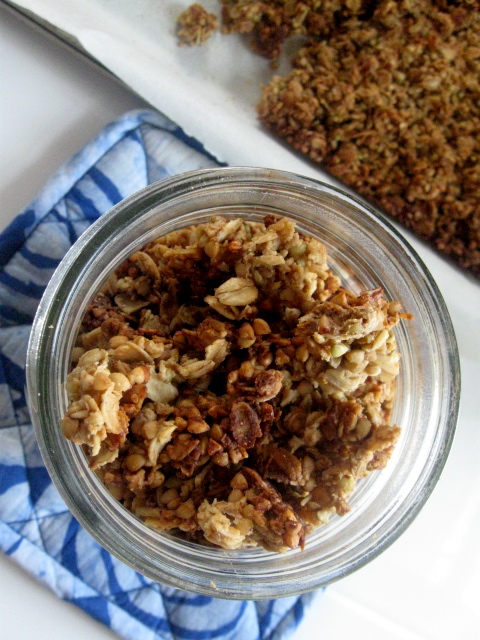
Crunchy Honey Buckwheat Oat Cereal

I have been on a breakfast kick lately. Really enjoying cooler and simpler options than the norm. The "norm" for me is hot gluten-free oatmeal or whole grain porridge. It is a hearty bowl of goodness, that starts the digestive fire out right in the morning. That is usually how I roll, but in the summer, and with as hot as this summer has been, you couldn't really want to eat super hot anything in the morning. I've been more into blueberry smoothies and just plain fruit. But this cereal is the best of both for me. It has a nice whole-grain crunch along with some cold non-dairy milk plus fresh, sweet blueberries galore! Yum!
This recipe is super simple, easy to store, and can be very versatile with other additions. I love eating my bowl with hemp milk and fresh blueberries, but you could also add any homemade or store bought non-dairy milk favorite, and could add almost any additional fruit you love. It is full of protein, fiber, and lots of nutritional vitamins like iron and magnesium. Essentials for your health and a guaranteed good start to the day!
Plus, did I mention how wonderfully easy this is. Well, it is. And, also easy to pack along and bring on weekend getaways, camping trips and even longer summer vacations. I love when simple and nutritious work together like that. It just makes eating from scratch and with whole grain healthy ingredients, that much more enjoyable!
Crunchy Honey Buckwheat Oat Cereal Recipe
(gluten, dairy, egg, nut-free, plus vegan option)


2 cups of raw whole buckwheat groats
4 cups of certified gluten-free rolled oats
1/3 cup of sunflower seed butter
1/3 cup of raw local honey (or use local maple syrup to keep it vegan)
3 TB of soft or liquid extra virgin coconut oil
dash of sea salt
dash of ground cinnamon

In a very large mixing bowl, mix all of the above ingredients together with a spatula or your bare hands, Then pour out the wet cereal mix on a parchment papered cookie sheet and spread 1 inch thin along the whole pan. I use a 11.5x17 inch sized cookie baking sheet and that seems to work almost perfect, but you could use 2 smaller sheets, or even one larger if you got it. Bake in a 375 degree oven for 25-30 minutes, until golden brown and crispy. Then let sit out and cool on the counter for a few hours until completely cooled and dried. Then pack up the leftovers in 2 quart mason jars, or however you would want to keep and store your new favorite cereal. 
If you haven't tried buckwheat groats yet then you may be up for a new discovery with this recipe. And the short is, that buckwheat is a very nutrient dense grain that is naturally gluten-free and full of many essential minerals and vitamins for your body. And then the oats are a favorite grain that just make you feel like you are more normal when it comes to your food choices :) 
If you are like me, you will want to make a batch and then store it in mason jars on the counter because it is so happy and healthy looking. It is a perfect kitchen decoration, plus very edible. So much more earthy than displaying a nice card board cereal box (recycled of course :)

I hope you are enjoying your weekend thus far. And you are planning to go on a brand new adventure that includes the summer sun, getting wet, and staying cool this weekend. Don't forget to pack along some gluten-free goodies and don't let the stress of eating gluten-free turn you into a grouch. Nobody likes to be around a grumpy gluten-free grouch. Your positivity toward your food and what and how you eat is just as much a part of the healing process as what kind of food you are eating as well.

Don't swallow anger and bitterness, swallow hope, healing and a new day!

Much love as always!

Thursday, April 12, 2012

Smoky Split Pea Soup-vegan style

I admit, I've not made homemade split pea soup before this recipe. I had noticed split peas at the store and even tried some tasty soup split pea soup at my favorite local cafe. But, I personally have not tried this feat. So, the other day I saw them again at the store and I heard them calling my name. So, what do you do when you hear real food talking to you? You buy it! 
So, I bought me some dried split green peas. No arm twisting here. They were so darn cheap too. Like just over a dollar for a pound. They also contain 12 grams of protein per 1/4 cup dry and so if you use 2 1/2 cups to make some soup- well, you do the math, that's a lot of vegan protein! They also contain loads of calcium, magnesium, fiber and vitamins too. The lists of what they contain for your health is amazing. I also learned that they contain a mineral that may help you with detoxifying sulfites from your body. Sulfites are what they add to many preservatives and packaged foods. So if you are a recovering processed food addict- try split peas!
So, I got my green peas home and started doing some flipping in my cookbooks and googling. I found that the traditional split green pea soup usually contains ham or meat or at least a hefty ham bone. I really wanted my soup to be meat-free, so I decided to adventure out away from recipes and go on a whim alone. I used some of my favorite savory spices and a few unexpected others and it turned out fabulous. It was hearty, savory, and yes, even kinda smoky too.

This soup is perfect for a rainy day (well- it was snowing here yesterday!) and perfect to feel full, satisfied and nourished. Plus, did I already mention that split green peas are super cheap. You can live on real food for cheap. It can be done, friends. It may be a step in a new direction and you may feel lost as times, but let me tell you....it is worth it. So, here's my take on a heart split green pea soup. Enjoy!
Smoky Split Green Pea Soup Recipe- vegan style
1-2 TB of ghee or sauteing oil
3-4 minced fresh garlic
1 large yellow onion finely chopped
1 heaping cup of finely chopped celery
2 heaping cups of chopped carrots
2 1/2 cups of washed, rinsed and rained split green peas
8-10 cups of vegetable broth or stock
handful of finely chopped fresh kale
handful of finely chopped fresh parsley
1 ts. of hungarian paprika
1 ts. of curry powder or tumeric
1/2 ts. of ground cumin
1 ts. of Italian dried herb blend
1/4 ts. of ground ginger
1/4 ts. of ground mustard seed
1/4 ts. of celery seed
2 TB of apple cider vinegar
1 TB of wheat-free low-sodium tamari sauce
sea salt and black pepper to taste

In a large 8 quart pot or dutch oven, saute the garlic, onion and carrots and celery in the oil. Cook for a few minutes and then add the washed split peas. You do not need to soak the peas. They are ready to cook after they have been washed. Then add the broth and the rest of the spices ingredients. Cook at high heat till a boil and then turn down the heat to medium low and cook at a simmer for 1.5 to 2 hours.  Slow cooking will allow the peas to soften up and to cook down allowing them to be more digestible and the flavors to blend together perfectly. So this isn't a quick fix soup, but it is one that can be put together and left for a while to cook on the stove. You will know it is ready to eat when the peas and softened and thickened the broth and everything is soft. If your soup has thickened up too much during the cooking process, no fear- just add a few more cups of broth to thin it out. Serve with a topping of fresh herbs or your favorite GF bread, cracker or crouton. This is a very hearty and healthy soup and you will be able to serve 10-12 people or at least have leftovers for a few days.
Well, that is my take on a staple food. Peas have been around since the earliest records of civilization and can be a great way to nourish a weak stomach and soul. I know I will be making this soup a staple in my kitchen and hope to find more ways to love split green peas!

Hope you enjoy! Much love as always!

Saturday, January 23, 2010

Sweet and Sour Cabbage Soup

Cabbage is such a tricky cruciferous (vegetable family) sometimes. I mean cabbage salads, coleslaw, and sauerkraut can only be replicated so many times. Yet, there are so many health benefits to cabbage. Helping to remove carcinogens from the body and promoting healing is what cabbage does best. So, it seems that it is a must to find way to use, eat and enjoy cabbage. So for the sake of find more uses for adding more vitamins and nutrients to my life, I simmer a pot of soup.

I must mention that this soup recipe was initially inspired by a local genius that creates and prepares gourmet soups at her restaurant cafe every day. She inspires me continually with her culinary genius, and ultimately her love for whole pure foods. So, I could never in any way replicate her delicious soups (and of course her recipes are off limits being top secret and all). So this is my version of trying to make a sweet and sour cabbage soup to warm the body and soul. I at least had to try and replicate...

Sweet and Sour Cabbage Soup
1 ts. of sesame oil or light olive oil
2-3 small green onions-tops chopped off, and white parts thinly sliced
1 medium head of green cabbage chopped and diced
2 cups of slivered matchstick carrots
3 stalks of celery, thinly sliced
handful of thinly chopped fresh cilantro leaves
2 swiss chard leaves, chopped and diced (added last minute, but can be omitted).
12 cups of pure water
1 28 ounces can of diced tomatoes (pureed in blender)
2 TB of wheat free tamari sauce
1 ts. of fish sauce (or miso paste)
1/4 cup of sucanat or agave nectar, either one works
1/4 cup of apple cider vinegar (or rice vinegar works too)
1/2 ts. of minced thai chili, or red pepper flakes

Saute the green onions, celery, cabbage, and carrots for 3-5 minutes on a low heat in a large 8-quart pot. Then add the water, tomato puree (just dump a 28 ounce can of diced tomatoes in the blender and blend till smooth, then add to the pot of veggies). Add the rest of the ingredients and cook to a boiling heat. Then turn the heat down and cook at a simmering heat for 30 minutes. If you simmer or cook longer that is ok, it only softens the veggies more and blends the sweet and sour flavors.

The best part about soup is that there is always many bowls to share or to savors for a few days. I have to admit, I did like my own version of sweet and sour cabbage soup, yet... it still wasn't all that I was dreaming of. Maybe in time, with more years of wisdom and experience in the kitchen, I will catch up to Marie's version. Until then...

Happy Saturday, and much love and warmth to you!

Wednesday, March 18, 2009

Tahini Roasted Cauliflower (vegan)

This is one of my favorite recipes in the whole world. And, my husband asks for it all the time. Which would explain why I probably make it about once a week for supper. Roasted cauliflower in all it's glory. I usually eat it by itself for supper, or match with some sweet potato fries, or with some baked salmon. Cauliflower is in the same family as cabbage and broccoli (cruciferous family) and has large amounts of calcium and rich in antioxidants that protect against colon cancer and build-up. There are also compounds and enzymes that help promote natural liver detoxification. Cauliflower lacks the chlorophyll of other cruciferous family vegetables, but it doesn't miss a beat on being full of beneficial nutrients to promote better digestion and detoxification. Ok, enough already of the nutrient info, and on to the simplicity of this recipe that will have you making it once a week like me.

Tahini Roasted Cauliflower Recipe (vegan) 2-4 servings
1 large head of local or organic cauliflower
1/3 cup tahini, with oils (sesame seed butter)
1/4 cup olive oil
1 1/2 TB of hungarian paprika
1 TB of dried garlic powder
2 ts of turmeric
sprinkled cracked black pepper
pinches of sea salt

Cut up the head of cauliflower into pieces and soak and rinse it in a strainer over the sink.

Try to get all the water off and then dump in a mixing bowl and drizzle the tahini and
olive oil evenly all over. If you need to use a little more olive oil and tahini to cover a large cauliflower head then go for it. I actually usually eyeball it, so putting a measurement on it was a guess based on experience. Then sprinkle sea salt and black pepper all through (to your own taste).

Sprinkle the spices in the bowl and roll up your sleeves and use your hands to throughly mix the oils and the spices evenly all over the cauliflower pieces. This is the best way I have found to truly cover each piece with the delicious flavor.

Pour out the mixture on a baking pan with parchment paper on it and shove it in an oven at 375 degrees. I usually cook for about 40-45 minutes. But, it may take longer or shorter depending on your oven. I like it a bit crispy so I tend to leave it in longer and keep checking it every minute or so to make sure it doesn't burn, but it is getting crispy. Or, if you rather not crispy then even after 30 minutes in the oven it is baked enough. Bake it as much as you desire.

A good condiment is some organic ketchup. It is best right out of the oven. Be careful you might just eat it all and lick your fingers clean. Oh and... it also is a great lunch leftover the next day.

Enjoy!