Friday, April 29, 2011

Sweet Banana Muffin-Top Scones (vegan)

Good morning, lovely people! It seems appropriate to have a scone recipe today. I feel like I need to write in a British accent and be more prim and proper for this post (must be because the British TV anchors are rubbing off on me!) Ahhh, I did wake up early and watch the royal wedding. It isn't every day you can watch a 'commoner' become a princess. And, even if I wanted to watch something else on TV this morning, I don't know if I would have a choice with all the media coverage. But, it was a fun to watch. I guess I am a sucker for a fairytale love story. And Kate, ehhhemmm, Princess Catherine, is just stunning...
A beautiful wedding... so simple and magical. Reminds me of my own almost 6 years ago... and I swear Kate stole my wedding dress :) OK, mine was not as royally elegant, but I do love the 1950's retro vintage elegant style that it was. Such simple grace and beauty. I must mark this day with a yummy scone with simple sweetness and perfectly moist texture. Yes, I know the Brits make their scones dry and crusty, but today, this gluten-free scone will have a nice touch of sweet moisture.
Sweet Banana Muffin-Top Scone Recipe (gluten-free, vegan)
1 cup of millet flour
1/2 cup of sweet sorghum flour
1/2 cup of tapioca flour
2 ts. of baking powder
1/2 ts. of sea salt
1 ts. of ground ginger
1 ts. of ground cinnamon
2 TB of ground flaxmeal
3 TB of coconut palm sugar
5 TB of solid Organic Palm Oil Shortening (or room temperature extra virgin coconut oil is a good substitute)

1 1/4 cup of mashed ripe banana puree
2-3 TB of non-dairy milk (I used So Delicious Vanilla Coconut milk)

add last:
1/2 cup of raisins, or vegan chocolate chips, or both :)

Mix all of the dry ingredients together first in a large mixing bowl, then fold in the palm shortening and get pea-like flour crumbles. Then add the moisture of the banana puree and non-dairy milk. Add 2 TB of milk first and add another if you need more liquid in the batter. Then add raisins as a last touch, or if you are in the mood for chocolate, add some vegan chocolate chips as a nice touch. Or both, why not?! :)

Mix well and you will get a biscuit-cookie-like batter mix. Then on a parchment papered cookie baking sheet drop circle-like scones (drop-scones technique) on the baking sheet. This recipe could make 6 large scones, or 12 smaller scones. The large scone is about 1/3 cup of the batter, and the smaller scone is half of that amount. They spread just a touch on the sheet when baking so do not place them too close together.

Bake at 350 degrees for 25-30 minutes. Until they are gold brown and smell delicious!

After pulling from the oven, let scones sit for 5 minutes to cool, and then serve and enjoy with your favorite cup of tea!
Yes, you must drink tea with these :)

If you want to save the leftovers, I suggest you keep in an airtight container for 2-3 days on the counter, and if you want to freeze then make sure they are wrapped well and put in the freezer right away after cooling.

I hope you enjoy, and have a fabulous weekend friends. Cherrio!

Wednesday, April 27, 2011

Red Lentil Tacos or "Bean-Dip" {Revised} (vegan)

I actually posted the first version of this recipe over 2 years ago, and it was proudly one of my first recipes to post. I recently was making this recipe again because tis the season when avocados are "in-season" and on sale. So, what better way to eat avocados than with tacos?! This recipe has been around for a few years, but this revised edition is a little bit easier to read and I made some adjustments to the seasonings and ingredients. Nothing major. Just revised it to be better after making it again and again. I have gotten so many compliments on this recipe alone. I think if you are looking to add more vegan recipes to your diet, this is definitely one to try.
It is a really basic, simple, flavorful and... it could pass as a "fake" meat. Or, don't even think about it like that. Think about how lentils are filled with beneficial plant protein, minerals, vitamins, and delicious-ness. So this is just a new way to eat tacos, and you may not really care about ground meat any more...

Lentil Mixture Recipe
1/2 cup of diced onions
3-4 garlic cloves minced
1 TB of olive oil
1 1/2 cup of dry organic red lentils
3 cups of pure water
1 TB of ground cumin
1 TB of ground paprika
dash to 1/2 ts. of ground cayenne pepper (or more if you like it hot)
2 ts. of ground turmeric
1/2 ts. of sea salt, or more or less to taste
1/2 ts. of ground black pepper, or more or less to taste
1/3 cup of crushed tomatoes (I used canned, but fresh could work)
2-3 TB of non-dairy milk, I use unsweetened So Delicious coconut milk (or 2 TB of organic butter or ghee would work too)
huge handful of fresh cilantro (finely chopped)
fresh lemon or lime juice to serve

Saute the chopped onion garlic in the olive oil in a large pan. Wait until the onions are clear or a little crispy, then pour in the red lentils with the pure water and stir and let simmer till it boils. It will take about 15-20 minutes for it to soak in and become a thicker texture.

After the thickening happens, you can add the spices, tomatoes, and non-dairy milk. You are constantly stirring at this point so that the mixture doesn't burn. It will start to become almost like a ground-meat texture. If your mix is a bit watery, just keep cooking on medium heat and it will thicken up as you go. I like to throw in the fresh cilantro in last to add some fresh flavor and color. I also add some fresh lemon or lime at the end to cool down the spices. Not too much, just a splash and lets the flavors dance together. Hm, it smells delicious!
Now serve up how you wish:

You can pile the mixture in a soft gluten-free corn taco shell that has been heated up in a pan with a touch of olive oil and salt. When you warm up the shell a bit it makes it easier to stretch when you are putting the insides in. You really only need to take about one minute to do this. If you over warm it up it will probably become a crispy chip that won't let you fold or wrap. If you want a crispy chip, then by all means... I liked having a flexible taco shell with this specific recipe. Load your vegan taco with lentil mixture, leftover brown rice (or quinoa), lettuce or greens, salsa, and avocado. Then splash with lemon or lime and eat!
Or, you can use this lentil mixture as a "bean-dip-bowl" kind of meal. You could pile on a plate some rice or quinoa, add the lentil mix and top with lettuce, avocado and salsa. Use gluten-free corn chips to scoop up your layers of flavor. Or forget the chips and just eat with a fork.

I made up this lentil mixture as a meat replacement for tacos and it actually turned out to be a very tasty comparison. I actually like it better! It has the legume flavor and texture of a burrito, but the fun of a messy and hand eaten taco.

Now that wasn't too hard... now, enjoy!

Servings, usually can make up to 8 tacos, so can serve anywhere from 4 to 8 people.

Much love to you today!

Monday, April 25, 2011

Quinoa-Millet-Kasha Porridge

Thank you for the birthday wishes and blessings! I had a fabulous day. And now that you know what my cake looked like...that was pretty special too. But it's Monday, and it's back to reality. I told my family yesterday that I had so much "special" food over the past 3 days that I feel like I need to go on a detox today! haha. Holidays and birthdays can do you in. But thankfully our bodies can be whipped back into shape, or heal from a few days away from eating the regular routine of food. I must clarify...I still always eat gluten and dairy-free even when it's a holiday or birthday, so the special-ness is eating cake, and extra treats people give me that have more sugar or richness then I am used too. I am still nursing my babe, so I can't really do a detox in real fashion, but I can get back into a routine of healthy foods that I know my body will respond well to and allow myself to feel balanced again.
This may be just my opinion, but I think our bodies crave routine. It seems like then we get into a pattern of sleeping, eating, and exercise that there is more balance and peace in our lives. Do any of you feel this way too? I know I do. When things are a little crazy or out of the usual it seems like you just do not know how your body may react to all the changes. This could just be the reflection of a very sensitive person like me, but I do think that everyone has a small tendency to appreciate routine. It's like if my baby misses a nap or goes to bed a few hours later than the normal, we end up paying for it for a few days after because of his crabbiness and over-tired behavior. People thrive on balance and routine. So, with all of this said I decided that this Monday I needed to start my day out with a good routine. Which starts with a nutritious breakfast, homemade and from scratch...
I love porridge for breakfast. It is a bowlful of fiber, whole grains and warmth. It is the perfect winter breakfast, but since we have had such a cold and wet spring so far, I haven't found the need to give up a good warm bowl of porridge just yet. Here is a simple way to make it at home with a few of my favorite grains.


Quinoa-Millet-Kasha Porridge Blend Recipe
1 cup of whole millet
1 cup of whole quinoa
1 cup of whole kasha (buckwheat) groats

Blend each (1 cup) grain by itself in a coffee grinder, magic bullet or high-powered blender to get a mealy-grainy-blended mix. Blend each grain separately the same way and then put all blended grains into a large mixing bowl. Mix together well then pour the dry grain blend into a container to keep in the pantry. A mason jar, or air-tight covered bowl. You can make this recipe with any quantity that you desire. So if you want to make less, just blend equal parts of the grains. If you want to make a huge batch, then double the equal parts of the grains.
When you want to cook the porridge on the stove top... Here is what you need.
For one serving:
1/4 cup of the grain-porridge-mix
1 cup of water
dash of sea salt
a small saucepan or pot

If you want to soak the grains before cooking the next morning then:
put 1/4 cup of the blend of grains, and 1 cup of water (or non-dairy milk) + a spoonful of yogurt (dairy or non-dairy) and then let sit and soak overnight. Then put the mix on the stove top and cook for the same amount of time as above. The soaking helps break down the grains and make it more digestible. The probiotics in the yogurt also help add digestion aid.
On medium-low heat, cook the water and grains. Wisk and stir constantly. Do not let it get too hot and burn or it will stick to the bottom of the pan. Just stir constantly, on medium heat and all of the grains will cook and get thick. Cook for about 5-7 minutes depending on your heat. You will know it is done when the water is all soaked up and the mix is a thick, almost creamy, porridge. Pour into your favorite bowl, and top with the following...

A spoonful of nut or seed butter
a sprinkle of sucanat or drizzle of agave or honey
a splash or 1/2 cup of non-dairy milk
a 1/2 cup of fruit, fresh or frozen

Here is the combo I made and have pictured above, that is my absolute favorite!
a large splash of non-dairy milk. I use either my favorite So Delicious coconut milk, or Living Harvest hemp milk
a sprinkle of sucanat
a large spoonful of frozen blueberries

Viola, a perfect bowl of porridge, ready for eating! What a great start to the day!

I hope you agree, and find the time and space to create health and balance in your life this week!

Much love to you!

Saturday, April 23, 2011

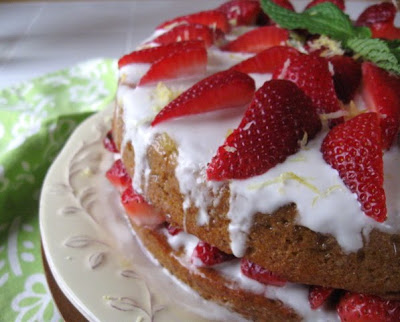
Honey-Kissed Lemon Coconut Cake with Strawberries (gluten, dairy and egg-free)

Yesterday was my birthday. A very special day with my family that actually started the night before and will probably end tomorrow :) I am so blessed to have a husband that loves me and an adorable baby that brings so much joy and love to my (our) life. I was also very excited to make a special cake that I have been dreaming about for a few months now. Mostly because I couldn't wait to get some strawberries, even if they were from California (Michigan strawberries are the BEST!). But also because I love to bake, and special occasions. So, I started working on this cake I had in mind...


As a kid, my mom would ask us kids when it was our birthday what cake we wanted this year. It was always a special thing because I am the oldest of five kids, and when you get something special, or that YOU yourself want, it makes it special in itself. Anyway, so I always liked to ask for some kind of fruit focused cake. Like strawberry or lemon.... and that is how this cake evolved. A funny memory from one of my lemon cakes when I was a kid was that it also had Starburst candy all over it in the formation of flowers (my mom really liked to decorate our cakes and have color themes :) And, I guess one year I remember a lemon cake with peach ring gummy candy on it as well... haha, I guess I have evolved as well to like more than chewy-gummy candy on a yummy cake. Good memories though.
This year I made a lemon themed cake with a honey glaze and coconut frosting topped with nothing more than a delectable and delicious fruit, the strawberry. Hm, I must tell the truth. I did a second take on the baking of the cake because I wasn't 100% satisfied with the texture results. But I guess that is what happens when you are a GF baker. You test, try and experiment more than sometimes you wish or want to. The recipe I am sharing today is what I came up with to be the best results. And, of course, it tasted fabulous to me. So, my friends, here is my birthday cake for 2011. It is very pretty, and brought much sunshine on my birthday that was covered in rain.

Lemon Coconut Cake Recipe
1/2 cup of sweet sorghum flour
1/2 cup of tapioca flour
1/2 cup of millet flour
1/2 cup of organic corn flour
1 cup of organic cornmeal
1 TB of flaxmeal
2 ts. of baking powder
1 ts. of baking soda
1/2 ts. of sea salt
2 ts. of xanthan gum

Mix all of the above dry ingredients together first in a large mixing bowl.

1 1/4 cups of non-dairy milk (I used So Delicious coconut milk beverage, which is the best!)
4 ts. of apple cider vinegar (or more lemon juice would work here too).

Then mix the above two ingredients in a separate bowl and let sit for 5-10 minutes to create a "buttermilk" or kefir-like mixture. After turning into a curdled milk, then you can add it to dry mix ingredients with the following wet ingredients:

1/2 cup of light olive oil
1/2 cup of pure maple syrup
1/2 cup of local honey
1/3 cup of applesauce (I used my own unsweetened homemade)
1/4-1/3 cup of freshly squeezed lemon juice
Also, add the zest of 1-2 lemons for about 2 TB of lemon zest.

Mix all of the ingredients together, the dry, milk mixture and wet ingredients. Mix well and then pour into (2) 8 or 9 inch circle cake pans. I greased my pans with solid organic palm oil shortening before I poured the cake mix to ensure that I could get my cakes out of the pan and still be in one piece. (Or you could pour this cake batter into a 9x13 pan if you wanted to make a long rectangular cake). Bake the cakes side by side to also get the same baking results, and bake for 40-45 minutes in a pre-heated 350 degree oven. Pull from oven, test with pick to make sure cakes are clear of any goo, and then let cool on the stove before doing the next steps...

After the cakes are cooled and ready for adding glaze and frosting and berries, poke the cakes with a toothpick and then brush a glaze over the tops of the cakes (or bottoms depending on what is the side you are going to use as the real bottom of the cake as you assemble).

Honey-lemon glaze ingredients:
1/3 cup of local honey
2 TB of lemon juice
dash of sea salt
(NOTE: I have been told that coconut nectar would be good subs for honey if you are strict vegan.)

Put the above ingredients in a saucepan and warm on the stove top until bubbling. Then use a kitchen brush and brush the glaze over the cakes that have been poked in their pans and let the glaze soak into little holes in the cakes. Let the cakes sit for 30 minutes to soak up the glaze, and in the meantime, make the coconut frosting...

Coconut Frosting Ingredients:
1 can of pure fat coconut milk (only use the cream that is separated in the can, toss the gooey liquid that is semi-clear and save and use the thick white cream that should be at the top of the can separated). Estimated amount of cream would be somewhere between 1/2 and 2/3 cup of cream.
1/4 cup of pure maple syrup
1/4 cup of tapioca flour

Use a mixer to whip up the following ingredients, then set in the freezer for the remainder of the time you are waiting for the cakes to soak up glaze, about 25-30 minutes. Then, use the same mixer to blend again before topping cakes. The frosting is a bit runny and more of a glaze as well, but it will harden more after it has been topped. If you need to make it more manageable to use, then I suggest you leave it in the freezer a bit longer till it is to your liking.

Then cut a quart of fresh, organic strawberries to tops your cakes with.

Ok, now we have come to the putting-it-all-together part!

Put one of the glazed cakes on your serving cake platter, brush with more glaze if you desire. Then, top with coconut frosting just on top ( it can drizzle down if that is the look you want). Then cover cake with slices of strawberry. do as much or as little as you want. Then take the second cake, and also brush with more glaze if you desire, and top with frosting. And arrange the rest of the fresh cut strawberries how you desire. Then also top with some lemon zest and mint if you want. It is ready to serve! Yeah, the moment you have been waiting for!

Yet, the cake is so pretty and yummy smelling you make have a problem cutting into it and serving. Take a moment to enjoy and display with much pride and love! Then, at the right moment (do not delay too long!) cut into your cake and eat, enjoy and share!

This cake could serve 8-12 people and is best kept in the fridge as leftovers because of the frosting and berries.

Some other "baker's" notes:
* If you are a strict vegan, you can sub out the honey for agave nectar, no problem.
* If you are allergic to corn, I would suggest using almond flour as the corn flour and meal substitutes...haven't tried it yet personally, but that is the flour I would try if wanting to avoid corn.

One last thought-

This is my beautiful birthday cake (Earth-Day style!), but because my birthday so wonderfully fell on Easter weekend this year, it could also serve as a leftover Easter treat as well. I doubt that it is your birthday (maybe one or two of you), but you may want to make this pretty cake as an Easter dessert treat.... I would suggest you do! It is a beautiful spring-looking and fresh smelling cake that would be loved and enjoyed by many!

I hope you enjoy this holiday Sunday, and if you are a Jesus-follower like me-there is much to celebrate! New life, restoration and resurrection because of the love of Jesus! Thank you God for His undying love!

Much love to you today! And a special Easter blessing to you!

Wednesday, April 20, 2011

Sesame Snap Cookies (vegan)

It's mid-week, and the fridge is low on food, and so I'm planning my grocery list a bit early this week. I really don't mind too much because I am excited for this weekend. It is my birthday on Friday (earth-day birth-day :), it is Easter weekend, and did I mention it is also earth day! It is something to be excited about considering it has been raining, snowing, storming, cold and dreary for the past 5 days. I am planning on making my own cake, a special new creation I have in mind... stay tuned for a recipe.

But in the meantime, I created a little pick-me-up cookie treat to get through the remainder of the week with some simple staple ingredients. You must get creative with ingredients you have in the fridge when in a pinch. It isn't always about having a serious rich cookie. Sometimes there is more joy is making something that you don't have to run to the store to make. I'll be honest. :) I pretty much do this most of the time. I love finding new ideas by being forced to come up with something out of what you already got. I also use up ingredients that might go to waste as well. These cookies are easy and did I mention I am in love with tahini lately?!
Tahini is the seed butter of sesame seeds. Or some call it sesame paste, but basically it is just ground sesame seeds that turn into a oil/butter mixture. It is said to be one of the oldest condiments in the world. I have been enjoying tahini in more ways than in hummus and sauces. Cookies with tahini is my new favorite treat. That is how these cookies originated, and also, I had some unhulled sesame seeds that I have had for a long time that needed to be used. So, these little sweeties were the perfect treat on a day like today. A little crispy, a little sweet, and a mix between a cookie and a cracker. Maybe a snapper? A snap cookie? Hm, they are one of a kind, and a good balance of flavors.

Sesame Snap Cookie Recipe (vegan)
1 cup of sweet sorghum flour
1/3 cup of tahini
1/3 cup of coconut palm sugar
1 ts. of ground cinnamon
1 ts. of ground ginger
1 ts. of baking powder
1/2 ts. of sea salt
2 TB of olive oil
4 TB of non-dairy milk (I used So Delicious Coconut milk)

Mix all of the ingredients above in a mixing bowl. The dough should be a tad sticky, but easy enough to roll little cookie balls without a problem. Roll a ts. sized cookie balls.

Then, roll cookie balls in bowl, with a mixture of the following:
1/4 cup of sesame seeds
1/4 cup of powdered coconut palm sugar

Once, the cookies are rolled and covered with seeds, then place the cookie balls on a baking sheet. Then use a 4 inch circumference glass or bowl to smash them down into little flattened circles. You want to make sure there is at least an inch between cookies for baking. On an average cookie sheet, you should get about 15 cookies. Bake in a 350 degree oven for 15 minutes. This recipe will make about 30 cookies, so somewhere between 2-3 dozen. This depends on your size of cookies as well.

The cookies are bite-sized and perfect for snacking. You may like to think of them as crackers...but they are most like a gingersnap-like- sesame cookie. Pretty yummy. I hope you try these out, especially since they are so simple, and if you like sesame or tahini.

I hope you have a good day. Looking forward to sharing my next post about my birthday cake....hmmm, it's going to be yummy! fingers-crossed! gluten-free baking is always a little bit of a risk, or should I say, adventure :)

Much love to you today!

Monday, April 18, 2011

Mango Curry Chicken Lentil Stew

We woke up to snow here in Grand Rapids, Michigan. Yes, I said that right....snow. It does seems a bit odd, especially since last year it was like 80 degrees today. I woke up with wonder, almost like a first snow again. It shouldn't be too surprising, but it is. Well, I am not going to get my panties in a bunch over it. I am going to stay inside and make stew today! Staying warm and dreaming of spring (when it decides to show it's beautiful face!) I am glad my tomato and pepper seedlings are safe in the warm basement, and that they are growing nicely. I am sad that the daffodils in the front yard are frozen...oh well, soon and very soon, we will be digging in the yard and watching our plants grow. Really, it will get warm, it can't snow in May, can it?

I made this stew based on a recipe a friend (thank you, Lori) shared with me a few weeks back. Hers didn't call for lentils, but since I love lentils so much (and know many of you do to) you could have both chicken and lentils. Or if you are vegan and want to just have lentils, then go for that option instead. I added a pound of organic chicken to make it a bit heartier, but really it would be just as wonderful a lentil stew as well. There is something wonderful about a curry-mango, sweet and savory dish. It is comforting and warms the soul. I think we all could use a little of that today...
Sweet Chicken Lentil Stew Recipe
1- 1 1/2 pounds of raw organic or local chicken breast cut into bite sized pieces
1/4 cup of rice/corn or millet flour
2 TB of curry powder
1/2 ts. of sea salt
1/2 ts. of black pepper or red pepper
1-2 TB of olive oil in the large soup pot (8 qt).

Toss the raw chicken pieces in the flour and spices and then, saute in a pan with 1 TB of olive oil for 4-5 minutes, until the chicken is browned and cooked. Then add:

1 cup of chopped red onion
1/2 cup of finely chopped celery
3-4 cloves of minced garlic
1 cup of chopped green bell pepper
1 TB of freshly minced ginger root (or dried could work too)

Continue to cook in the same large pot (one pot meal) and let the onion get soft, then add the following to the cooked meat and onions/garlic/pepper:

1 1/4 cup of french lentils (green lentils could work too)
1 TB of olive oil
4 cups of veggie or chicken stock
4-5 cups of pure water (depending on watery you want your stew)
1 ts. of paprika
dash of cinnamon
dash of cayenne pepper (optional)
2 ts. of dried cilantro
2 ts. of dried basil
1 can of 14.5 ounces of diced organic tomatoes (or 1 cup of diced plum tomatoes)
1 cup of chopped mango pieces
1/2 cup of raisins

Cook the combination of all the above for 40-50 minutes until the lentils are cooked and have soaked up the water. You will notice the raisins have plumped out again, and the flavors of the sweet mango and savory spices will have been brewed together. Hm, fantastic!

Options for serving: Pour over some rice, and top with fresh herbs.
fresh cilantro (about 1/4 cup for serving)
1 cup servings of brown rice or quinoa
That is it. It is a few step process, but once you got all the goodness in the pot, you have dinner and you get to enjoy the flavors in your kitchen without a huge clean-up. I must say, I really love french lentils. I have just used them a few times, but after this recipe I am going to try using them more. I think they are really beautiful dry, but then so delicious cooked as well.

If you are in West Michigan today, I hope you stay warm and don't stop dreaming of spring and daffodils. If you are in other warm and spring-like parts of the country...Just keep your comments to yourself (or at least start sharing your warmth) because we are a bit sensitive about the weather today...:)

Much love to you today!

Thursday, April 14, 2011

Salmon Herb Cakes

Salmon! It's what's for dinner!

I recently found a really good deal on wild-caught salmon from Alaska that was bone and skin free and canned for preservation. I really love salmon, and white fish... even though I am not much of a seafood fan. Yet, with all the recent news about farmed fish, and even more pollution getting into the fresh fish waters... it is a bit disheartening. Well, disheartening for a few reasons. It is sad that we are so careless now days that we allow pollution to disrupt natural habitats and have to create "farmed-fish" unnaturally with chemicals. And then also disturbing because if you are a fish eater it is becoming harder to find wild and healthy fish to eat. So for those reasons I was excited to find some wild canned salmon that had nothing added to it and was ready for eating. The first thing I wanted to make was salmon cakes.... so that is why I am sharing this recipe today.
If you are trying to eat less meat, or at least get more creative with eating healthier meat, then I would suggest trying to add some fresh (or canned) wild salmon to the diet. You hear it all the time about how fish is full of good fats and oils like the Omega 3's and Essential Fatty Acids... and this is very true. It is a great source of these oils to help your brain and other organs run smoothly and stay strong. The best source of these oils is from wild caught fish. Farmed fish are like GMO foods with destructive heavy metals that can spread to your body when consumed. So if you can find fresh/frozen or canned wild caught salmon, then you have found a good source to buy from.
Maybe you are trying to eat less meat this Lenten season, or at least trying to eat only fish on Friday's. This may be a great recipe to try at home and enjoy with a little homemade tartar sauce. What do you say? Let's make some salmon cakes... or burgers if you prefer...
Salmon Herb Cakes Recipe
2 (3 ounce) cans of wild caught fresh salmon (or 6 ounces of precooked fresh salmon meat)
1/4 cup of chopped fresh cilantro
1/4 cup of fresh chopped parsley
1/2 cup of GF bread crumbs, or crushed crackers (use your favorite kind, I used Sami's millet and flax bread, 1 sliced and crumbled it to use).
2 fresh farm eggs
1 ts. of sea salt
1 ts. of black pepper
1 ts. paprika
1 ts. dried minced garlic
1/2 cup of finely chopped celery
1-2 ts. of olive oil to help mix together

Put all of the above ingredients in a large mixing bowl, then use a spatula or good mixing spoon and mix well all of the ingredients until you get a nice looking salmon mix. Then use your spoon to divide the mix into 4 even sections. Then wash and use your hands to form 4 patties or cakes or burgers, whatever you prefer to call them :) For cooking, heat up a skillet or cast iron pan and make sure it is well oiled with olive oil, ghee or butter to fry in the pan. Cook on each side at medium heat for 4-5 minutes. Turn over with a handy flipper. Then it will be crispy and browned and fully cooked on both sides. Serve on a GF bun, or just on a plate with a side of veggies and potatoes. I served my salmons cakes with green beans and some roasted potatoes. I also made some homemade tartar sauce to serve with the cakes...

Homemade Tartar Sauce Recipe
1/2 cup fresh mayonnaise
1 freshly squeezed lemon (2 TB or so)
1 TB of dried cilantro
1 ts. of dried minced garlic
salt and pepper to your taste

Put all the above ingredients in a small serving bowl and wisk together for a minute and it is ready to top your cakes and spice up your fish dinner.

I hope you try this wonderful, fabulous healthy salmon dinner and feel satisfied and full of life.

Much love to you today! Hope you are well...

Stephanie


Tuesday, April 12, 2011

Tahini Raisin Drop Cookies (vegan)

Goodmorning sunshine! What a beautiful weekend we had here in Michigan...it finally feels like spring and the birds are chirping and the yard is coming alive with creatures and plants. Easter is right around the corner, which means there is little bunnies, chicks, eggs and baskets lining the grocery stores and markets. Which may get you thinking about what you may be doing for an Easter treat for the kids...

These cookies are here to get you ready for Easter treat ideas. I would call them, egg n'nest cookies, but then you might not really know what they are made of. They are a very simple, sugar-free, egg-free, and gluten and dairy free cookie... and oh did I mention, also nut-free. BUT, they have lots of flavor and crunch, and they are soooo cute too. They look like little eggs in nests and you may feel guilty if you are a true vegan eater, but I promise, they are truly vegan and yummy to boot.
I love these little cuties. And you may feel like you cannot have treats, or lamenting how difficult it would be to share a treat with a sensitive child for Easter...this recipe is for you. If you are a chocolate lover, then sub the raisin for a vegan chocolate chip or chunk. The chocolate may be more enticing to some rather than a wrinkly old raisin. I personally love the sweet chewy texture of the raisin. It also is a perfect match for the strong sesame flavor.
I have made 2 batches of these cookies already, and I bet I will be making another before the end of the month. I am loving how simple they are, and also how they are packed with nutrients and protein. I am not afraid of the fat from the sesame butter. I know my body needs it, and I know my body needs balance. That is what is so great about tahini...it is a creamy substance from ground sesame seeds that has a high dose of fat and even protein. It is a good source of iron and also essential minerals like copper, manganese, and calcium. They are a good dose of goodness if you ask me. Besides, did I mention how cute these cookies are....:)
Tahini Raisin Drop Cookies Recipe (vegan)
1/2 cup of raw tahini (sesame seed butter)
1 cup of sweet sorghum flour
1 TB of non-dairy milk (I used So Delicious Coconut Beverage)
1/3 cup of pure maple syrup
1 TB. of baking oil, use light olive oil, or melted coconut oil
1 ts. of baking powder
1/2 ts. of sea salt
1 ts. of ground cinnamon

Mix all of the ingredients in a mixing bowl and let sit for a few minutes for all the ingredients to soak into each other, then use a spatula and move your dough around a bit more. It is supposed to be a bit sticky, but also like a thick roll of cookie dough, almost like a traditional PB cookie. Roll out teaspoon sized balls in your hand and place on a cookie sheet, the cookies can be close to each other since they do not spread much. Press a raisin, or chocolate chip in the middle and push down into the cookie. Bake at 350 degrees for 15 minutes. This recipe will make about 30 cookies, but could be more or less depending on how big you make the cookies. This recipe is easily doubled if you want to make more, or bigger cookies in one sitting as well. They turn out to be a mix between a shortbread textured cookie and a nut butter cookie. I hope you try these cuties out and enjoy!

Much love to you today!

Stephanie


Friday, April 8, 2011

Creamy Kale Walnut Rice (vegan)

This recipe could be called 'green rice' because it is so green! But I thought I would title it with some of it's ingredients so that truth be told where it's color comes from. It is a simple, yet complex combo of flavors that is also a colorful green in celebration of spring. I have been keeping busy with getting ready for our garden, yet, with all this rain and colder temps this week it's been better to stay mostly inside and daydream from the window with my baby. I am not complaining about the rain though, we need it here. If we want moist and ready-to-dig soil, then we gotta enjoy this rain first. Although...I do think I need to get myself a snazzy-cute pair of rain boots when it is time to actually get out there..... Hmmm, this is a hint for my husband since my birthday is a few weeks away.....;)
But, in the meantime I am using some great green ingredients to make a creamy side or even a meal if you so desire... This recipe was inspired by some of my most favorite foods, along with what is laying around in my fridge and needs to get used. So, friends, here we go...

Creamy Kale Walnut Rice Recipe (vegan)

First, if you do not have 3-4 cups of leftover brown rice in your fridge like me, you will have to make some fresh on the stove. I always soak rice for 4-8 hours before cooking, (just cover rice in a bowl with pure water, rinse and then cook like usual). I usually cook a batch every/other week or so and have some ready in the fridge to use with soups, salads and ect. So, I make 2 cups dry at a time, but this recipe will use about 3-4 cups of cooked brown rice, so if you are just making rice for this recipe, then make 1 1/2 cup of dry rice with 3 cups of water.

Second, You want to assemble the ingredients for the creamy sauce, so this is what you need:

1 1/2 cup of chopped lactino kale leaves
1 cup of chopped raw walnuts
1/4-1/2 cup of fresh chopped basil, or 1 TB or so of dried basil
1-2 cloves of minced garlic, or more if you love garlic. You can use dried garlic as well, about 2 ts. of dried garlic powder
1 ts. of dried oregano
1 ts. of dried marjoram
1/2 cup of water
1/4 cup of olive oil
1 TB of fresh lemon juice
1 ts. of sea salt or to your taste
1 ts. of cracked black pepper or to your taste

Put all of the above ingredients in a food processor, blender or magic bullet and blend on high to whip up a creamy green sauce. It should be a thick creamy substance when done, and if you need to add a touch more water or oil to get it moving in the blender, then do a spoonful at a time to get it moving to blend better. Then you have your sauce made and ready for mixing.

Lastly, steam/cook 1-2 cups of green beans, or sweet peas.

Put it all together: Combine in a large bowl the 3-4 cups of warm cooked rice, the sauce you blended and the steamed beans or peas. If you are stirring together cold rice and veggies, then I suggest you stir the rice, sauce and steamed veggie together on the stove to get warm together. The dish is done when it is all stirred and warmed together. Serve warm, not super hot... so that you can enjoy the flavors together. This is a great side, but if you want to add a protein to it or with it, then you have a whole dish as well.

Some toppings for this dish:
fresh basil
squeeze of lemon
pine nuts
chopped raw walnuts
favorite Italian cheese or vegan cheese
There you have it. I hope I didn't miss anything. It is really not that hard to make, just a few steps and mix it all together for the dish. Have rice, blend sauce and add veggie. Viola you are done! So, friends, I hope you enjoy this super green recipe. Hopefully this green dish will continue to encourage us as out grass starts to turn green again and the plants are ready for planting. I love this time of year....

Much love to you today!

Stephanie


Wednesday, April 6, 2011

Banana Berry Muffins (gluten-free, vegan)

Another banana recipe. It's been a busy week here. Trying to get ready for my garden, I have been planting seeds in containers and germinating them under daylight lights in the basement. Hopefully, if the weather permits and the ground starts to thaw a bit more all will be ready for planting within 4 weeks. I am so excited to finally be planting some more food in my little urban yard. Who says you can't have a bountiful garden in the city? :) (I will let you know how it goes... then we can judge it can be done or not).

Anyway, so another banana recipe. :) I had lots of ripened 'nanas' here in the kitchen and looking for a quick mix recipe that would be a good treat for me and my family this week. I love using up ingredients in my kitchen for a purpose. And, I hate wasting food. So, when I can create a baked good out of foods that need to get eaten, I am all in. I bet you feel the same way these days. Have you noticed how food prices are rising? I know I have. Another reason to be excited for growing your own food in your own yard. With food, gas and many other prices on the rise it is important to not be wasteful. To be a good steward. And to get the the most from the money you do spend on the food you buy. So once again, I bake muffins...

Why is banana bread or muffins so comforting? I am not really sure, but this recipe was a quick fix and a comforting treat this week. So moist, chewy and yummy. I always feel like when I make a banana muffin that it is the best one I have made yet, and so naturally I feel that way about these muffins. I never buy packaged snack or junk food. It just doesn't compare to freshly baked muffins. Gluten-free muffins taste better, they're better for you, And, it saves you money... so put that pretty apron on hunny and start up the oven. It's time to bake.

Banana Berry Muffin Recipe (gluten-free and vegan)
1/2 cup of millet flour
1/2 cup of tapioca flour
1 cup of organic corn flour
1/2 cup of organic corn meal
2 ts. of baking powder
1 ts. of baking soda
1 ts. of xanthan gum
1/2 ts. of sea salt
3/4 cup of non-dairy milk separately mixed with 2 TB of fresh lemon juice (1 lemon). Set aside milk and lemon in a small bowl for 5 minutes to start to curdle and turn into a "buttermilk-like" mixture. I used So Delicious Coconut Milk, which works wonderfully!
1/3 cup of maple syrup 
1/3 cup of melted coconut oil
1/2 cup of unsweetened applesauce
1 1/4-1/2 cup of ripened mashed bananas (I used 3 large bananas)

1/2 heaping cup of berries (fresh, frozen, blue, red, or black)

Mix all of the dry ingredients together first, then add the milk/lemon mixture, oil, bananas and applesauce to the mix and mix well. Lastly fold in the frozen/fresh berries and make sure to carefully fold and not mix too well. Unless you want blue-battered muffins. I used frozen blueberries I had leftover in my freezer from last summer which were so ready to be eaten as well. But this recipe could use fresh berries too, or a mix of raspberries, blackberries or blueberries... whatever fits your fancy. I love how you can tell a muffin is going to be fabulous even before you bake it. That's how I felt about these pre-baked beauties pictured above.

Bake at 350 degrees for 30 minutes and pull from the oven and let cool for 5 minutes before moving. Then they are ready to eat.... :)

Oooo, tearing into one of these babies warm from the oven is heaven! Gluten-free at it's best! I can't stop gushing... Ok ok, here's the recipe before you go crazy listening to my ooooing...
Hmmm, here I go again. Just look at that moist sweet banana berry goodness! I am in love! And, now it is back to work for me... thanks for a quick break with me!

Much love!

Stephanie

Saturday, April 2, 2011

Banana Butter Pancakes


It's Saturday! One of my favorite days to make a big and special breakfast with my family. Today we made a special banana pancake with sunflower seed butter, which is why these are called "Banana Butter Pancakes." They are so chewy and have a perfectly sweet taste with the added banana and butta'. If you want to drizzle some pure maple syrup, then you have it made!

I love pancakes. There are many ways you can whip them up to be a healthy breakfast. Added pumpkin, fruit or even vegetables and you have a easy way to eat your basic food groups. Don't let yourself get bored with breakfast- make something special and celebrate another day! Every day is a gift and it is important to live for all it is worth. I am reminded of that today as there is so much hurt, pain and troubles in the world. I am so thankful for every day that I get to spend with my loved ones, eat real food and be blessed by God's love and mercy. So many times it is easy to compare your life to others and wish you had something they had.... a "normal-easier" diet, a skinnier waistline, a larger bank account, the list goes on and on. But if you had it, would you be happier, or still wanting something else? I bet the people that do have the "normal-easier" diet, skinnier waistline and larger bank account still want something you have, so it is a vicious circle.

Eating gluten-free can sometimes make you wish for a life of normalcy or a different life in general. You just want to be normal when you go to that restaurant, or out with your friends... you just wish you didn't have to read all the labels and be such a good planner and shopper. Friend, you are not alone. There are many of us. And, we are doing ok, and we are celebrating that we can live gluten-free! Just remember that living gluten-free actually allows you to live. Living with the limitations actually allows you to be better in your day in and day out. You can run the race, you can celebrate with friends, and you can eat those pancakes...

Yeah, you can eat those pancakes. It is a good life living gluten-free. So don't try to hide it. Don't try and wish for something else. You got a gift my friend, it is a life of abundance and love. Don't give up on yourself. Keep looking for new ways to celebrate this life you have been given and take nothing for granted!

Banana Butter Pancake Recipe
1/2 cup of corn flour
1/4 brown rice flour
1/4 cup of millet flour
1 TB of coconut palm sugar
1 cup of non-dairy milk (I used So Delicious Coconut Milk)
2 ts. of baking powder
1 TB of light olive oil or melted coconut oil
3 TB of creamy sunflower butter
1 cup of mushed ripe banana
1 fresh egg, or egg substitute


Mix all the ingredients in a mixing bowl and pour with a ladle or 1/4 cup measuring cup little cakes into a oiled frying pan or griddle. If you are wondering ho much oil, use about a spoonful-amount. Or use ghee, that works great too. Cook on each side on medium heat for about 2 minutes or until they turn fluffy with no gooey middles. If you want to press your spatula on the pancake to check if it is done, there will be no oozing batter when done.

This recipe makes about 6-8 small pancakes. Enough for 2-3 people. Double this recipe if you want to make enough for 4-6 people. Or, they also freeze really well, so make a big batch and have them in the freezer for an easy thaw out in the morning for a quick on the go breakfast.

Some good toppings for pancakes:
chopped raw seeds or nuts
fresh fruit
fresh jam
toasted coconut or seeds

Drizzle with some pure maple syrup, top with some fresh fruit or a smoothie on the side and you have a hearty yummy, special breakfast!

Now I must go enjoy this day with my family. I hope you do too! Have a happy Saturday and much love to you as always!

Stephanie