Wednesday, August 31, 2011

Garden Fresh Quinoa Pilaf (vegan)

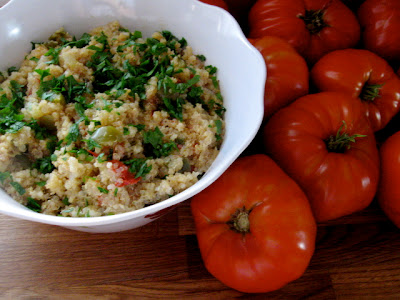
We have tomatoes, tomatoes and more tomatoes. So beautiful. I have made tomato-everything the past few days, sauce, soup, and the list goes on. I can't help but feel a bit motherly over them since we grew them from seed in our basement. They are our little babies that grew into beautiful plants and gorgeous tomatoes. They are so ripe and fabulous that I could not go back to buying tomatoes from the grocery store that sells them from far, far away. These fresh ripe tomatoes remind you of how wonderful real food can be. If your tomato eating experience lacks flavor or reminds you of eating a plastic toy tomato slice, then friend, you must plant your own tomatoes or buy from your local farmer. You will be converted just after one slice.
It's almost funny to me when I think back on my life of eating vegetables. I used to hate tomatoes, onions and most green things. Maybe I was just a child and lacked mature taste buds, or maybe I was just raised a part from fresh local produce, or maybe I was just so disconnected from where real food came from. Either way, I have seen how fresh real food does make the healing difference for your body. You feel more alive, because the food you are eating is in fact, alive. Not processed in a machine, or genetically modified... these foods that pretend to feed you are only flashy convenience. Maybe you wonder why people that eat fresh food and vegetables seems so happy? Well, it's in the food. It really is. All those vitamins and minerals feed your mind, body and soul and make you happy. True food comes from the ground my friends, and when you decide that fresh food is they best way to eat, then you will be craving more and more of simple dishes like this garden pilaf.


Garden Fresh Quinoa Pilaf Recipe (vegan)
1 cup of chopped sweet onion
3-4 cloves of garlic
1/4 cup of olive oil
2 cups of chopped zucchini
1 heaping cup of chopped sweet or bell pepper
1 heaping cup of chopped fresh tomato (skins on is ok)
1 1/2 cups of dry quinoa
3 cups of vegetable broth
sea salt and cracked pepper to taste
handful of freshly chopped basil and parsley to serve

In a medium to large pot, saute the chopped onion and garlic in the olive oil. Then after a minute add the zucchini and peppers, saute all together for a few more minutes until you noticed them getting soft. Then add the diced tomatoes and keep cooking, you will notice more moisture at this point from the veggies cooking down. Then lastly add the dry quinoa, and broth and stir continually until you have a boil again. Add some sea salt and pepper at this point if you wish to add a touch of flavor while you cook. Turn down the heat and stir occasionally, this dish will take about 15-20 minutes to cook up and you will notice how the quinoa and veggies cook together quite perfectly. Lastly, turn off the heat and let sit for a few minutes to fluff up and cool down. Then add the freshly chopped basil and parsley for added freshness, vitamins and flavor. Serve hot, warm or cool. It is perfect for almost any summer dinner or picnic.
This dish I have made again and again this summer. So simple, fresh and easy. I love how a dish like this will go with most anything. I think it will once again be on my Labor Day Weekend Menu and I love how the fresh tomatoes add so much flavor and depth. I will put together a few recipe ideas for Labor Day weekend in my next post. Can you believe we are here already??? Crazy!

Much love to you today!

Monday, August 29, 2011

Blueberry Pie Ice Cream (vegan)

Can you believe this is the start to the last week of "official" summer? It is just crazy how fast summer flies. I always think we have more time to go to the beach or pick more berries, but then before you know it, summer winds down and it's back to the fall routine. So much to savor about the summer months; long days of sunshine, campfires, and my all time favorite...homemade ice cream and berries. When the long hot days of summer got you sweating and ready for something cool, it's time to make a batch of ice cream.
I think it is pretty obvious how much I love blueberries, and even so cobbler, pies and such, but what about mixing up a blueberry pie into your homemade ice cream? Would is be yummy as one dish? I have tried and proven this answer to be, YES! Just add a touch of cinnamon and some crunchy graham crackers or granola and you have frozen blueberry creamy pie.

The base of this vegan ice cream is frozen bananas and full fat coconut milk. They are a perfect mix to making a soft serve type ice cream, and if you want it to be more solid, then just let it hang out in the freezer for a while and you will have hard serve in no time. It is really so easy to make dairy-free ice cream at home on your own, especially for a group of people. I made a similar ice cream a few years ago about this time of summer. Kinda like the last hurrah before we settle in to more routine. Of course, for me, I am just looking forward to apples, pumpkins and cider...I truly fall in love with each season for what it brings.

Blueberry Pie Ice Cream Recipe (vegan) (serving for 6 people)
6 cups of (or 6 rough chopped) frozen banana pieces
1 can of chilled coconut milk (full fat is best)
splash of fresh lemon juice
1/4-1/3 cup of coconut milk beverage (So Delicious brand is best)
1 ts. of ground cinnamon
dash- 1 ts. of ground nutmeg
1 cup of fresh or frozen blueberries ( I prefer frozen here)

Put all of the above ingredients in a high-powered blender and mix, blitz and do what it takes to get the texture of ice cream. Add the coconut milk beverage (or other non-dairy milk product) slowly to get things moving. You may need to stop and stir a few times to get everything moving through the blades. I like to add the frozen blueberries to this mix because you are making something frozen anyways, but then add the fresh berries to top for a little extra something and for looks. Serve right from the blender for soft serve ice cream, or if you want it to stiffen up a bit, then put in a steel or glass container in the freezer for best results. Let it hang out in the freezer for no more than 2 hours for a hard ice cream, and to keep you can keep freezing, but you may need to set it out to "defrost" a bit before you spoon up some more for another time. This recipe makes a one cup serving for about 6 people.

For serving:
-a few more fresh berries to top and serve, maybe some mint or basil for looks :)

A personal review of the Kinnikinnick graham crackers is that they are a great convenient way to have a GF graham dessert. They are tasty, perfect for this ice cream, would be a fabulous pie crust, and of course to make the beloved campfire favorite s'more. So, they are (in my opinion) a great GF alternative, yet, I would only buy them for special occasions. Not an every day kind of treat. The Kinnikinnick Co was kind enough to send me some samples of their product for tasting and review. And, the other great thing about this product that it is on a 10% discount for the remainder of the week. So if you are interested in trying these out, go to their website and order a box while it's on sale. I was pretty impressed with this product for what it is, and was thankful to try it out in this new ice cream of mine. Pretty perfect match for taste. Thanks, Kinnikinnick for being dedicated to GF people!

This ice cream is a fabulous way to have a decadent dessert without the mention of chocolate. So creamy and fresh. If you haven't made your own vegan dairy-free ice cream before... I am telling you that you must. Get some overly ripe bananas in the freezer for a day and a can of coconut milk getting chilled in the freezer and then you have all you need to get started. If you don't have blueberries, try another berry or fruit and get creative. There are literally hundreds of flavors you can make. You may even want to start your own vegan ice cream shop for your friends. So fun!

I hope you enjoy this last week of official summer and plan to make this delicious treat before summer us up.... perhaps a labor day weekend treat? I think so!

Much love to you today.

Friday, August 26, 2011

Blueberry Peach Cobbler Bars (vegan)

Last night for dinner we ate out. Out of our garden that is. It was pure love let me tell you. So fresh and flavorful. True payback after weeks of work and tender-lovin'. I steamed green beans with a little drizzle of olive oil and sea salt and cracked pepper(my favorite!), then added in a sweet onion and zucchini saute, along with steamed broccoli with a sprinkle of sea salt and red pepper. Super simple veggie sides (or shall I say main course!). They are so wonderful you don't need to do much. I promise. Also, with some fresh heirloom tomatoes I made a roasted with basil to make a fresh tomato sauce to pour over a bed of brown rice pasta. It was a dinner from heaven. And, I loved watching my boys eat their veggies. Especially my little babe with his pudgy fingers, and watching him lick his lips for more zucchini (his favorite!). So precious.
And after the evening chores of dishes, sweeping and taking our evening walk around the neighborhood. The babe got a bubble bath and went quickly to bed to leave me and the hubby with a quiet night at home. At last. The hubby and I settled in for some reading... and some cobbler. Cobbler bars that I made earlier in the day. So they are a bit less decadent that a bubbling cobbler in the oven ready to eat warm with some homemade vegan ice cream, but still amazing none the less. They are hard not to want more. It's like a fruit cookie, or pie. So you must stop yourself to savor the goodness and enjoy it while the bountiful fresh fruit is in season. A perfect ending to a gorgeous summer day!
I have been trying to come up with a cobbler-fruit bar that would stick together for years. And this one is a bit crumbly, but holds together quite nicely. I am pretty excited about this recipe, and hope to make it again and again in the future. It was also baby-approved. He really loves blueberries, and I love his jam covered face. So yummy to kiss!

So, here is my newest favorite bar recipe.... I promise it won't disappoint...
Blueberry Peach Cobbler Bar Recipe (vegan)

Base and Topping:
3/4 cup of gluten-free oat flour (grind oats in a blender to make your own)
1/4 cup of rolled gluten-free oats
1 cup of sweet sorghum whole grain flour
1/2 cup of tapioca flour
1 ts. of baking powder
1 ts. of baking soda
1/2 ts. of sea salt
1 ts. of ground cinnamon
1/3 cup of slightly ground raw sunflower seeds
1 TB of flaxmeal

wet:
2 TB of non-dairy milk (I used hemp milk)
1/4 cup of applesauce
3 TB of warmed coconut oil or olive oil
3 TB of vegan butter (Earth Balance-soy free is what I use)
Mix all of the dry ingredients together first and then add the oil and the vegan butter. Mix with a fork like you are making a pie crust and then add the applesauce and milk. Then continue mixing until you get a sticky, crumbly base. Divide the base in half in the bowl and take half of it and press it one inch thin on the bottom of a 9x13 pan. Oil the pan first if you are worried about sticking. Then use a cup or spoon to press out evenly in the pan. Then, the base is ready to fill with fruit. The leftover cobbler batter save in the bowl to use as the topping...
Fruit Filling:
3 cups of washed fresh blueberries
2 cups of thinly sliced fresh peaches
2 TB of tapioca flour (starch could work here too)
2-3 TB of maple syrup or more coconut sugar
squeeze of fresh lemon or add a splash of vanilla

In another bowl, mix the fresh berries and peach slices with some flour and syrup. It should create a syrupy coating over the fruit, and then pour evening over the cobbler base in the pan.
Then, take the remaining cobbler base and crumble it over the fruit. There will be lots of fruit showing. It is not meant to cover the whole fruit filling completely. Then sprinkle some raw sunflower seeds if you wish, or if you prefer you could use a chopped nut as well.
Then, bake in a pre-heated 375 degree oven for 45 minutes. You will know it is done when you see the fruit bubbling, the crust is golden and your kitchen smells like heaven.
Let cool for at least 1 hour before cutting into. This will help reduce the mess and keep the bars intact. The 9x13 pan can be evenly cut into 20 bars (4x5).
Well friends, that is it... a new favorite summer fruit recipe that will have you coming back for more. I hope you enjoy and have a fabulous weekend. It is supposed to be absolutely gorgeous weather here (maybe squeeze another beach day?).... yet, as we watch the national weather sending out much love and prayers to those preparing for the hurricane on the east coast. Praying for safety and strength for all.

Much love to you!

Monday, August 22, 2011

Whole Grain Summer Fruit Cake (vegan)

This cake defies all. It is gluten-free, dairy-free, sugar-free, egg-free, nut-free, vegan and to top it all off- it's whole grain too! No added fillers, gums, or white anything. Pretty exciting... I guess you could call me "proud". That's ok... it's alright to be proud of something great, right?!
Ok, ok, I cannot take the credit here. You can give the credit to the fresh buckwheat and gluten-free oat flour. They hold up beautifully and makes gluten-free baking easier.
I mean, gluten-free usually means you take out the white wheat flour and put in the white whatever flour to try and get a close substitute. I am not against regular gluten-free baking at all, but it is pretty exciting when you can eat a baked, whole grain, gluten-free treat. Or, maybe, I just love to baking-nerd and find joy in nutritious treats.

I added fresh yummy, seasonal fruit to this cake, mostly because it is what I had on hand. Plus, I stumbled into another u-pick, no-spray, blueberry farm this weekend and walked away with another 10 pounds of berries. I don't think I will be able to get enough in the freezer this year though, the season is flying by and I am trying to get as much as my freezer will hold.

This is called a 'summer fruit' cake because of the fresh peaches and blueberries that are so perfect and juicy this time of year. I am blessed to live in a place that have fresh berries and fruit in abundance this time of year. So thankful for each berry. (Especially after knowing how much work goes into picking 10 pounds!)

Whole Grain Summer Fruit Cake Recipe (gluten-free, vegan)
1 cup of freshly ground buckwheat flour
1 cup of freshly ground gluten-free oat flour
1/2 cup of millet flour
1/3 cup of flaxmeal
1/2 ts. of ground stevia powder or 1/4 cup of pure honey
1 ts. of baking soda
1 ts. of baking powder
1/2 ts. of sea salt
sprinkle of cinnamon
1/2 cup of light olive oil or warmed coconut oil
1/2 cup of non-dairy milk
1/4 cup of organic apple juice (or water)
1/3 cup of pure maple syrup
1 cup of mashed ripe banana
1 heaping cup of freshly diced peaches (about 2 peaches)
1/2 cup of fresh or frozen blueberries

Mix all of the dry ingredients together first in a large mixing bowl. Then add the mashed banana and other wet ingredients. Last add the washed diced fruit and fold in carefully. Then pour into a 9x13 oiled baking pan, or a bundt cake pan (what I used) or muffin tins or even 2 9x9 cake pans.
Bake the 9x13 and/or bundt cake for 55-60 minutes and check with a toothpick in the middle of the cake to make sure it is fully cooked through.
Then, let cool for at least 15 minutes before cutting into. Then, ENJOY!
This cake holds up well, but is best to be refrigerated if not eaten within a day or two. And, it will freeze well I am sure.
This cake had my baby's stamp of approval. He loved it warm from the oven for a mid-day snack. And, I love giving him nutrient dense food that is sugar free and delicious!

I hope you try this one out and enjoy!

Much love to you today- and I am hoping to share more blueberry lovin' in my next few posts!

Thursday, August 18, 2011

E.L.T. Sandwiches (Egg, Lettuce, Tomato!)

This "recipe" is not really an original recipe of my own. It is one that people have been making for decades ( I assume) and it is one that my husband has inspired me to make again and again. It is so easy, full of fresh summer yumminess, and not to mention nutritious. I think I should title this recipe, "Matt's ELT sandwiches" because he is the brains behind this operation, and loves to go on and on about how fabulous these sandwiches are. I couldn't agree more!
I decided to post this recipe idea (and some delicious pics) and how to make it because of the abundance of fresh tomatoes this season. In my own garden, we have about 30 tomato plants and they are just starting to turn ripe. We have had HUGE green tomatoes on the vines for weeks, and now they are just starting to turn orange, and now red. So exciting! I grew these plants from little seeds in our basement in March, and then planted them in our newly tilled back yard the last week of May. I can't help but get a little sentimental about them. They are like your babies that have been planted and grown into such beautiful fruit. There is something wonderful about growing your own food (of course, with the help of water, good soil, prayer and God's grace!)
We are about to have tomatoes coming out our ears in the next few weeks. I am going to try my hand at canning some, and then maybe some salsa, and then maybe some sauces and salads. I can't believe how big some of these heirloom tomatoes are. Some are as big as my face! They are just simply beautiful. I never really loved tomatoes until now. They have stole my heart and I can't help but smile.
Here is my most favorite way to eat fresh, ripe and dripping juicy tomatoes...

E.L.T. Sandwich Recipe (for one, can be doubled and tripled)

2 pieces of your favorite gluten-free bread- I used Sami's Millet and Flax Bread, not certified gluten-free, but my absolute favorite GF ingredient bread that I can buy from my local health store.

Put the broiler on 500 degrees in your oven, and place the pieces of bread on parchment paper on a baking sheet. Brush the bread with olive oil, and sprinkle some garlic powder over the oil. Then, put in the oven/broiler for 1-2 minutes until it is crispy and toasted. Keep a close on on these, they can quickly burn if you don't watch it. Turn and just toast the other side of the bread if you prefer extra toasty-ness. Then, cover your toast pieces with some fresh, real mayonnaise.
In a cast iron skillet, fry 2 free-range organic eggs in a little olive oil or ghee. Fry for 1-2 minutes on one side...till the whites are cooked and bubbling. Sprinkle with a little sea salt and black pepper and then turn the egg over to fry on it's front side. Cook for another 1-2 minutes. If you like your eggs runny, then do not cook the yoke, if you want to have a less messy sandwich and cooked yoke, then break the yoke bag and cook thoroughly. Personally, I like my yokes a bit runny, so I pull the eggs from the skillet right after the whites are cooked.
Then, thinly slice your juicy tomato

And wash and dry your fresh favorite lettuce leaves
And, then you assemble:

-Toasted garlic bread with real mayo spread on 1 or both slices
-2-3 pieces of fresh lettuce
-a large serving of fresh tomato slices
-and 2 fried eggs

additional ingredients for those that like meat and dairy:
*fried organic turkey or pork bacon
*organic cheddar goat cheese
Well, you know what I will be eating for a few weeks while the tomatoes are perfectly ripe. This sandwich is perfect for any meal, and is so quick and easy you will have the kitchen cleaned up before you normally finish dinner. Plus, why not get out for an evening walk?! Summer is quickly leaving us. So enjoy it this season for all it's gifts... and eat some fresh juicy tomatoes in your favorite way :)

Much love to you!

Tuesday, August 16, 2011

Carrot Quinoa Bars (gluten-free, vegan)


If you ask moms what their kids like to eat, I would guess that vegetables would only be the answer for a few. We probably all wish they would eat more vegetables than anything else, but the reality is that it is sometimes hard to fit them all in and get them to really love and want them. Maybe that is why as adults we grow into the habit of not eating as many vegetables as we should. We have been groomed to only eat a few and it takes work to eat them every meal. And, our kids watch us eat, so if we are struggling to eat our greens, why would they?
Yet, this is what our bodies are created it eat. Plants. Green things. Things that grow from the ground, fall off of trees, and that need to be replanted to get more. Not things that come from plastic wraps and cardboard boxes and that you can just go to the store to get as much as you want. Plants are what our bodies need and thrive on...

Those who agree with this are the ones that have been sick for periods of time, and then decide to stop eating the sugar, high fructose corn syrup, dyes, preservatives, and chemicals. Which pretty much leaves them to only eat... plants. Plants are what heal. But in reality, they are just bringing your body back to balance and what it originally intended to eat from the beginning of time. Plants are what we are designed to eat, and your body actually recognizes plant-food when you eat it. And, when you eat the fake stuff, it is confusing and leads to toxic build-up and sickness.
That is my number one goal as a new mom trying to feed my baby food. Everything I put in front of him is new to him, so he doesn't know about french fries, pop tarts and candy. He only knows about green things, sweet fruit, and whole grains. He will find out about those fake foods some day. But for now, he knows and loves food that is real.

I want to instill in him the pure love for plants and real food. And, that the other stuff is just fake "food" wrapped in plastic. The real food is what grows from the earth and to that we must thank God for everyday.

I pray that I may have the strength and courage to show my son the love of plants, and eat what is real and beautiful. The challenge is really to eat the plants myself, so that he can do as I do. He is a little monkey after all.... what I do, he does. So, friends, I pass along this challenge to you today... Eat plants and your life will be alive, beautiful, and grounded in creation.
Here is a little recipe I made to make eating quinoa and carrots easy for my little guy. This may just be a variation of some other muffins I have recently made, but I am really loving how cooked quinoa in a baked treat, and how you don't need to add eggs, and not to mention how my baby loves it. Enjoy!

Carrot Quinoa Bar Recipe (gluten-free, vegan)
3 cups of pre-cooked quinoa
2 cups of shredded carrots
1 cup of fresh millet flour
1 cup of tapioca flour
1/4 cup of flaxmeal
2 ts. of baking soda
1/2 ts. of sea salt
1 ts. of ground cinnamon
1 ts. of ground ginger
1 ts. of ground stevia powder
1 mushed ripe banana
1/3 cup of non-dairy milk (I used hemp milk)
1/3 cup of pure apple juice
1/3 cup of olive oil
3 TB of maple syrup 

optional additions:
1/2 cup of organic raisins
1/3 cup of organic shredded coconut

Mix all of the above ingredients in a large mixing bowl. Then, after it is well blended, pour into a 9x13 oiled pan. (Or you can make tow 8x8 pans, or 12-15 muffins). Bake in a 350 degree oven for 50-60 minutes. Check around 50 minutes to see if it is baked through with a toothpick. Bake until it is no longer gooey in the middle and the tops are golden and crispy.

Let cool a few minutes before cutting into. It is wonderful warm from the oven, but great the next day too kept on the counter (or fridge in hot/humid temps).
A pan will make as many bars as you cut, but I think a good cut size is 2x3 and you can get about 20 bars. They are perfect for snacking, take-along,s and breakfast. My baby doesn't know it now, but with a mouthful of quinoa and carrots, he is getting a nutritious yummy treat that doesn't come from a wrapper.
I hope you have a great day and enjoy life for all of it's gifts. Especially plants :)

Much love to you!

Saturday, August 13, 2011

Tangy Cucumber Salad with Plum Vinaigrette (vegan and raw)

Sweet and tangy. Crisp and cool. What a salad for a summer day! Simple and fresh and ready for almost any lunch or dinner meal. Yet, the cucumbers are not the main star of the show...the shiro plums that make up the sweetness of the dressing is the other daring flavor to be found in this wonderful salad. I am a big fan of having a little sweetness with a little sour. I like a sweet and spicy combo as well... or maybe I just like any kind of sweet combo :) Either way, this homemade salad dressing is one to love.
Cucumbers could be called boring. But, when you have them growing like weeds or finding them for mere pennies at the farmer's market, you must try your hand at making something grand with them this time of year. A salad of course. Nothing too crazy, just a simple salad without the leaves.
These little cuties are the 'shiro' plums. They are obviously a yellow plum variety, but they have been described at big juicy cherry-like plum. I have not tried them before this summer. I found them at my local farmer's market, and after seeing them, talking to a farmer about them, leaving, and then coming back to buy them, I am glad that I did. Afterall, I do like to try new things, and these little juicy fruits will make you smile. So, today I share with you a little cucumber creation to enjoy this weekend, along with lots of summer-relaxing I hope.
Tangy Cucumber Salad with Plum Vinaigrette Dressing Recipe (vegan)
6 small cucumbers (about 4-5 heaping cups of pealed and diced cucumbers)
1 small sweet onion, thinly sliced and diced (a red onion works too)
1/2 cup of raw sunflower seeds
1/2 cup of organic raisins
optional additions: finely chopped mint or sage

Peel and quarter the cucumbers and put them in a serving bowl. Then add the finely chopped onion and sunflower seeds and raisins. Set aside to make dressing...

dressing ingredients:
1/2 cup of pealed and chopped shiro plum pieces with excess juice
1/4 cup of apple cider vinegar (balsamic works too)
1/4 cup of extra virgin olive oil
2 TB of maple syrup
1 TB of prepared mustard
1/2 ts. of seal salt
1/2 ts. of black pepper

Put all of the above ingredients in a small blender or magic bullet. Blend on high till oil is emulsified and plums are pureed completely. Then pour the whole dressing over the cucumbers and mix well. Top with additional seeds or raisins and mint if you want more.

Serve freshly made, or let the dressing and cucumbers marinate together in the fridge and serve cold.

Serving size 6-8 people.
Well, there you have it. A yummy summer salad. Every time I make a cucumber or fresh cool salad like this, I ask myself why I don't make these more. They are so yummy and refreshing. I only suggest that you make enough to share with your friends, or bring to a picnic or barbeque. It is a perfect side to almost any summer meal.

I hope you enjoy and have a beautiful day!

Much love and light to you!

Monday, August 8, 2011

Peach-Topped Maple Oat Shortbread Cookies (gluten-free, vegan)


Maple-kissed oat shortbread cookies. Plus peaches... It's like eating a peaches n' cream oatmeal bowl in one yummy bite. So simple and delicious. I don't know what part I love more... the maple goodness, or the sweet peaches, or even the crumbling oats. Every bite has a perfect dose of each. I have fallen in love with these cute treats and my husband knows it...
I was away on vacation for a week, and away from my own kitchen. So always nice to be home and sleep in your own bed, and even so, cook in your own kitchen. Yet, I did enjoy being away. Sometimes you just need a break from routine you know. So nice to relax and enjoy my loves. When we got home, I made these little cookies with some fresh picked peaches that I got while away on vacation in northern Michigan. My husband walks into the kitchen and smells the goodness in the oven and exclaims, " You're back!" Like I was lost somewhere...

I am lost when I can't be creative. I'm a serious wreck. So, it's a good thing when I can let loose and create something just for me (and for all those to enjoy!) So these little sweeties came into existence with a few simple ingredients. They are free of sugar, eggs and nuts and of course gluten. No need to tell your friends though, they will want another after only one and who would blame them.
Just look at those pre-baked cuties. There is just something about them that will make you smile. Not to mention, they bring bright cheery sweetness to a rainy day. So wonderful for an afternoon tea break. And, if you don't have one of those in your schedule, you might just have to make these sweet things and create space for your first official 'tea break'.
After baking they will be golden in every way, crispy and sweet, and ready to eat!
Enough of my blubbering, I am sure you want the recipe before I go on and on about how much I love peaches...


Maple Oat Shortbread Cookies with Peach Tops
1 1/2 cup of gluten-free oat flour (I make my own by grinding gluten-free rolled oats in a food processor or magic bullet on high for a minute or so)
1/4 cup of gluten-free rolled oats
1/2 ts. of sea salt
1/3 cup of organic palm oil shortening (Spectrum Organic's Brand) Or use the same amount of extra virgin coconut oil that is solid
3-4 TB of pure maple syrup (I use local Michigan maple syrup...hm, the best!)
1 TB of So Delicious coconut milk beverage (or other non-dairy milk)
splash of vanilla (half teaspoon)
dash of cinnamon (half teaspoon)

Mix the flour, oats, salt and cinnamon in a bowl together with the shortening. The batter will almost be like a pie crust, with pea-sized batter pieces. Then add the maple syrup and splash of milk and vanilla and then mix well. It will be sticky, but that is ok, use a spoon to spoon out little balls sized pieces on a parchment papered baking sheet. You can roll the batter in your hands if you want, and then press your finger or thumb in the middle for the fruit topping.

Then, in a sauce pan,
put 1 cup of diced and pealed, fresh peaches

Cook on medium heat for 5 minutes or so to reduce the liquid and make a peachy-sauce. It should be free of most of the liquid when you spoon it into the cookies.

If you don't have peaches on hand, you could use 1 cup of any stone-fruit, like apricots, plums, or even cherries. These fruits seems like they would work best for this type of cookie.

Or, if you prefer, I bet some homemade preserves would be a yummy center to these cookies as well.

Try the peaches though...

They are so yummy!

Anyway,

Spoon a teaspoon or so of peach-sauce into the center of each pre-baked cookie. Like you would for thumbprint cookies. This recipe will make about 15-18 cookies depending on how big you make them. Then bake for 15-18 minutes in a 350 degree oven. They will be done when you decide on how crispy and golden you want them. Make sure to watch carefully so that you do not over bake and burn.

Then, pull from the oven and let sit for just a few minutes. The peach centers will be hot.

Now, it is time for trying...

I know you will have one and then think that it would be ok to have another...

or another...

They are cute enough.

Hope you enjoy and have a beautiful week. Don't forget to enter the Joy Bauer GIVEAWAY by Friday morning!

Much love to you!