Monday, November 28, 2011

Leftover Curried Turkey Salad

It's Monday. Monday after a long holiday Thanksgiving weekend with lots and lots of amazing food and relaxing. Our Thanksgiving feast was amazing, even though not everything went as planned it was still a great day. When does everything go as planned anyways... :) We had plenty of food to go around for the whole family, with a good helping of leftovers as well. The pies were a hit, and with not much leftover I even made another two pies to get through the holiday weekend leftovers. I'm a little bit crazy about pie though, and really love making pie too. Especially this one. And this one. Perfect holiday deliciousness!

But, now it's days after the holiday and we still have some wonderful roasted turkey still around. So, why not make an amazing and fresh turkey salad that can be layered over a bed of greens or served with your favorite gluten-free bread, chips or crackers. I ate a lot of tuna, egg and chicken salad when I was a kid and this recipe is a grown-up version of all the love for a mayo coated salad. I guess because of it being a food I ate as a child, it has a special place in my heart and may even find it's place as a personal comfort food. This salad also has all of the perfect fall flavors paired with a nice dose of curry powder to bring it to an addicting lunch, appetizer or meal centerpiece.
Leftover Curried Turkey Salad Recipe
1 pound (3 cups) of leftover roasted turkey pieces (light and dark meat)
3 stalks of celery finely chopped (about one cup)
1 large apple finely chopped (about one cup)
1/2 cup of dried cranberries or cherries
1 Tablespoon of fresh chopped parsley
1 Tablespoon of fresh chopped sage leaves

1 Tablespoon of curry powder
1/3 cup of organic mayonnaise (or egg-free vegan vegenaise)
1 Tablespoon of extra virgin olive oil
1 Tablespoon of prepared mustard
1 teaspoon of gluten-free tamari sauce
dash of sea salt and black pepper


In a mixing bowl, add your shredded roasted turkey pieces and your finely chopped celery, apples, herbs and dried cranberries.  In a separate bowl, add the mayo, mustard, tamari and spices, then whisk the sauce together really well and then pour over the turkey and fresh ingredients in the other bowl. Mix well together and top with some fresh cut herbs or sea salt and pepper if you want.

Serve with your favorite GF chips, crackers or bread. Or just add it to a bed of greens to serve up. This recipe will make enough for 4 people to have a heaping cup-full serving. Could be enough for 6 people if you were not serving as the main dish. This is a perfect leftover lunch,or  could even be a festive appetizer dip for another holiday party. Enjoy!


Well friends, I feel like I am on a holiday cooking hangover and hope to get back to the kitchen in a few days to start up some Christmas cookie experiments. I also received an amazing package from NuNaturlas Stevia products that I want to use in some of my holiday baking, and also share with you in a giveaway...more to come soon... Stay tuned. For now, I'm just going to worry about finishing up those amazing Thanksgiving leftovers and look forward to the Advent/Christmas season.

Much love to you as always!

Thursday, November 17, 2011

Pumpkin Coconut Cream Pie (vegan)


Pumpkin pie with a coconut cream twist. It is a creamy, pudding-like piece of goodness that will have you coming back for more. I just needed to post this one last recipe before I posted my gathered together 2011 Thanksgiving menu for you (I hope to tomorrow). I have been working on putting this together for weeks, and because I am hosting this year, I had a lot more planning up my sleeve to keep me busy. I am so excited for it all to come together, and share a delicious meal to celebrate life and give God thanks for all the gifts he has given us.
This dessert is perfect for fall, and perfect for the dairy-free, gluten-free, nut-free friend that may be having troubles figuring out what to make for a Thanksgiving dessert. Yes, there are a lot of options out there, but this one avoids eggs and milk, and not to mention has an amazing dose of wonderful in it. Tastes good and good for you. And can I just say, I love chia seeds and coconut. And the pumpkin is just the "cherry" on top.
I will mention that the inspiration for this recipe from comes from Iris's Squash Pie and Kelley's Pumpkin Bars. Both are other amazing options for a Thanksgiving dessert or fall treat. Thanks ladies for your inspiring devotion to gluten-free living. 

Pumpkin Coconut Cream Pie Recipe (vegan)


Crust:
1/2 cup of tapioca flour
1/2 cup of sweet sorghum flour
1 cup of fresh buckwheat flour
2-3 TB of coconut palm sugar
dash of sea salt
dash of cinnamon and ginger
5 TB of organic coconut oil
1-2 TB of pure water
2 TB of apple cider vinegar

Mix the flours first, then add the sucanat and salt. Then add the oil and mix well together. Lastly add the cider and water and get a crumbly but sticky dough. Then roll it a few times in your hands and then press with your hands on the bottom of a pie pan. It doesn't have to be perfect. Just make sure to try and even out the crust dough with a fork or your fingers. Once even to your liking, put in a preheated 350 degree oven for 15 minutes. Pull out from the oven and let cool on the stovetop.  Prepare the filling while cooling.

Pie Filling:
2 cups of fresh baked pumpkin
1 can of full-fat coconut milk
2 TB of coconut flour
1/4 cup of chia seed meal
1/3 cup of coconut palm sugar
1 ts. of ground white stevia powder or 12 drops of Nu Naturals pure vanilla stevia liquid
2 TB of soft coconut oil
1 teaspoon of pure vanilla (omit if you use vanilla stevia liquid)
1 TB of pumpkin pie spice blend (or 2 ts. of ground cinnmon,  plus 1/2 ts. of ginger, cloves and nutmeg)
1/2 ts. of sea salt

In a large blender (I used just a regular, but a high-powered or Vitamix or Blendtec would be awesome), or large food processor, put all of the above ingredients in. Then blend away and it should whip it up to a pudding-like mixture. You could also try whisking the filling in a bowl with a mixer or hand held whisk, but I liked using my blender to have less mess and work. Blend till smooth. Then pour the mixture into the cooled pie crust. You will want to lick the spatula on this one. So yummy just as a pudding mix really. Then. smooth out the filling in the pie crust and make a swirl or look pretty because it will come out this way when you are done. Then re-enter the pie to the preheated 350 degree oven and bake for exactly 30 minutes. Pull from the oven and let cool till you can touch the pan with your fingers, then put in the fridge and let cool overnight. Or at least 6-8 hours so that it is set and firm and ready for cutting.


Then, ENJOY!
Notes:
-You do not need a whip topping for this dessert, the pie is perfect as a combo of pumpkin and whip already together.

-It's best served cold. And it may get a bit messy, but the crust is firm, so you will be able to get under the crust and pull the piece out from it's roots. Try and use a clean knife to cut each piece if you are worried about the pieces sticking together.

-You can use any GF pie crust if there is one you prefer


I hope your holiday menu is coming together and you are enjoying the thought of having a feast with friends and family. I will be posting my menu tomorrow. Much love to you today!
xoxo
Stephanie

Wednesday, November 16, 2011

Maple Green Beans with Caramelized Apples

What a combo! Caramelized apples, onions and then tossed with tender and fresh green beans. Once you have this simple green bean dish you will not be wishing for some creamy green bean casserole. I know, it's true, I used to love the "traditional" green bean casserole. You know the one you eat maybe only once a year at Thanksgiving dinner. Yeah, that one, with the crispy onion tops. Yes, there is something about tradition, but I promise this dish will fulfill all of your desires in a green bean dish. It's crisp, fresh, healthy and full of flavor. Perfect for any fall feast, and could even be made into a great dinner dish on it's own.
Just look at those flavors and colors. Green beans are one of my most favorite veggies. Mostly because I love the texture and the first bite into a freshly picked and steamed beans. Crisp and crunchy. And, I love their gorgeous green color. But really, I think this simple combo of apples and green beans is the perfect addition to your Thanksgiving feast. That is why I am sharing this dish with you now, and you can also look for it on my Thanksgiving Menu line-up (that will be coming in the next post!)
The great thing about this simple green bean dish is that it can be made in minutes. With all the other craziness of preparing the Thanksgiving feast, you need to have one simpler side that is better than canned apples or beans. This is your trump card. Plus, fresh or frozen green beans are so very simple to prepare. No cutting, no pealing...so simple. I love fresh beans, but I have also bought some great frozen organic beans at Costco in the freezer section. 

This dish will have everyone ooooing and ahhhing with the great fresh fall flavors and whether you are planning a turkey or not, this dish may steal the show. I have been making this dish for a few weeks now with all the fresh apples, but now that Thanksgiving is almost here I decided this is a must for the feast. A gluten-free Thanksgiving doesn't need to be frustrating, difficult or "impossible". This simple, fresh side is a good reminder that eating gluten-free is actually an amazing journey of eating fresh and delicious food. Celebrate and be thankful, friends!

Maple Green Beans with Caramelized Apples Recipe
2-3 TB of olive oil
1 medium sweet onion, or 4 large shallots
2 medium-large apples cored, and thinly sliced (I used 3 small Empire apples)
2 pounds of organic fresh or frozen green beans
2 TB of pure maple syrup
2 TB of apple cider (or orange juice) *If you want more tangy, use apple cider vinegar instead*
sea salt and cracked black pepper for topping and taste
1/4 cup of roasted pumpkin seeds or slivered almonds for topping


optional ingredients: fresh sage, dried craisins or raisins


First, in a large skillet or pan drizzle some olive oil and saute the onions and apples. Let them saute on medium to low heat to not burn, but to caramelize and turn golden and soft. Then, bring a large pot to a boil and sprinkle some sea salt. Add green beans to the boiling water and do a quick 3-4 minute boil with the beans...until they are tender, but still crunchy crisp.  Or, you can also steam the beans for about 4 minutes if you prefer. 


Lastly, add the tender green beans to the large skillet with the onions and apples, Then add the cider (or vinegar), maple syrup and salt and pepper. Stir all together and let cook over the heat for just a minute to blend all of the flavors. Then you can toss some fresh roasted pumpkin seeds or slivered almonds to the top of the dish to serve. If you prefer to add more oil (or butter if you prefer) or syrup for more saucy flavor, then go for it. Also, I have a lot of fresh sage on hand that I thought about adding just a sprinkle of to add some more flavor. I didn't add it to the recipe though because I didn't want the sage flavor to overpower the caramelized onions and apples. So add some fresh herbs only if you like. 


Serve with dinner as a side, or pour over some quinoa and chickpeas for a nice dinner plate. This recipe will serve about 6-8 people as a side dish. 

Ok, friends... I had to post this simple and amazing recipe before I posted my Thanksgiving line-up. I am planning to roll that out by Friday and looking forward to sharing my favorites, some other's favorites and a little bit of thanks-givings-of my own.

Much love to you today!

Monday, November 14, 2011

Apple Pie Bars (vegan)

Thanksgiving is just days away and I am thinking about pie. I was thinking about the turkey as well, and the stuffing...but the pie, that is what I can't get off my mind. Who doesn't love the fresh pumpkin pie, and yet I have so many fresh apples this time of year too. Should we make both pumpkin and apple?
Hmmm, yes, I think we should. But, could we really eat a slice of both?! Even after the fabulous dinner? Who am I kidding?! Ok, ok, it is Thanksgiving after all...

What a dilemma. In a good way, of course. The dilemma alone is something to be thankful for! To have an abundance of fresh apples and pumpkins, plus the ability to make a gluten-free vegan homemade treat from a warm and cozy kitchen. Very, very thankful for the abundance of food and pleasures that we are able to have. Much to be thankful for, and much to share.

So, what if hypothetically... let's just say...we made both. But one was a bar, and the other a real pie.

Ok, ok, I can deal with that. And, superficially, it makes me feel less of a glutton. One piece of pie, and one bar...:)
It doesn't really matter (really!) because you are still eating both, but for the sake of appearances :)

The apple pie bars add variety and they are pretty cute as well. I have been thinking up this creation for a while. Especially since I love apple pie so much, but sometimes, you really don't want (or need) a whole slice of pie. Apple crisp is yummy as well, but sometimes it's hard to portion-control when you feel like you are eating oatmeal. So a cootsie-cut-up apple pie bar might just be a fun way to get the best of both worlds. Plus, these turned out to be melt-in-your-mouth delicious!
Apple Pie Bars Recipe (vegan)

Crust:
1 cup of Bob's Red Mill gluten-free baking blend (or other GF blend)
2/3 cup of millet flour
1/3 cup of tapioca flour
2 TB of sucanat
dash of sea salt
4 TB of organic coconut oil
2-3 TB of pure water

Mix the above ingredients in a small bowl, except for the water. After you have mixed the flour and oil you will have pea-shaped flour blend, then add 2 TB of water to get a doughy crumble-like pie crust. You may need to add another TB of water depending on how dry it is. Then, crumble the dough on the bottom of a 9x13 pan and press down with your hands and fingers to make a "pie crust" It doesn't have to be perfect, but if you want to use the bottom of a cup or measuring cup to smooth out and even out the crust, that works great. Then, put in a preheated 350 degree oven for 15 minutes, until golden brown, but not overly baked. Par-baked. While baking, make your apple fulling... 

Filling:
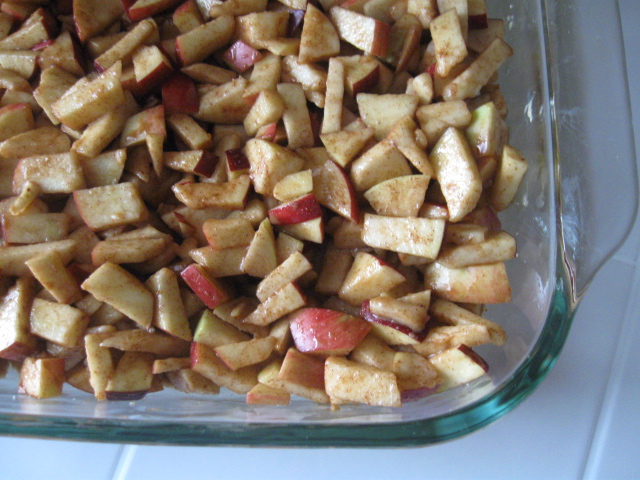
5-6 cups of finely chopped apple pieces ( I used 7 small empire apples)
1 TB of ground cinnamon
1/3 cup of tapioca flour or arrowroot starch
1/4 - 1/3 cup of maple syrup or coconut palm sugar
juice of one lemon
3 TB of pure water, or apple juice

I leave the skins on my apples because I like skins, but if you want to peal, that is fine too. Basically, fine chop your apples into small pieces, then in a medium bowl mix the apple pieces with your lemon juice, water, sweetener and flour and cinnamon. You make a nice coating of spice and flour over all of your apples. Mix well to make sure it is evenly coated. Let sit while you pull the crust from the oven and let cool just a bit. Then, when the crust is par-baked and slightly cooled, pour the apple filling over the crust in the 9x13 pan.
Then, lastly, you are ready to make the topping...

Topping:
1 1/2 cup of gluten-free rolled oats ( I used Bob's Red Mill)
1/2 cup of Bob's Red Mill gluten-free flour blend
1/2 cup of millet flour
1 cup of coconut palm sugar
dash of sea salt
1/2 cup of organic coconut oil
2-3 TB of pure water

Mix the oats, flour, salt and then mix in the oil. Lastly add the water to bind and make a crumble-like mix. Start with 2 TB of water, add  1 more if you need it to be more crumbly or wet. Then crumble the topping over the apple filling and press down firmly with a spoon or spatula (I used my hands too!) Make a firm and packed looking top and don't be afraid to press down to pack it all in together.


Then, put back in the 350 degree oven for 1 hour. Bake until you can see the apples bubbling. Then pull from the oven and let cool at least 1 hour, but 2 would be better. Cut squares, 4x5 bars in a 9x 13 pan. Use a fork or spatula to serve to be able to get under the pie crust and serve out like a bar. You can use your hands or a fork to eat. It will still be a bit messy and crumbly like a pie or crisp, but you have more control over it because you cut the squares. You can serve slightly warm or cold. 
No need for ice cream, unless you want it. They can be cut and serve on a nice platter to make it easy to pick up and put on a plate. Good for dessert, but could also be a nice party-food for a group or an appetizer.
I even had some friends be my guinea-pigs on this treat, and they also liked it. So, just don't take my word alone, even though I am my harshest food-critic. Plus they surprised me and even tasted better the next day. Just look at the apple pie goodness...
So, you may be thinking about your gluten-free Thanksgiving menu as well. I am gathering my menu together, and I am planning on sharing it with you in one of my next posts. I will share what I am making, my recipes, and even some of my other favorite links to my favorite turkey brine and roasting tips. I buy my turkey from a local farm, which I think only adds to the amazing-ness to the dinner and follows my values of eating local, farm (not factory) raised meat. More info to come in my future post...
But for now... You can bet this apple pie bar will make an appearance on my Thanksgiving menu. It turned out just as I had hoped and it will be a great addition to the fall-seasonal dinner and dessert menu.

I hope you find yourself planning with excitement and no anxiety this holiday season. Make your gluten-free menu fun and full of the foods you love. Lots of seasonal veggies and fruits, and may you have the spirit of anticipation instead of dread!

Much love to you as always!

Thursday, November 10, 2011

Tahini Roasted Kale Chips

Tahini roasted anything is good. So why not roast your kale with a touch of tahini and make an easy snack that is green and packed full of vitamins and goodness? Why not, right?! 

Kale is full of vitamin K, C and A- all essential vitamins for your immune system and blood. Good to keep you strong and full of energy. And, great this time of year when the cold germs are everywhere and the busy-ness of the holiday season quickly approaches. Kale is dubbed a super-food by modern nutritionists and has been said to be a healing agent against digestive issues. But really why wouldn't it be? Hello- it's green and totally seems like the healthiest green thing to eat on the planet.
Also, it is November and I still have kale growing in my garden, in fact, besides a few herbs, it is the only thing growing in my whole yard. It is the heartiest green I have ever seen. I look in the backyard and I see tons of dead leaves, brush and an obscene hole of where the garden once was... and then I spot the green beacon of life coming from the kale plants. They still stand strong and green, in fact they look brighter and greener now than in August. So, they stand there green in the dead backyard as a reminder that we must eat our greens. And with a touch of tahini and a few spices, these "kale chips" are perfect for eating straight from the oven as a snack or topping on a soup or salad or even as a side dish for lunch or dinner. Plus, the added fats in the tahini (and oils) helps your body digest the nutrients in the kale better. It makes the vitamins more soluble and that is always a good reminder when eating your greens.
Tahini Roasted Kale Chips (vegan)

1 large  bunch of curly or lactino kale (about 4 cups of washed, deveined and chopped leaves)
3 TB of natural tahini (not sesame seed butter because it is too thick) you just want an oily-natural-tahini
*drizzle of olive oil if your tahini doesn't have any naturally occurring sesame oils
1 ts. of ground paprika
1 ts. of ground garlic powder
1/2 ts. (or more if you like it hot) of black pepper or cayenne pepper
1 ts. of wheat free tamari sauce
1 TB of pure maple syrup
dash of sea salt if you like

First, wash and de-vein your kale leaves and make sure you pat the leaves dry with towel. You get less soggy and crispier kale chips with drier leaves. Roasting clean, dry and crisp leaves is key!


Mix all of the above ingredients in a large mixing bowl. Make sure you chop the kale leaves to be more bite size if you want to make "chips". The tahini you use should and must be a natural variety that has lots of naturally occurring oils coming from it. If you use a thicker tahini, I suggest you drizzle just a touch of olive oil to get the tahini spread over all of the leaves. Add the spices and thoroughly blend over all of the leaves. Spread out the coated kale leaves on a baking sheet. Spread thin and don't double up the leaves too much. Then put in a preheated 350 degree oven for 15 minutes, then turn over the leaves and bake again for 10-15 minutes, until they are crispy to your liking. Then, let cool just a minute and eat!
This way of eating kale is so addicting. You can't stop popping the leaves in your mouth. But I guess that isn't such a bad thing! Much rather being addicted to green chips than fried chips or fake foods. This is a perfect snack for kiddos and an after school boost.

I am hoping my kale will keep growing until December (or at least until the snow starts falling)! Kale is one of my most favorite vegetables to add to everything. And, my baby loves it too. I guess it is as they say, monkey see monkey do. And I really hope my little monkey continues to enjoy all the green things that I do. What's your favorite way to eat kale or roast kale?

Hope you have a great day and stay warm and healthy!

Much love!

Tuesday, November 8, 2011

Sweet Potato Lentil Quinoa "Meatloaf" (vegan)

Amidst all of the fall love for pumpkins, squash and apples, I almost forgot about another fall favorite: the sweet potato. The sweet potato, or yam, is another vegetable to eat this season to get ready for the cold winter months. It has unsurpassable amounts of vitamin A and vitamin C. Plus the beta-carotene benefits are most definitely high enough to brag about. It has been said that the sweet potato is the most nutrient dense vegetable according to it's weight and price that you can buy at the market. We did not plant any sweet potatoes in the garden this year, but I am hoping to next year because my family loves them so much. Thankfully you can buy them at most farmer's markets or grocery stores for a decent price this time of year because it's their harvest time.

So to get creative with this great old favorite vegetable I decided to try my hand at making another ol' time favorite: a "meat"loaf. Except this one is filled with quinoa and lentils instead of the usual main ingredients of meat. It has all of the same flavors and spices, and with a hearty fiber filled mix of quinoa and lentils you will not be lacking any protein or nutrients. And who isn't looking for another way to eat lentils and quinoa? A perfect vegetarian or vegan dinner option, plus not to mention a super budget-friendly meal. A cup of quinoa, plus a cup of lentils, and some sweet potato mash is certainly half the price of a quality few pounds of ground meat. So add this loaf to your dinner rotation to save some cash and also add some variety and spunk to you life.
I topped the loaf with some gorgeous heirloom tomatoes from my garden. Yes, crazy enough I still had some lingering fresh tomatoes from my plants that just recently died. So I was excited to enjoy them yet again in such a yummy way. The fresh tomatoes plus the spicy glaze was just the touch this loaf needed.
Sweet Potato Lentil Quinoa "Meat"Loaf Recipe
3 cups of cooked red lentils (1 1/2 cup dry lentils with 3 cups of water)
3 cups of mashed sweet potato
3 cups of cooked quinoa (1 cup dry quinoa cooked with 2 cups of water/broth)
1 medium onion, finely chopped
3 minced cloves of fresh garlic or 2 ts. of dried garlic powder
1/2 cup finely chopped kale
1/4 cup finely chopped fresh parsley
1 TB. of olive oil
1/2 ts. black pepper
1/2 ts. ground cumin
1/2 ts. paprika powder
dash of cayenne pepper or more if you like
1 ts. chili powder
1 ts. Italian seasoning blend or dried thyme

First, bake one very large sweet potato to get about 3 cups of sweet potato puree or mush. Or you can boil a pot full of chopped sweet potato pieces. Just make sure you bake or boil enough for 3 cups. Then in the meantime cook 1 1/2 cup of dry red lentils with 3 cups of water on the stovetop for 20-30 minutes until a mushy soft lentil mix. Alongside of cooking your lentils, cook some dry quinoa (about 1 cup dry) with 2 cups of broth or water. After about 30-40 minutes you should have all of the main ingredients cooked and ready for mixing. I let the lentils, quinoa and sweet potato cool down a while to make sure that when I mixed with my hands it wasn't too hot. 

Then in a large mixing bowl I mixed the sweet potato, lentils and quinoa along with the onion, kale parsley and spices. Like I said, I mixed with my hands to fully mix in all of the spices and blend the ingredients well. Then, I laid a piece of foil in a 9x13 baking pan and drizzled it with olive oil. Then with my hands I formed a large oblong loaf-like with the mix over the foil. It should look like a loaf of bread (or meat) and you can form or spread it out to look whatever you like. Then you need to whip up a glaze for baking...

Glaze:
1/2 cup of organic ketchup
1 TB of pure maple syrup
1 ts. of ground cumin
dash of hot or black pepper
1-2 Heirloom tomatoes slices thinly for topping

In a small bowl, whisk the ketchup and spices to make a glaze. Then brush or spread the glaze over the loaf and then top the glaze with thinly spiced tomatoes.
Then put the loaf in a preheated 350 degree oven for 1 hour.
Serve warm from the oven for your meal. Because you have the potatoes already in this loaf you may just want to skip the traditional mashed potatoes with "meat" loaf and add just a side of a green salad or green veggie. This meal is filled with protein, fiber and lots of vitamins and minerals. Super yummy and super good for you too!
A bite of that will have you surprised about how good this combo works together. It may not be the prettiest of dinners, but it is very flavorful and healthy, so who's complaining?

I hope you try this dinner out, especially if you liked my sweet potato patties. That's what's for dinner at my house, now, what's for dinner for you this fabulous fall day?

P.S. I started a Facebook Page for this blog... it is still in the starter stages, but you should still come over and "like" me... just for the sake of boosting my self-worth of course ;)

Hope you enjoy!

Much love to you as always!

Sunday, November 6, 2011

Pumpkin Chocolate Granola (gf+vegan)


Yes, yet another pumpkin recipe. Like I said in my last post, when you roast a pumpkin and make pumpkin puree you have a lot of pumpkin to play with in recipes. So, why not add some pumpkin to your granola, right?! I have been dreaming up this granola idea for a while and finally whipped up the idea to see what would happen. Making homemade granola is a fabulous idea anyways (any time of the year) to fill your kitchen with goodness, but yesterday with the magical colors and scents it was extra special. It was absolutely gorgeous here in Michigan yesterday. The colors of the trees were so radiant.
The sun was shining super bright and it was reflecting off of our bright yellow trees in the back and front yard. The bright blue skies against the yellow trees was just stunning. The occasional drop of a leaf from the sky added a magical touch to the day as well. A whimsical fall wonderland. And, the best part was that it was Saturday and my husband was home and we had such a fun family day. Well, I guess it was kinda a family 'work' day because we had lots of leaves to rake and had to winterize the garden. Yet, when it was as gorgeous as it was, and we are all together, those are the best kind of 'work' days with the family.
Yet, after all that outdoor fresh air and bright sunshine, I did find my way to the kitchen to bake something. Nap time for the babe means baking time for me :) And, there is no better way to add the scents of fall to your life than fall baking with pumpkin. Hmmmm, perfect! So I made this super easy, nut-free, vegan granola recipe to share in the magic of the season. Added a touch of cocoa to make it rich and delicious.
Pumpkin Chocolate Granola Recipe (vegan)
1 cup of raw pepitas (shelled pumpkin seeds)
1 cup of raw sunflower seeds
1 1/2 - 2 cups of dried cranberries (or mix with raisins)
1/2 cup of coconut palm sugar 
1/2 cup of raw cocoa or baking cocoa
1/2 cup of homemade applesauce
1 cup of pumpkin puree
1/3 cup of pure maple syrup
1/3 cup of melted organic coconut oil
1 TB of ground cinnamon (or pumpkin pie spice blend)
1 ts. of ground nutmeg
1 ts. of ground ginger
1/2 ts. of sea salt

optional: add 1-2 cups of a slivered almond or crushed pecan if you enjoy nuts, I left nuts out because I have been trying to avoid nuts lately for me and for the sake of my little boy, but you can for sure add in some nuts to this granola recipe if you desire. I must say though that the brown rice puffs and oats, plus the seeds make a perfect nut-free version of granola... I didn't even miss the nuts.

optional last ingredient: 1-2 cups of Enjoy Life mini chocolate chips mixed into the cooled granola

Mix all of the ingredients by hand or with a spatula in a large mixing bowl. Then on a parchment papered large baking sheet (12x18) or 2 cookie sheet lay out the granola mixture about 1 inch thick. Spread thin and put in a preheated 350 degree oven. Bake for 30 minutes and then pull from oven.... leave the oven on, and let the granola cool for 15-20 minutes, then use a fork or spatula to turn over the granola and toss just a bit. Then put back in the oven for another 15-20 minutes to really get crispy. I like my granola crispy and because of the moisture in this recipe I think the baking-twice method works best here, but you can also just bake once for 30-35 minutes on the 350 degrees and pull from the oven to cool as well. Once done baking, let cool for an hour or two to really crisp and crunch up. Then if you want to make it really chocolately, add some mini chocolate chips to the granola and toss it up. Then transfer to your saving container: glass jars, or tubs, or even a zip lock bag works well.
Fun ways to eat or share granola:
+ for breakfast with a cup of your favorite non-dairy milk
+ for snacking on a long trip, hike or walk
+ over an apple or peach crisp recipe
+ share with friends in a large mouth mason jar with a recipe tag
+ bring it to a party as a condiment or for snacking

Pumpkin and chocolate are such a nice pair. They compliment each other's bitter yet sweet qualities and the added cinnamon and nutmeg really bring out the depth of the flavors. I haven't made granola in a while, and this recipe was a perfect fall way to make granola (and I am sure I will be making this recipe more throughout the holiday season).

I hope you enjoy, and have another fabulous fall day.

Much love to you!

Thursday, November 3, 2011

Savory Pumpkin Corn Muffins (vegan)

Tis the season for soups, stews and chili's and what better to pair a simmering bowl of goodness than with some corn bread muffins. Add some pumpkin and you have a fall-filled treat. I tried to make these muffins a bit savory, but if you like you could add a little more sweetness and some more sweet spices and you could have a sweet treat as well.
Pumpkin has been a huge part of my kitchen as of late. Just look at my past few posts...:) But seriously, baking a pumpkin is so simple and it is a perfect way to fully engage in the fall spirit, and not to mention the goodness of the seasonal eats. Pumpkin is packed full of vitamins and minerals: vitamin A, vitamin C, magnesium, potassium and zinc. Perfect to build up your immune system as we head into the cold-flu season. Plus, the fiber rich pumpkin will help clean up and build up your digestive tract. So if you haven't carved, smashed or composted your pumpkins yet, I suggest you try and cut them open, and start baking away.
Here is the simple steps I follow to bake a pumpkin:
1. Wash in the sick to clean up any sand, dirt or whatever.

2. Pull of the stem and use a serrated or sharp knife to start cutting at the top and move to the bottom. You can cut on each side of the stem and then turn over and meet in the middle. I do not peal or chop up my pumpkin in many pieces unless it is very large. I just slice it in half.

3. Take a large spoon and carve out the seeds and strings. (Save the seeds in a strainer to rinse and roast with a little oil and sea salt).

4. After you clean out the insides, rinse again under water, and then lay on a baking sheet lined with foil or parchment paper. You can do the same to the other side of the pumpkin and then...

5. Bake the 2 pumpkin sides in a 350 degree oven for 1 -1/2 hours depending on how large you pumpkin is. You can check after an hour with a knife. Just use the knife to slice through and see how soft it is. You want it to be butter soft and ready to puree...so soft.

6. When the pumpkin is soft, pull from oven, let cool for an hour or so, then use a spoon, your fingers or a knife to peal away the skin and save the meat.

7. Put all of the meat of the pumpkin in a food processor or high-powered blender. Blend until smooth and creamy, you may need to add a splash of water to get the pumpkin moving, but you should not need to add too much because you do not want a smoothy, you want pumpkin puree.

8. Then use the puree in your pies, soups, baked goods, smoothies, pudding bars, or in whatever you want. The pumpkin puree also freezes really well, so freeze in 2 or 4 cup amounts in freezer zip lock bags or containers of choice. I also bake 1-2 pumpkins at a time to have lots of puree to play with or freeze.

Those are the steps I follow, pretty simple and it makes so much pumpkin puree that you will not buy canned again. Plus it is so fresh and flavorful that you will be so happy you went domestic on this one. You can bake most any winter squash this way and make puree from the meat. It is just the first step to making your kitchen filled with fall.
Savory Pumpkin Corn Muffin Recipe (vegan)
1/2 cup of organic corn flour (millet flour is a good replacement here)
1/2 cup of organic corn meal (quinoa flour is a good replacement here)
1/2 cup of tapioca flour
1 cup of Bob's Red Mill gluten-free baking flour mix (or brown rice flour works too)
2 TB of flaxmeal
2 TB of coconut palm sugar
2 ts. of baking powder
1 ts. of baking soda
1/2 ts. of sea salt
1 ts. of ground cinnamon
1/2 ts. of ground cumin
dash- 1/2 ts. of ground chili powder
dash- 1/2 ts. of cayenne pepper
dash-1/2 ts. of ground nutmeg
1/4 cup of pure maple syrup 
1/4 cup of light olive oil
1/3 cup of non-dairy milk with 1 TB of lemon juice (I used So Delicious coconut milk beverage)
2 cups of pumpkin puree (I used fresh puree)

In a large bowl, mix together the flours and all the dry ingredients. Then in a separate bowl add the non-dairy milk and lemon juice to culture just a minute. Then in the large bowl add the wet ingredients and finally add the milk-mixture. Mix well together and make sure it is well blended and no clumps. Plus, you will want to notice if there is bubbles from the baking powder. This is a good sign. Then after letting the batter sit for a few minutes to soak up the moisture, then pour into 12 cupcake liners in a cupcake baking tin. This recipe will make 12 large muffins. Bake in a preheated 350 degree oven for 20-22 minutes. Until golden brown and baked through.

BAKING NOTES:
*If you are trying to avoid corn products, I added some substitution flours to make a savory pumpkin muffin without the corn. It will turn out just as hearty, minus the corn.

*If you want to sub the milk mixture for some vegan yogurt, you can do that too. I recommend So Delicious' plain coconut milk or greek yogurt.

*If you want to pour this batter into a 9x13 greased pan, you should come up with a cornbread to cut and serve. Bake at the same tempt and at the same times, then you may need another 10 minutes of baking depending on your oven. Bake until golden brown.
Let cool and serve with hot chili or soup.

Here are some of my favorite recommended soups to go with these pumpkin corn muffins:


I hope you have a fabulous fall day and stay warm with a bowl of comforting soup and perhaps some pumpkin cornbread muffins.

Much love to you!!!